Enter Data in a Timesheet
In the Timesheets area of iAccess, you can enter your charge codes (project, phase, and so on) and hours on a daily basis.
Your timesheet processing capabilities depend on how your system administrator defines settings in
Vision. Contact your system administrator if you have questions.
To enter data on a timesheet, complete the following steps:
-
In the Employee workspace, click
 to go to the Timesheets area.
-
If the correct timesheet is not displayed by default, click
 and select any date in the timesheet's timesheet period. (You can also use
 and
and
 on either side of the current timesheet period to select an earlier or later timesheet period.)
Note: If you select a timesheet and
on either side of the current timesheet period to select an earlier or later timesheet period.)
Note: If you select a timesheet and appears to the right of the timesheet period, you can display and print that timesheet but you cannot make additions or changes to the timesheet. Timesheets are locked to prevent changes under the following circumstances:
- The timesheet has been submitted, and you are not allowed to resubmit timesheets.
- The timesheet has been posted.
- The timesheet period is closed.
-
Do one of the following:
- To enter hours for an existing special category row or labor charge row, click anywhere in that row. The selected row is highlighted.
- To create a blank row after the last existing row so you can enter hours for a new set of charge codes, click + Add Line below the grid.
- To insert a blank row after one of the existing rows so you can enter hours for a new set of charge codes, hover over or click the existing row so that
 displays at the end of the row. Click
and click
Insert.
displays at the end of the row. Click
and click
Insert.
- To create a new row by copying the charge codes from an existing row, hover over or click the existing row so that
displays at the end of the row. Click
and click
Copy. The new row displays below the row you copied. You can then change any of the charge codes that do not apply to the hours you want to enter on the row.
- To copy the charge codes for all rows in another timesheet into the currently displayed timesheet, click
 on the Timesheets toolbar and select the timesheet from which you want to copy rows.
-
To enter or change the project for the row, do the following:
-
Click
 in the
PROJECT field (or
PROJECT NAME field, if
PROJECT is not displayed).
in the
PROJECT field (or
PROJECT NAME field, if
PROJECT is not displayed).
- In the PROJECT list on the Project/Phase/Task Lookup dialog box, select the project for which you want to enter time. If the list is long, enter one character from the project number or the project long or short name in the field above the list to display only projects with numbers or names that start with that character, or enter two or more characters to display only projects with numbers or names that contain those characters.
- If the project uses phases, those phases display in the PHASE list. Select the phase.
- If the phase uses tasks, those tasks display in the TASK list. Select the task.
- Click Select.
-
Click
-
To enter or change the phase for the row (if a phase is needed), do the following:
-
Click
in the
PHASE field (or
PHASE NAME field, if
PHASE is not displayed).
- In the PHASE list on the Phase/Task Lookup dialog box, select the phase for which you want to enter time. If the list is long, enter one character from the phase number or phase name in the field above the list to display only phases with numbers or names that start with that character, or enter two or more characters to display only phases with numbers or names that contain those characters.
- If the phase uses tasks, those tasks display in the TASK list. Select the task.
- Click Select.
-
Click
-
To enter or change the task for the row (if a task is needed), do the following:
-
Click
in the
TASK field (or
TASK NAME field, if
TASK is not displayed).
- In the TASK list on the Task Lookup dialog box, select the task for which you want to enter time. If the list is long, enter one character from the task number or task name in the field above the list to display only tasks with numbers or names that start with that character, or enter two or more characters to display only tasks with numbers or names that contain those characters.
- Click Select.
-
Click
-
To enter or change the labor code for the row, either enter the labor code in
LABOR CODE, or do the following to select the labor code:
-
Click
in the
LABOR CODE field.
-
On the Labor Code Lookup dialog box, select a code for each of the labor code levels. If the list for a level is long, enter one or more characters from either the labor code or the labor code name in the field above the list to display only labor codes with codes or names that contain those characters.
Note: If, instead of the search field, the FILTER BUDGETED LEVELS check box displays above the list and is selected, that indicates that only labor codes for which you are budgeted for the project are displayed in the list. Depending on how Vision is configured, you may be able to clear that check box to display and select from all of the labor codes for the level.
- Click Select.
-
Click
-
To enter or change the labor category for the row, do either of the following in
LABOR CATEGORY:
- Type one character from the labor category name to select from a list of labor categories that start with that character.
- Type two or more characters from the labor category name to select from a list of labor categories that contain those characters.
- Click
 to select from the full list of labor categories.
-
To enter hours and/or a comment for a day, do one or more of the following:
- To enter regular hours, click in the day/date column and enter the number of hours.
- To enter overtime or secondary overtime hours, click in the day/date column, click
 below the field, and enter the hours in
OVERTIME or
OVERTIME-2 in the drop-down dialog box. Click
below the field, and enter the hours in
OVERTIME or
OVERTIME-2 in the drop-down dialog box. Click
 to close the drop-down dialog box. (If you click or tab into a field that already has hours in it, or if a comment is required, the drop-down dialog box displays automatically.)
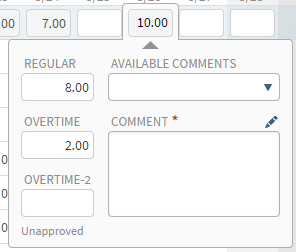
- To enter a comment for the hours (or even if you enter no hours for the day and row), click
below the day field. Either click
in
AVAILABLE COMMENTS and select a pre-existing comment, or enter your own comment in
COMMENT. (If you select a comment in
AVAILABLE COMMENT, you can modify it or add to it in
COMMENT.) Click
 above
COMMENT if you want to apply special formatting (bold, color, and so on) to the comment. Click
to close the drop-down dialog box. (If you click or tab into a field that already has hours in it. or if a comment is required, the drop-down dialog box displays automatically.)
above
COMMENT if you want to apply special formatting (bold, color, and so on) to the comment. Click
to close the drop-down dialog box. (If you click or tab into a field that already has hours in it. or if a comment is required, the drop-down dialog box displays automatically.)
- Repeat step 9 for each day for which you want to enter hours or comments for the row.
- Repeat steps 3 - 9 for each set of charge codes for which you want to enter hours.
-
To save your entries, click
 on the Timesheets toolbar. (You can save your work as often as you want.)
iAccess confirms that all required fields are complete. (Required fields that do not have an entry display a red background.) If there is no missing data, the timesheet is saved.
on the Timesheets toolbar. (You can save your work as often as you want.)
iAccess confirms that all required fields are complete. (Required fields that do not have an entry display a red background.) If there is no missing data, the timesheet is saved.
Alternatively, if you are also ready to submit the timesheet, you can click
 on the Timesheets toolbar to save and submit the timesheet in one step.
-
If you revised the hours entered on an existing timesheet for a day prior to today, you may be required to provide an explanation for the revision. If the Revision Explanation dialog box displays, do the following:
-
To use a pre-defined revision explanation, click
in
STANDARD EXPLANATIONS and select the explanation.
iAccess automatically copies the standard explanation into the
EXPLANATION field.
-
If you selected a standard explanation in the previous step, you can modify or add to it in
Explanation, if necessary. If you did not select a standard explanation, enter the explanation in
EXPLANATION. Click
above
EXPLANATION if you want to apply special formatting (bold, color, and so on) to the explanation.
- Click SAVE. The date and time of the revision, as well as the person responsible for making the changes, are saved in the revision records that are associated with the timesheet in the Vision database.
-
To use a pre-defined revision explanation, click