Log in to the application that is connected to the database you want to export (for example, your test database).
Click Main Menu > Configuration > Migration > Config Export.
The folders that display in the middle of the form are the Data Migration Contexts.
To export all contexts, select the All check box.
To select which contexts to
export, click the ![]() button to expand the folder
and check the option you want to export.
button to expand the folder
and check the option you want to export.
The default export File Name is MigrationExport.xml. Change the name as needed.
To export only those records updated by a specific person, enter the Person Number in the Updated Person Num field.
To export only those records updated after a certain date, select the Use Updated After check box and select the Updated After date.
Select the Include System check box if you want to include system defined records in your export file (records for which Updated By is set to SYSTEM).
Click Export.
Your browser will display a message asking if you want to save the file.
Save the migration export file to the location of your choice.
Log in to the application that is connected to the database where you will import the data (for example, your production database).
Click Main Menu > Configuration > Migration > Config Import.
Click the Browse button next to the XML File field.
Select the migration file you saved in step 10.
The Data Migration Contexts from the XML file will display in the middle of the form.
If you want to import the items in the file, skip to step 20.
If you want to compare the items in the file with the database, select the contexts you want to compare and click the Compare button. Continue with the steps below.
If there are any differences between the file you are importing and the database you are logged into, the Differences pop-up form will display.
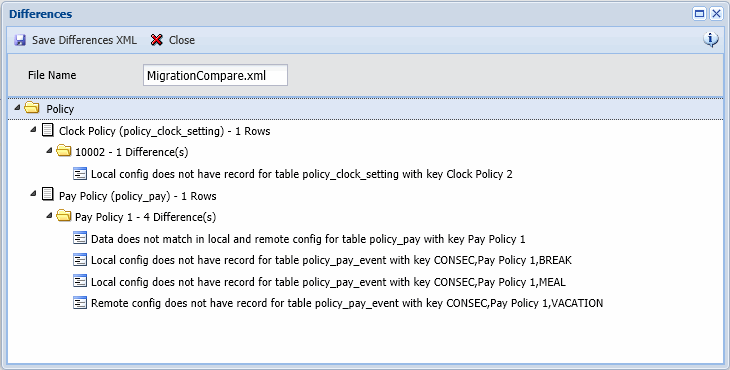
This form will show records that are in the import file but do not exist in the database. The form also shows records in the import file that are different from the records in the database.
If you only want to import these differences, click Save Differences XML. Otherwise, click the Close button when you are done viewing the differences.
If you clicked Save Differences XML, your browser will display a message asking if you want to save the file. Save the file to the location of your choice. You can now import this differences file.
To continue importing data, click the Browse button next to the XML File field and select the file you saved in step 18. Continue with the steps below.
Select the contexts you want to import. To select individual items in a context, click the button to expand the context folders. Select the items you want to import.
Select the Import Type for the data you are importing.
Select Insert if you are importing only new records into your database. Select Update if you are updating existing records. Select Insert/Update to insert the record if it does not yet exist, or update the record if it already exists.
Detail records are imported in Insert/Update mode. When a record is being updated, its detail records will be inserted if they do not yet exist, or updated if they already exist. Likewise, if a detail record does not exist in the import file, it will be deleted from the database.
To validate the data before attempting to import it, click Validate. If the selected records can be imported, a Validate Successful message will display. Otherwise, the Import Log form will open to display any error messages. For example, if a record already exists, an error will display. Click the Close button when you are done.
To import the data from the XML file, click Import. If the selected records were imported, an Import Successful message will display. Otherwise, the Import Log form will open to display any error messages. Click the Close button to close the Import Log form.