Schedule Cycle
The Schedule Cycle form is used
for the following:
A schedule cycle is a multiple day pattern of schedules
that can repeat numerous times. You first define a Cycle Name with a start
date and cycle length. Next, you create the schedules for each day within
the schedule cycle.
In order for the schedule cycle to take effect, you must
do the following:
Define the Cycle
Name for the schedule cycle.
Define the days
in the schedule cycle.
Assign
the schedule cycle to one or more persons.
Generate
the schedule cycle.
Once the schedule cycle has been assigned and generated,
you can view it on the Person Schedule
form. You can also view the schedule cycle on the Assignment
tab of the Employee form.
If you have been assigned a Supervisor
Role, the actions that you can carry out on the Schedule Cycle form
will depend on the Functional Areas that have been assigned to your role.
Note: If you change
a person's schedule for a day or period that is already signed, the signatures
may be removed. Make sure you check the days and sign them again if necessary.
Detail Forms:
Cycle
Event
See Also:
Margins
Properties
Schedule Cycle
Field Descriptions
Define Days
in a Schedule Cycle
Modify a Day
in a Schedule Cycle
Copy
a Day or Day Range in a Schedule Cycle
Delete Days
in a Schedule Cycle
Assign
a Schedule Cycle to One or More Persons
Generate Schedules
Generating
Overlapping Schedules
Schedule
Generation and Daylight Saving Time
Recalc Time Card
Schedule
Cycle Field Descriptions
Day
This field indicates the record's order number in the cycle.
For example, Day 1 would be the first day in the cycle.
Week Day
This field identifies the week day that the day number
falls on.
Schedule Start Time
The Schedule Start Day and Time indicate the actual physical
day when the schedule starts. For example, a schedule designed to post
for Wednesday could actually start on Tuesday or Thursday. The options
for the Schedule Start Day depend on whether or not the schedule crosses
midnight.
If the schedule crosses
midnight, the valid options are YESTERDAY
and TODAY. If you select YESTERDAY, the employee comes in
the night before and works until the current morning. If you select
TODAY, the employee comes
in on the current day and works until tomorrow morning.
If the schedule does
not cross midnight, the valid options are YESTERDAY,
TODAY, and TOMORROW.
For example, you can set the employee’s Monday schedule to actually
begin on Sunday, Monday, or Tuesday.
Schedule End Time
This field indicates the official end day and time of the
employee's schedule. When calculating whether an employee is inside or
outside of schedule, the schedule’s applicable
start and end times apply.
Note: The difference
between the Start Time and End Time of a schedule record cannot be more
than 24 hours.
Net Time
This field shows the net time for the day. It is calculated
by the application based on the Schedule
Start Time and Schedule End Time.
Schedule
Type
This category describes the schedule. Select Normal,
Exclusion, or Optional.
See Schedule Types
for more information.
The color of the Schedule Type is based on your assigned
Color Policy. See Color Policy - Other
Context for more information.
Ad Hoc
Type
This field only applies if the Schedule
Type is Ad Hoc Placeholder.
If the Ad Hoc Type
is Virtual, then whatever schedule
was set on the most previous post date for the person, and was not identified
as a Gap Day, is copied into the placeholder time span.
If the Ad Hoc Type
is By Clock, the system will pick
an Ad Hoc Template that corresponds to the period containing the time
stamp of the clock in. To create an Ad Hoc Template, use the Ad
Hoc Templates form. You must assign the Ad Hoc Template to a Schedule
Group using the Assign Ad Hoc Template
form.
Availability
Type
This field indicates whether the person is Working,
Not Working, Available,
or Unavailable. The available
options depend on the Schedule Type
you selected.
For a Normal schedule, the Availability
Type is always Working.
For an Exclusion schedule, the Availability
Type is always Not Working.
For an Optional schedule, you can set the Availability
Type to Not Working or
Working to indicate whether the
person will be working or not during the schedule times. However, the
availability type will not affect the person's ability to clock-in during
the scheduled start and end times.
For an Availability schedule, you can set the Availability
Type to Available or Unavailable. However, the availability
type will not affect the person's ability to receive additional schedules
or clock-in during the scheduled start and end times.
Gap Day Number
A gap day is a day when the employee is not scheduled to
work. However, the employee may be allowed to come in and work on certain
gap days and you can distinguish each gap day with its own Gap Day Number.
The Gap Day Number can then be used by Pay Rules to identify the day in
the schedule.
For example, a Monday – Friday schedule includes Optional
schedules on Saturday and Sunday. Saturday is defined as Gap Day Num 1
and Sunday is defined as Gap Day Num 2. To apply a particular hours classification
to Sunday, a Pay Rule is defined using the Is a Gap Day Number operand
set to 2.
Gap Day Number may also be used for Availability Schedules
and Ad-Hoc Schedules.
Applicable Start
This is the effective start date and time of the schedule
record. Calendar date and time defaults to current date and time. When
calculating whether an employee is inside or outside of schedule, the
schedule’s applicable start and end times apply.
Applicable End
This is the effective end date and time of the schedule
record. Calendar date and time defaults to current date and time. When
calculating whether an employee is inside or outside of schedule, the
schedule’s applicable start and end times apply.
Required
This option inicates whether the person is required to
adhere to the schedule (Mandatory), or if the schedule is Optional. If
a schedule is Mandatory, the person must follow the schedule or an exception
will occur.
Normal and Exclusion schedules are always Mandatory. Optional
and Availability schedules are always Optional. An Ad Hoc Placeholder
schedule can be Mandatory or Optional.
Shift
This field identifies the shift that is being used for
this schedule. Shifts are created on the Shift
Definition form.
Note: This shift
will be used only if the employee has a Shift
Policy with Shift From Schedule
selected.
Description
This field contains a description of the schedule.
Start Early Margin
This whole number represents the number of time units the
employee can start the schedule before a schedule start without receiving
a violation notice. The Unit field
determines if the value is hours, minutes, or seconds. The default value
is minutes.
Start Late Margin
This
whole number represents the number of time units the employee can
start the schedule after a schedule
start without receiving a violation notice. The Unit
field determines if the value is hours, minutes, or seconds. The default
value is minutes.
End Early Margin
This whole number represents the number of time units the
employee can end the schedule before the schedule end without receiving
a violation notice. The Unit field
determines if the value is hours, minutes, or seconds. The default value
is minutes.
End Late Margin
This whole number represents the number of time units the
employee can end the schedule after the schedule end without receiving
a violation notice. The Unit field
determines if the value is hours, minutes, or seconds. The default value
is minutes.
Protected
The Protected check box is configured on the Other Properties
tab when you are adding or modifying a schedule.
If this box is checked, the schedule will be generated
as a Protected schedule. When a person has a Protected schedule, the person's
schedule cannot be modified or deleted by the SCHEDULE_GENERATION service
or the Generate button on the Schedule Cycle form. However, you can modify
a Protected schedule on the Person Schedule form if you un-protect the
schedule first.
Is Elapsed
If this box is selected, the employee is expected to post
time using the elapsed entry method. The time is entered after the time
has been worked. Employees can enter one or more days' worth of time entries
at a time. This is a method typically used by salaried employees.
Holiday Overtime
If this box is selected, the schedule applies to holiday
overtime.
Overtime Type.
This indicates the type of overtime done:
Note: Overtime type applies
only to Optional Schedules.
Split Day
Indicates whether this day is a split day in a 9-80
schedule.
A 9-80 schedule is a two-week schedule in which 80 hours
are worked in nine days instead of ten. Typically, one week consists of
four nine-hour days and a single eight-hour day, while the other week
consists of four nine-hour days. The time worked on the eight-hour day
is split between two pay weeks (therefore this day is called the split
day).
A split day will have two adjacent schedules – one for
the First Half of the day and one for the Second Half of the day.
Select NO SPLIT
if the schedule is not a split day.
Select FIRST HALF
if the schedule is for the first half of a split day in a 9-80 schedule.
Select SECOND HALF
if the schedule is for the second half of a split day in a 9-80 schedule.
When you select FIRST
HALF or SECOND HALF, you
must also specify the Pay Week
and Pay Period.
Pay Week
This field is available when you select FIRST
HALF or SECOND HALF in
the Split Day field. This setting
indicates whether the schedule will apply to a different pay week while
still having the same Post Date. This setting will affect how the schedule
displays on the timecard as well as weekly overtime thresholds. Select
from the following options:
For example, a 9-80 biweekly schedule has a split day in
the middle of the pay period. The First Half has Pay
Week set to CURRENT and
the Second Half has Pay Week set
to NEXT. When you view the first
week of the pay period in the timecard, the First Half of the split day
is included. When you view the second week of the pay period in the timecard,
the Second Half of the split day is included.
Pay Period
This field is available when you select FIRST
HALF or SECOND HALF in
the Split Day field. This setting
indicates whether the schedule will apply to a different pay period while
still having the same Post Date. This setting affects how the schedule
displays on the timecard as well as weekly overtime thresholds. Select
from the following options:
For example, in a 9-80 biweekly schedule, the last day
in the period is a split Friday with an Optional schedule. For the First
Half of this day, Pay Week and
Pay Period are set to CURRENT.
For the Second Half of this day, Pay
Week and Pay Period are
set to NEXT. If the employee works
on this optional split day, the First Half will apply to the current pay
period and pay week. The Second Half will apply to the next pay period
and pay week.
Total Paid
Represents the amount of hours in the schedule record that
are paid. Paid time is made up by time that is not an event.
Total Unpaid
Represents the amount of hours in the schedule record that
are unpaid. Unpaid time is made up by events, such as MEAL and/or BREAK.
Update Date, Updated By
These fields display when the record was created or updated,
and the person who created or updated the record.
Define
Days in a Schedule Cycle
Important: You
must have a Cycle record before you can define the schedules for each
day within the cycle. Cycles are created on the Cycle
form.
Click Main
Menu > Administration > Schedules > Schedule Cycle.
Select a Cycle
Name from the drop-down list
or click the  button next
to the Cycle Name field and
select Lookup from the pop-up
menu. If you do not have a Cycle in place, you must create one. See
Cycle.
button next
to the Cycle Name field and
select Lookup from the pop-up
menu. If you do not have a Cycle in place, you must create one. See
Cycle.
Click Find
on the Schedule Cycle form.
The existing records will appear. Each record represents
one day in the cycle. For example, if the schedule cycle has ten days
in the period, ten records will appear.
Each day is defined as a GAP day until you add a
schedule to it.
Click Add
Day to define a day in the cycle. The Add Schedule Cycle pop-up
form appears. The Cycle Name
field displays the cycle you selected in step 1.
In the Day
of Cycle field, enter or select the day in the schedule cycle
for which you want to define the schedule. You can only select between
the number of days that are included in the schedule cycle. For example,
if your schedule cycle is 10 days, you can only select between 1 and
10. Note that if you repeat the schedule cycle, day number one will
fall on different weekdays as the cycle repeats.
Select a Schedule
Type.
If you selected Ad
Hoc Placeholder as your Schedule Type, you will also have to
select an Ad Hoc Type.
Select an Availability
Type.
Enter a Gap
Day Number.
A Gap Day is a day when the employee is not scheduled
to work as part of his normal work. If this schedule applies
to one of those gap days (for possible use in pay rules), enter that
number here (for example, Sunday = 1). The most likely schedules to
use Gap Days are Availability Schedules and Ad-Hoc Schedules
Select an Applicable
Start Day (TODAY, TOMORROW, or YESTERDAY)
and an Applicable Start Time.
This is the effective start date and time of the schedule and is used
to calculate whether an employee is inside or outside of the schedule.
Select a Start
Day and a Start Time.
Select an Applicable
End Day (TODAY, TOMORROW, or YESTERDAY)
and an Applicable End Time.
This is the effective end date and time of the schedule and is used
to calculate whether an employee is inside or outside of the schedule.
Select an End
Day and an End Time.
Set Required
field as desired. This indicates whether the schedule is mandatory
or optional. It is based on the selected Schedule
Type.
Select a Shift.
Shifts are created on the Shift Definition
form.
Click the Margins
tab. Enter the applicable values on the Margins form.
Click the Properties
tab. Enter the applicable values on the Properties form.
Enter a Description
for the day.
If you want to add more than
one day to the Schedule Cycle, click Save
and Add to save your settings and keep the Add Schedule Cycle
window open. Click Save to
save the cycle day record and return to the main form.
Modify
a Day in a Schedule Cycle
Click Main
Menu > Administration > Schedules > Schedule Cycle.
Select a Cycle
Name from the drop-down list.
You can also click the button next to the Cycle
Name field and select Lookup
from the pop-up menu. On the Cycle form, select the Cycle for which
you want to modify days. Click OK
to return to the Schedule Cycle form.
Select the day you want to modify.
Click Modify.
The Modify Schedule Cycle pop-up form appears.
Modify the necessary fields.
Click Save
when you are finished.
Assign and generate the schedule.
Copy
a Day or Day Range in a Schedule Cycle
You can copy values from and to days within a Schedule
Cycle. Note that if you already have a schedule in place for the day you
are copying values to, the existing schedule will be replaced with the
copied value.
Click Main
Menu > Administration > Schedules > Schedule Cycle.
Select a Cycle
Name from the drop-down list.
You can also click the button next to the Cycle
Name field and select Lookup
from the pop-up menu. On the Cycle form, select the Cycle for which
you want to copy days. Click OK
to return to the Schedule Cycle form.
Click Copy
Days.
The Schedule Copy form appears. The Cycle
Name field displays the Cycle Name you selected in step 2.
The Cycle Length field displays
how many days are in this schedule cycle.
In the Source
Start Day field, enter the first day number of the range of
days you want to copy values FROM.
For example, if the schedule cycle has 7 days, and you want to copy
schedule values from days 3 and 4, enter 3.
In the Source
End Day field, enter the last day number of the range of days
you want to copy values FROM.
If you only want to copy values from one day, then enter the same
number in both Source Start Day
and Source Start End fields.
In the Copy
To Start Day field, enter the first day number in the range
of days you want to copy values TO.
In the Copy
To End Day field, enter the last day number in the range of
days you want to copy values TO.
Click Save.
Click Find
on the Schedule Cycle form to refresh the page.
Delete
Days in a Schedule Cycle
Click Main
Menu > Administration > Schedules > Schedule Cycle.
Select a Cycle
Name from the drop-down list.
You can also click the button next to the Cycle Name field and
select Lookup from the pop-up
menu. On the Cycle form, select the Cycle for which you want to delete
days. Click OK to return to
the Schedule Cycle form.
Select the day you want to delete
and click Delete. To select
more than one day, press the CTRL key while you select the records.
Click OK
to confirm the action.
Assign
Schedule Cycle to One or More Persons
Once you have defined your Schedule Cycle, you need to
assign it to the appropriate person. To do so, use the Assign button on
the Schedule Cycle form.
You can also assign a Schedule Cycle to a person using
the Assignment tab of the Employee form.
Note: A Schedule
Cycle will not take effect until you have generated it via the SCHEDULE_GENERATION
service. You can run the Schedule Generation service via the Generate
button on the Schedule Cycle form, or you can run the service on the
Service Monitor form.
Click Main
Menu > Administration > Schedules > Schedule Cycle.
Select the Schedule Cycle you
want to assign.
To do so, select a Cycle
Name from the drop-down list. You can also click the
button next to the Cycle Name
field and select Lookup from the pop-up menu. On the Cycle
form, select the Cycle you want to assign. Click OK
to return to the Schedule Cycle form.
Click Find
on the Schedule Cycle form. The existing records will appear. Each
record represents one day in the cycle. For example, if the schedule
cycle has ten days in the period, ten records will appear.
Click Assign
to display the Assign People form. The form will display active person
records.
If the filter area is not visible,
click the  Filter
button to display the filter fields.
Filter
button to display the filter fields.
In the Start
Date field, enter the date when the Schedule Cycle assignment
starts.
Note that the Cycle Name’s Reference Date also determines
which dates will have the assigned schedule. If the Cycle Name’s Reference
Date is before the Start Date, then the first date that will have
the assigned schedule is the Start Date. If the Cycle Name’s Reference
Date is after the Start Date, then the first date that will have the
assigned schedule is the Reference Date. The Start Date will be assigned
the Day number in the schedule that corresponds with the days in the
cycle.
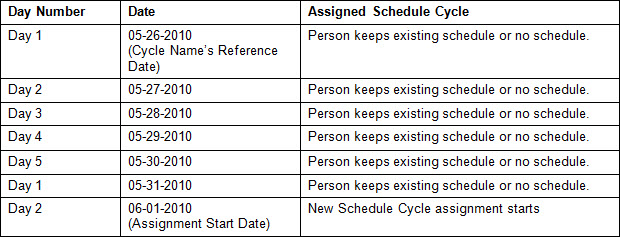
Example:
A Cycle Name’s Reference Date is May
26, 2010. This cycle is 5 days long. A person is assigned this cycle
with a Start Date of June 1, 2010. The person’s schedules from May
26 to June 1 are shown below.
In the End
Date field, enter the last date of the Schedule Cycle assignment.
Check the Override
box if you want to assign the schedule for a short period of time
to override an existing schedule assignment of the same type. The
new Override schedule will automatically be assigned a Level Number
that is one number higher than the original schedule. The Level Number
indicates which schedule should be used when the two schedules have
overlapping dates. The Override check box on the Schedule Cycle/Assign
People form works the same as the Override check box on the Assignment
tab of the Employee form.
To filter the persons you want
to assign schedules to, use the Facility,
Employee, and Supervision Type fields.
Select the Include
Direct box if you want to view persons that report directly
to the logged in Supervisor via Employee Group type DIRECT_MANAGER.
This check box applies to the Supervision
Type filter.
Once you have made your selection,
click Find to display the
persons that match your criteria.
You can assign the Schedule
Cycle to one, several, or all the persons shown.
To assign to ALL persons shown,
click Assign All.
To assign to one or more but
not all persons shown, select the persons and click Assign
Selected. You can perform a multi-select by pressing the CTRL
key on the keyboard while selecting the persons.
The selected persons will be assigned the Schedule Cycle
you selected for the dates that fall on and in between the indicated Start
and End dates. You can view this SCHEDULE_CYCLE assignment on the Assignment
tab of the Employee form.
The schedule will not take effect until you generate it
(see below).
Generate Schedules
Once a schedule has been assigned
to a person, you can use the Generate button on the Schedule Cycle form
to generate the schedule. A schedule must be generated in order to take
effect. Once a Schedule Cycle has been assigned and generated, it can
be viewed on the Person
Schedule form.
You can also run the SCHEDULE_GENERATION service via a
Service Schedule or using the Service Monitor
form. A Service Schedule is useful if you want to generate schedules
on a regular basis.
When you click the Generate button, you select the date
range and persons for which you want to generate the selected schedule.
The SCHEDULE_GENERATION service will then check the Person Assignment
of each of these persons to see if a new SCHEDULE_CYCLE assignment for
the selected schedule has been added and if so, the service will generate
this schedule assignment.
Note: You cannot
generate a schedule on a day that is payroll locked. The SCHEDULE_GENERATION
service will skip payroll locked days and record an error on the Error
Log form.
To generate schedules via the Generate button on the Schedule
Cycle form:
Click Main
Menu > Administration > Schedules > Schedule Cycle.
Select the Schedule Cycle you
want to generate.
To do so, select a Cycle Name from the drop-down
list. You can also click the button
next to the Cycle Name field
and select Lookup from the pop-up menu. On the Cycle form, select
the Cycle you want to generate. Click OK
to return to the Schedule Cycle form.
Click Find
on the Schedule Cycle form. The existing records will appear. Each
record represents one day in the cycle. For example, if the schedule
cycle has ten days in the period, ten records will appear.
Click Generate
to display the Schedule Generation form.
If the filter area is not visible,
click the Filter
button to display the filter fields.
Enter or select the Start
Date and End Date for
which you want to generate the cycles. The End Date can be a maximum
of 30 days after the Start Date (schedules can be generated for up
to 30 days).
To filter the persons for whom
you want to generate the Schedule Cycle, use the Facility,
Employee ID, and Supervision Type fields.
Check the Include
Direct box if you want to view persons that report directly
to the logged in Supervisor via Employee Group type DIRECT_MANAGER.
This check box applies to the Supervision Type filter.
Once you have made your selection,
click Find to display the
persons that match your criteria.
Select the persons for whom
you want to generate schedules. Press the CTRL key and click to select
multiple employees.
Click Generate
Selected.
The service will generate the selected Schedule Cycle for
the selected persons for the dates that fall on and in between the indicated
Start and End dates.
You can now view each person’s schedule on the Person Schedule
form.
Generating
Overlapping Schedules
During Schedule Generation, if there is an overlap between
day X (the day being generated) and day X+1 or X-1, the new schedule and
the overlapping (old) schedule are examined before generating the schedule.
The New Overlap Algorithm is as follows:
New schedule gets generated unless the old schedule
is Protected.
The above is true regardless of the schedule
types (Normal, Optional, Exclusion, Ad Hoc Placeholder or Availability),
whether there are punches on the post date, or anything else.
Old schedule gets updated (if partial overlap)
or deleted (if complete overlap – the Real range is completely consumed)
so that the overlap condition is avoided.
Scheduled events in the old schedule either
do not get updated at all (not affected by new schedule) or else they
get deleted (because there's either partial or total overlap).
A schedule that is “Protected” cannot be touched. Any
schedule attempting to generate that overlaps a protected schedule will
fail.
Schedule Overlap
Complete Schedule Overlap
A complete overlap is where the “real” part of the old
schedule (start time stamp to end time stamp) is entirely consumed by
the applicable range of the new schedule.
For example, say the schedule on Tuesday is 0000 to 0700,
with applicable range 2000 Monday to 1100 Tuesday. A new schedule for
Monday is generated and is 2000 Monday to 0400 Tuesday, with applicable
range 1600 Monday to 0800 Tuesday.
In this scenario, the “real” parts of the two schedules
partially overlap, as do the applicable range. However, the applicable
range of the new schedule (1600-0800) extends beyond the real part of
the old schedule (0000-0700). This scenario counts as a complete overlap,
and in this scenario, the old schedule is deleted, including any events
in it.
Partial Schedule Overlap
A partial overlap is any overlap that isn’t a complete
overlap in that at least some real part of the schedule isn’t overlapped.
In this case, the applicable and, if necessary, real ranges of the old
schedule are adjusted so that the schedule shrinks and there is no overlap.
For example, say the schedule on Tuesday is 0000 to 0700,
with applicable range 2000 Monday to 1100 Tuesday. A new schedule for
Monday is generated and is 1600 Monday to 0000 Tuesday, with applicable
range 1200 Monday to 0400 Tuesday.
In this scenario, in order to make the schedules no longer
overlap, the old schedule is modified so that both the applicable start
and real start times are both 0400 so at no moment do both schedules apply.
The real and applicable end times are not adjusted as they are both outside
the new schedule.
Scheduled Event Overlap
If a scheduled event is completely or partially overlapped,
then the scheduled event is deleted. This applies regardless if
an event is AUTO or PUNCH or OVERRIDE.
If the Scheduled event is defined as OFFSET instead of
STRICT (with time stamps), the start and end of the event from the unmodified
old schedule are calculated and if there’s any overlap, the Scheduled
event is deleted.
In the case where the event is not overlapped, and the
real start time of the schedule is being moved later (partial overlap),
the offsets are changed such that the event does not move within the schedule.
For example, if an event in a schedule that starts at 8 AM has offsets
of 4 and 4.5 (12-12:30 PM), and that start time changes to 9:30 AM, then
the event’s offsets must become 2.5 and 3 to remain 12-12:30 PM.
Schedule
Generation and Daylight Saving Time
If a schedule is being generated on the Spring Daylight
Saving Time day, and the schedule has a timestamp (Start Timestamp, End
Timestamp, Applicable Start, or Applicable End) between 2:00 a.m. and
3:00 a.m., an hour offset will be added to the timestamp.
This offset is to account for Daylight Saving Time beginning
at 2:00 a.m. local time on the Spring Daylight Saving Time day (the second
Sunday in March). The time between 2 a.m. and 3 a.m. on this day technically
does not exist, as the time has sprung forward starting at 2 a.m. (1:59
a.m. jumps to 3:00 a.m.).
For example, a Schedule Cycle’s Applicable End is March
8, 2015 at 2:30 a.m. When the SCHEDULE_GENERATION service generates this
service, the Applicable End will be March 8 at 3:30 a.m.
Note: If this offset
creates an overlap with the next day’s schedule, the next day’s schedule
will be adjusted accordingly.
Recalc
Time Card
The Recalc Time Card
button is used to bring a timecard into compliance after you add or modify
an employee's schedule on a day that already has time posted. For example,
an employee starts working a new schedule before his schedule is updated
in the system, causing him to receive a Late Arrival event. When the employee's
schedule is updated, the day will be marked as needing recalculation.
The Recalc Time Card button will process the event postings according
to the updated schedule and remove the Late Arrival event.
Note: You cannot
recalculate a period while the employee is clocked in.
Click Main
Menu > Administration > Schedules > Schedule Cycle.
Find the Cycle
Name you want to recalculate.
Select the record for the scheduled
day you want to recalculate. Update the schedule as necessary.
Assign and Generate the updated
schedule to the appropriate person.
Click the Recalc
Time Card button.
The Recalculate pop-up form appears.
Click the Filter button to display the Start Date, End
Date, and Force Recalculation
fields.
Enter the dates of the schedules
you updated in the Start Date
and End Date fields. Note
that the End Date cannot be later than the current post date. When
the system finds a record that needs recalculation, it will recalculate
the entire period, even if that period occurs outside of the Start
and End Dates.
Note that the Max
Periods Back setting in the employee's Recalculation
Policy applies here. If your Start Date and End Date range spans
beyond the Max Periods Back setting, the system will only search for
records that need recalculation up to the Max Periods Back setting.
Max Periods Back is the maximum number of periods/weeks prior to the
current period/week for which the system will search for days that
need corrections.
Check Force
Recalculation if you want to run recalculation even if none
of the days in the week/period are marked as needing recalculation.
Select one or more Employee
records for the employees whose timecards you want to recalculate.
Click Save
to perform the recalculation.
To close the Recalculate pop-up
form, click the  in
the upper right corner.
in
the upper right corner.