
The Assignment tab on the Employee form is used to configure and maintain assignments such as Schedule Cycles, Shifts, Ad Hoc Rates, and Home Default Locations.
Note: Schedule Cycles can also be assigned to a person via the Schedule Cycle form. Shifts can be assigned to an Employee via the Shift Definition form.
If you are logged in as a supervisor and your Security Role has the Supervisor Employee form enabled, the Assignment tab will only allow you to Find and view employee assignments.
If your Security Data Role includes the PERSON_ASSIGNMENT item, then only records for specific Assignment Types will appear on the Employee Assignment tab. You will only be able to view, add, and modify the Assignment Types defined in the Security Data Role.
See Also:
Assignment Type
Identifies the specific assignment. See "Assignment Types" above for more information.
Assign. Type Label
Used by the ADHOC_ASSIGNMENT types. Displays a dictionary label for the assignment type (e.g., Adhoc Assignment 1, Adhoc Assignment 2, etc.).
Assignment Value
The assignment value identifies the unique assignment name (for example, Shift 1 or Schedule Cycle A). The available options depend on the Assignment Type you selected.
When you are creating a new assignment, the Override checkbox can be used when two or more assignments of the same type have overlapping Start and End Dates.
For example, you may want to create a schedule assignment for a short period of time that will override an existing schedule assignment.
When you create the new schedule assignment, check the Override box. The original schedule assignment will remain unchanged. The new Override schedule assignment will have a Level Number that is one number higher than the original schedule assignment. The Level Number indicates which schedule should be used when the two schedules have overlapping dates (see Level Number).
If you do not check the Override box, the original schedule assignment will be end dated the day before the new schedule takes effect. An additional schedule will then be created that starts when the new schedule ends, and has the same end date as the original schedule. No Level Numbers will be needed because there will be no overlapping Start and End Dates.

You cannot check the Override box if the assignment you are creating does not overlap an existing assignment of the same type.
Note: When you create an assignment on the Employee Loan or Manage Employee Loan form, the Override box will always be checked. Assignments created on these forms are always created as Override assignments, even if there is not a regular (non-override) assignment of the same type.
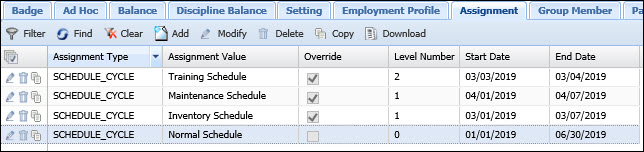
A Level Number is assigned automatically when you create a new assignment with Start and End Dates that overlap an existing assignment of the same type and the Override box is checked. The Level Number indicates which assignment should be used when the two assignments have overlapping dates.
For example, a person is assigned a schedule from January 1 to June 30 of a given year. This schedule is the person’s default schedule assignment and the Level Number is automatically set to zero (0). The person gets a new schedule assignment from March 1 to March 7; the Override box is checked and the Level Number gets set to 1. If another Override schedule is added from April 1 to April 7, this assignment will also be Level 1.
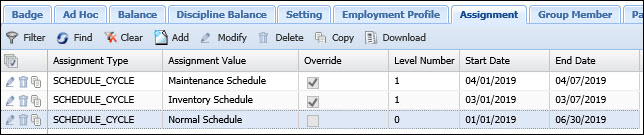
If the person gets another schedule assignment from March 3 to March 4 and the Override box is checked, then this schedule’s Level Number will be set to 2. On March 3, the schedule assignment with the highest Level Number (“2” in this example) will be used.
Start Date, End Date
The start and end date when the assignment record is in effect.
If you modify an assignment and set the Start/End Date to dates in the past, the new assignment record may affect transactions that were already posted on those past dates. You may have to Recalculate the person's timecard.
Update Date, Updated By
These fields display when the record was created or updated, and the person who created or updated the record.
Click Main Menu > Employee Management > Employee.
Select the Person record you want to view.
Click the Assignment tab on the lower half of the form.
Click Find. The existing Assignment records appear.
Click Main Menu > Employee Management > Employee.
Select the Person record you want to view.
Click the Assignment tab on the lower half of the form.
Click Add.
Select an Assignment Type and an Assignment Value.
Check the Override box if you want to create an assignment for a short period of time that will override an existing assignment of the same type. The new Override assignment will automatically be assigned a Level Number that is one number higher than the original assignment. The Level Number indicates which assignment should be used when the two assignments have overlapping dates. Refer to the Assignment Field Descriptions for more information.
Select the Start Date and End Date for the assignment.
Click Save.
Click Main Menu > Employee Management > Employee.
Select the Person record you want to view.
Click the Assignment tab on the lower half of the form.
Select the assignment record you want to modify and click Modify.
Modify the necessary fields.
If you modify an assignment and set the Start/End Date to dates in the past, the new assignment record may affect transactions that were already posted on those past dates. You may have to Recalculate the person's timecard.
Click Save.
Click Main Menu > Employee Management > Employee.
Select the Person record you want to view.
Click the Assignment tab on the lower half of the form.
Select the assignment record you want to copy and click Copy.
Modify the necessary fields and click Save.
Click Main Menu > Employee Management > Employee.
Select the Person record you want to view.
Click the Assignment tab on the lower half of the form.
Select the assignment record you want to delete and click Delete.
Click OK to confirm the action.