Calc Rule
The Calc Rule form allows you to create and maintain your
company's business rules in one central location.
Each rule is expressed as an IF-THEN statement. The IF
portion contains one or more conditions, and the THEN portion contains
one or more actions. When the condition is met, the action is executed.
When you create rules, a combination or operands and operators
make up the IF and THEN clauses. The combination of operands and operators
must return a Boolean value or be a Boolean expression itself (True or
False) in order for the rules to work. The IS operands will return a Boolean
expression (True or False statement). The GET operands will return a value.
In order for a rule to take effect, it must be assigned
to a ruleset via the Rulesets form.
See Also:
Calc Rule Field
Descriptions
Find a Calc Rule
Delete a Calc Rule
View a Calc Rule
Add a Calc Rule
Add Operators
Add Brackets
Copy a Calc Rule
Modify a Calc Rule
Enable/Disable a Calc
Rule
Sync Rule/Sync All Rules
Calc
Rule Field Descriptions
Context Name
The Context Name is used to categorize rules based on their
function. For example, rules used to select data for an export are part
of the ExportRuleset context. The available contexts are listed below.
Context
Name |
Applicable Use |
AccrualRuleset |
The Accrual Rules
determine how and when balances, which are used to offset employee
time off, should be accrued. These rulesets are assigned to the
time reporter's Leave Policy.
The ACCRUAL service uses the settings in the person’s Leave Policy
to create and add time to person balance records.
See Accrual
Rules Operands for a list of the various operands.
|
Analytics |
The Analytics rules
are used to calculate Key Performance Indicators - Efficiency,
Productivity, and Utilization - for one or more employees over
a specified date range. This KPI data can be viewed in the KPI Dashboard portlets and the KPI Report.
The Analytics rulesets are assigned to Ruleset
Profiles which are connected to events via a Process Policy.
See Analytics
Rules Operands for a list of the various operands.
|
AttendanceRewardRuleset |
The Attendance Reward
Rules are used by the ATTENDANCE_REWARD service to determine a
person’s eligibility to receive an attendance
reward, as well as any attendance violations.
See Attendance
Reward Rules Operands for information on the operands used
to create these rules.
|
AttendanceRuleset |
Attendance Rules determine
how an event shall post on employee timecards when the event occurs.
The rulesets are assigned to the time reporter's Attendance
Policy. Note that the event in question must also be enabled
in the time reporter's Attendance Policy in order to post.
See Attendance
Rules Operands for a list of the various operands.
|
AuxiliaryHoursRuleset |
The Auxiliary Hours
Rules determine how Auxiliary
(Bonus) Hours will be calculated. These rulesets are assigned
to the person’s Pay Policy. The LABOR_ALL_MT
service uses this ruleset to calculate Auxiliary Hours.
See Auxiliary
Hours Rules Operands for a list of the various operands.
|
DisciplineBalanceContext |
The Discipline Balance
Rules are used by the DISCIPLINE_BALANCE service to add points
to, add levels to, and reduce the points in your Discipline Balance
Codes.
See Discipline
Balance Operands for information on the operands used to create
these rules.
When defining the Discipline Balance rulesets,
you should organize them according to the tasks of the DISCIPLINE_BALANCE
service (BALANCE_ACCUMULATION, BALANCE_LEVELS, and BALANCE_REDUCTION).
These rulesets will be assigned to the Discipline Ruleset, Level
Ruleset Name, and Reduction Ruleset settings in a Discipline Balance
Policy.
For example, the ruleset that will be processed
by the BALANCE_ACCUMULATION task of the DISCIPLINE_BALANCE service
(the Discipline Ruleset in the Discipline Balance Policy) should
be designed to look for discipline violations in the timecard
(e.g., unexcused absences) and add the appropriate number of points
to the Discipline Balance Code.
|
ExportRuleset |
Export Rules determine
when and how data is grouped and extracted from the system tables.
The Export Rulesets are available to select on the Export
form when configuring an export. The data itself is extracted
via the Run Export button
on the Export form or via a service
instance.
The rule listed on top is executed first. However,
all rules will be processed for all transactions. If a transaction
satisfies more than one rule, only the last rule will apply.
See Export
Rules Operands for a list of the various operands.
|
MessagingRuleset |
Messaging Rules allow
you to create messages for specific business conditions. For example,
a company may want to send a warning message to employees who
have been tardy at least three days in the current pay period.
These rulesets are assigned to a Message
Definition which is assigned to a Message
Policy. The Message Policy can then be assigned to one or
more persons. Refer to the Messaging
feature topic for more information.
See Messaging
Rules Operands for a list of the various operands.
|
PaidRateRuleset |
Paid Rate rules determine
how a transaction’s payroll and labor rates will be calculated.
The rules in the PaidRateRuleset will be used to calculate the
PAID_PERSON_PAY and PAID_PERSON_LABOR rates. See Trans
Rate for a description of the various rates that are stored
with a transaction.
See Paid
Rate Rules Operands for a list of the various operands for
this ruleset.
|
PayRulesRuleset |
The Pay Rules Rulesets
determine how hours should be classified on the timecard via the
Time Classification service. Pay Rules Rulesets are assigned to
Pay Policies via the Pay Policy form.
The rule listed on top is executed first. Once
a condition is met for a transaction, the system will not continue
to the next rule for that transaction.
See Pay Rules
Operands for a list of the various operands.
|
PostProcessEventRuleset |
The Post Process Event
rules determine whether an employee will receive a Post
Process Event.
A “Post Process” event is an event that posts
automatically after a person clocks out, adding extra time to
the day. For example, an employee may receive bonus hours at the
end of the day after working a minimum number of hours. Or, an
employee may receive additional time after clocking out to account
for time needed to clean up before going home.
See Post
Process Event Rule Operands for information about the operands
used to create these rules.
|
PVEValidationRuleset |
The PVEValidationRulesets
are used to define custom event validations. The operands will
check for specific charge element values, person data, or other
information while an event is being posted, and perform the appropriate
action (stop processing, give validation error, etc.)
You can assign the PVEValidationRulesets or the
individual rules to a Custom Validation.
This Custom Validation can then be assigned to an event using
the Validation tab of the Events
form.
See PVE
Validation Rules Operands for a list of the various operands.
|
TimecardCheckRuleset |
The TimecardCheckRuleset
is used to check an employee’s timecard for hours exceptions,
such as reported time that is different from the scheduled hours
and time posted on an unscheduled day. This ruleset is added to
a person’s Sign Policy and
is applied when an employee or supervisor signs a timecard.
See Timecard Check
for more information on this feature. See Timecard
Check Rules Operands for a list of the various operands that
make up these rules.
|
Rule Name
Name that identifies the rule.
System Required
If this box is checked, the record is system required and
cannot be deleted.
Enabled
If this box is checked, the rule is active. Click the Enable/Disable Rule button to enable
or disable a selected rule.
Rule Synchronized
Indicates whether the rule is in sync with the sequences
in the database. This box may not be checked if you imported the rule
with the Config
Export/Config Import forms, Use the Sync Rule
button to compile the rule and synchronize it.
Number of Rulesets
Identifies how many Rulesets
are currently using this rule.
Update Date, Updated By
These fields display when the record was created or updated,
and the person who created or updated the record.
Find a Calc Rule
Click Main
Menu > Configuration > Rules > Calc Rule.
Select the Context
Name of the rules you want to find.
To select specific rules, enter
a Rule Name.
You can use the * or % wildcard
symbol in this field to search
using partial values. The wildcard symbol can be placed anywhere in
your search value to represent unknown characters. For example, to
find rules that start with AP, enter AP*. To find rules that include the word hourly, enter *hourly*.
To find only synchronized
rules, select True from
the Rule Synchronized field.
To find only rules that are not synchronized, select False
from the Rule Synchronized field. Leave this field blank to find both
synchronized and not synchronized rules.
Use the Last
Updated checkbox and the From
and To date fields to find
only those rules that were updated on certain dates. For example,
if you only want to find rules with an Update Date of 01/01/2012,
check the Last Updated box and enter 01/01/2012 in the From and To
fields.
Click Find.
The Rule Names that match your criteria will display.
View a Calc Rule
To view the IF and THEN statements of a rule:
Click Main
Menu > Configuration > Rules > Calc Rule.
Find the Rule
Name you want to view, select
it, and click the View Rule
button.
The Calc Rule Builder pop-up form appears with the
IF/THEN statements. Click Cancel
to exit.
Enable/Disable
a Calc Rule
You can quickly enable or disable a rule via the Enable/Disable
button on the horizontal toolbar:
Click Main
Menu > Configuration > Rules > Calc Rule.
Find the Rule Name you want
to enable or disable, select it, and click the Enable/Disable
button. If the rule was enabled, it will be disabled. If the rule
was disabled, it will be enabled.
Add
a Calc Rule
Click Main
Menu > Configuration > Rules > Calc Rule.
Select the appropriate Context Name and click Add.
The Calc Rule Builder pop-up form opens.
Enter a Rule
Name.
Click Add
IF Clause at the top of the form.
On the IF Clause form, click
Select Operand and select
an operand from the drop-down menu.
The available operands will depend
on the Context Name you selected.
If applicable,
select or enter a value for each parameter that displays.
Click Save
to save the IF clause.
To add brackets, see Add
Brackets below.
To add IF Clauses:
a. Click Add IF Clause on the toolbar.
b. Select an operator (AND/OR).
c. Select an operand.
d. Select or enter a value for each parameter that displays.
e. Click Save.
Click Add
THEN Clause at the top of the form.
On the THEN
Clause form, click Select
Operand and select an operand
from the drop-down menu.
The available operands will depend on the Context
Name you selected.
If applicable,
select or enter a value for each parameter that displays.
Click Save.
To add brackets, see Add
Brackets below.
To add more THEN Clauses:
a. Click Add THEN Clause at the top of the form.
b. Select an operator (AND/OR).
c. Select an operand.
d. Select or enter a value for each parameter that displays.
e. Click Save.
Click Save
on the Calc Rule Builder form to save the rule.
Next, you must add
the rule to a ruleset in order for it to fire.
Add Operators
You can use operators to add, subtract, multiply, divide,
and compare parameters in an operand. To add an operator, click the arrow
 located to the left of the rule.
For example, an operator is used in the Get Aggregate Eligible
Hours operand to see if there are 45 or more hours eligible for EWT/Comp
Time in the pay week.
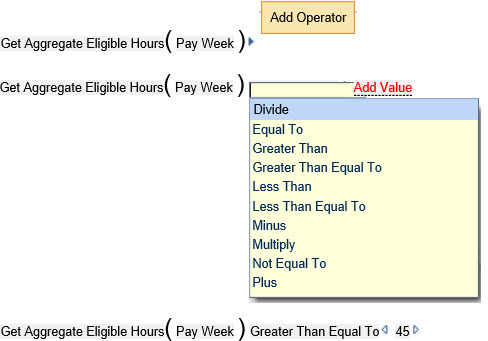
The Add Value field will also appear when you select an
operator. Add Value determines the value that the previous parameter is
compared to or calculated with (depending on which option was chosen in
the Add Operator field). Enter a numeric value or right-click to add an
Operand to calculate this value.
Operators
The available operators will depend on the calculations
you can make with the operands. Below is a list of all possible operators.
Equal To = Tests whether the previous input parameter is
equal to the parameter that follows.
Less Than = Tests whether the previous input parameter
is less than the parameter that follows.
Less Than Equal To = Tests whether the previous input parameter
is less than or equal to the parameter that follows.
Greater Than = Tests whether the previous input parameter
is greater than the parameter that follows.
Greater Than Equal To = Tests whether the previous input
parameter is greater than or equal to the parameter that follows.
Not Equal To = Tests whether the previous and the parameter
that follows are not equal.
Plus = Adds the previous parameter to the parameter that
follows.
Minus = Subtracts the next parameter from the previous
parameter.
Divide = Divides the previous parameter by the parameter
that follows.
Multiply = Multiplies the previous parameter by the parameter
that follows.
Add Brackets
To add a left bracket to a rule, click the
arrow located to the left of the rule.

To add a right bracket to a rule, click the
arrow located to the right of the rule.

Modify a Calc
Rule
Click Main
Menu > Configuration > Rules > Calc Rule.
Find the Rule Name you want
to modify, select it, and click Modify.
To modify the IF Clause, click
the  pencil icon to the far left of the record.
The IF
Clause form will display. Click directly on an operand to modify
it.
Click Save
in the IF Clause form when you are finished.
To modify the THEN clause, click
the pencil icon to the far left of the record.
The THEN
Clause form will display. Click directly on an operand to modify
it.
Click Save
in the THEN Clause form when you are finished.
Click Save
on the Calc Rule Builder form to save all the changes.
Delete a Calc
Rule
You cannot delete rules that are currently in use by a
ruleset.
Click Main
Menu > Configuration > Rules > Calc Rule.
Find the Rule Name you
want to delete, select it, and click Delete.
Click OK
on the pop-up box to confirm the action.
Copy a Calc Rule
Click Main
Menu > Configuration > Rules > Calc Rule.
Select the Rule Name you want
to duplicate and click Copy.
Use the Calc Rule Builder form
to modify the rule as necessary.
Click Save.
Sync Rule/Sync All Rules
If you imported rules using the Config
Export/Config Import forms, you need to compile the rules in the new
database. A warning message will display on the Calc Rule form if there
is more than one rule that is out of sync (the Rule
Synchronized box is not checked).
To synchronize the rules, use the Sync
Rule or Sync All Rules
button. These buttons will make sure the imported rules are in sync with
the sequences in the database.
Use the Sync
Rule button to compile the selected rules in a particular context.
You must first select the rule(s) on the Calc Rule form and then click
Sync Rule.
Use the Sync
All Rules button to compile all the rules in a particular context
(except for the System Required rules).
Click Main
Menu > Configuration > Rules > Calc Rule.
Select the Context
Name of the rules you want to synchronize.
To sync all the rules in the
selected context, click Sync All
Rules.
To sync only certain rules in
the selected context, select the rules and click Sync
Rules.
The Sync Rule
Successful message will display.
The Rule Synchronized
box will be checked for the selected rules.