The Auxiliary (Bonus) Hours feature allows employees to earn more hours than they actually work. For example, a second-shift employee may work 6.5 hours and be paid for 8 hours. The employee’s timecard will still show the actual hours worked (6.5 in this example). The Auxiliary Hours (1.5 in this example) will be visible in transaction details and will have a unique pay designator.
To make Auxiliary Hours visible in the timecard, you must configure your Form Profile.
If an event is configured to draw from a balance, both the worked hours and the Auxiliary Hours will draw from the balance. Auxiliary Hours can also be included or excluded from a payroll export or ad hoc report as necessary.
Note: The Weekly Summary Report will also include any Auxiliary Hours earned by employees.
To use auxiliary hours, you need to define your Auxiliary Hours Ruleset and assign this ruleset to the person’s Pay Policy.
See Also:
Defining the Auxiliary Hours Rules
Assign the Auxiliary Hours Ruleset to a Pay Policy
Auxiliary Hours for Events That Draw from Balances
Viewing Auxiliary Hours in Transaction Details
Viewing Auxiliary Hours in the Timecard
Creating an Ad Hoc Report for Auxiliary Hours
Use the AuxiliaryHoursRuleset context in the Calc Rule form to define your Auxiliary Hours Rules. Once you have your rules defined, you need to assign them to a ruleset using the Rulesets form. Add this Auxiliary Hours Ruleset to the Pay Policy of employees who will be receiving the Auxiliary Hours.
Examples of Auxiliary Hours Rules are shown below. See Auxiliary Hours Rules Operands for more information on the operands and parameters in these rules.
Example 1
Employee who works 8 hours during Shift 2 will be paid for 9 hours.
IF:
Is Shift Num( 2 )
THEN:
Add Bonus Hours( 0.125, Post Date, 1, AX1 )
And
Stop Processing( )
During Shift 2, the employee posts time to three different work orders (WO1, WO2, and WO3). The auxiliary hours for all these transactions will display in the Auxiliary Duration 1 column.
First, the employee posts 2.5 hours to WO1. To calculate the auxiliary hours for this transaction, 2.5 is multiplied by the Multiplier in the rule (2.5 hrs. * 0.125 = 0.3). The Auxiliary 1 Duration is now 0.3.
Next, the employee posts 4 hours to WO2. The duration for the day is now 6.5 hours (2.5 + 4.0 = 6.5). The 6.5 hours are multiplied by 0.125 for a total of 0.8. The auxiliary hours from WO1 are then subtracted from this amount (0.8 – 0.3 = 0.5) and this transaction receives 0.5 auxiliary hours. The Auxiliary 1 Duration is now 0.3 (from WO1) + 0.5 (from WO2) = 0.8.
Finally, the employee posts 1.5 hours to WO3. The duration for the day is now 8.0 hours, multiplied by 0.125 = 1.0 auxiliary hours. Subtract the auxiliary hours already received (0.8) and this transaction receives 0.2 hours. The Auxiliary 1 Duration is now 0.3 (from WO1) + 0.5 (from WO2) + 0.2 (from WO3) = 1.0.
Example 2
An employee scheduled to work 36 hours in a week during Shift 2 or Shift 3 will be paid for 40 hours. The auxiliary hours in this example are calculated across the pay week.
IF:
Is Scheduled Day( )
And Is Shift Num( 2 )
Or Is Shift Num ( 3 )
THEN:
Add Bonus Hours( 0.11, Pay Week, 1, AX1 )
And
Stop Processing( )
The employee is scheduled to work Monday to Friday. On Monday during the 2nd or 3rd shift, the employee posts 10 hours and receives 1.1 auxiliary hours (10 * 0.11). On Tuesday, the employee posts 9 hours. The auxiliary hours for Tuesday are calculated by adding the Monday and Tuesday hours and multiplying this sum by 0.11. Monday's auxiliary hours are then subtracted from this result (19 hours * 0.11 = 2.1 and 2.1 – 1.1 = 1.0). These calculations continue as the employee posts time on the remaining days in the pay week.
Example 3
In this example, auxiliary hours are calculated for both Project events and Meeting events, but the hours are calculated for different Auxiliary Durations. The following Auxiliary Hours rules are used:
IF:
Is Event Name( Meeting (DAY_WORKED) )
THEN:
Add Bonus Hours( 0.125, Post Date, 2, AX2 )
And
Stop Processing( )
IF:
Is Event Type( Labor ( Project ) )
THEN:
Add Bonus Hours( 0.125, Post Date, 1, AX1 )
And
Stop Processing( )
First, the employee posts 2.5 hours to PROJ1. To calculate the auxiliary hours for this transaction, 2.5 is multiplied by the Multiplier in the rule (2.5 hrs. * 0.125 = 0.3). The Auxiliary 1 Duration is now 0.3.
Next, the employee posts 4 hours to PROJ2. The duration for the day is now 6.5 hours (2.5 + 4.0 = 6.5). The 6.5 hours are multiplied by 0.125 for a total of 0.8. The auxiliary hours from PROJ1 are then subtracted from this amount (0.8 – 0.3 = 0.5) and this transaction receives 0.5 auxiliary hours. The Auxiliary 1 Duration is now 0.3 (from PROJ1) + 0.5 (from PROJ2) = 0.8.
Finally, the employee posts 1.5 hours to the Meeting event. For this event, a different rule is used and the auxiliary hours will be stored in Auxiliary Duration 2. The duration for the day is now 8.0 hours, multiplied by 0.125 = 1. Auxiliary Duration 2 now displays 1 hour.
At the end of the day, the employee has 0.8 hours in Auxiliary Duration 1 and 1 hour in Auxiliary Duration 2.
Example 4
In this example, auxiliary hours are calculated for both Project events and Meeting events, and the hours are calculated for different Auxiliary Durations. However, the auxiliary hours are calculated across all Auxiliary Durations.
This example is similar to Example 3, except that it uses the Add Bonus Hours All Aux Columns operand instead.
IF:
Is Event Name( Meeting (DAY_WORKED) )
THEN:
Add Bonus Hours All Aux Columns( 0.125, Post Date, 2, AX2 )
And
Stop Processing( )
IF:
Is Event Type( Labor ( Project ) )
THEN:
Add Bonus Hours All Aux Columns ( 0.125, Post Date, 1, AX1 )
And
Stop Processing( )
First, the employee posts 2.5 hours to PROJ1. To calculate the auxiliary hours for this transaction, 2.5 is multiplied by the Multiplier in the rule (2.5 hrs. * 0.125 = 0.3). The Auxiliary 1 Duration is now 0.3.
Next, the employee posts 4 hours to PROJ2. The duration for the day is now 6.5 hours (2.5 + 4.0 = 6.5). The 6.5 hours are multiplied by 0.125 for a total of 0.8. The auxiliary hours from PROJ1 are then subtracted from this amount (0.8 – 0.3 = 0.5) and this transaction receives 0.5 auxiliary hours. The Auxiliary 1 Duration is now 0.3 (from PROJ1) + 0.5 (from PROJ2) = 0.8.
Finally, the employee posts 1.5 hours to the Meeting event. For this event, a different rule is used and the auxiliary hours will be stored in Auxiliary Duration 2. The duration for the day is now 8.0 hours, multiplied by 0.125 = 1. The Meeting event has 1 auxiliary hour. However, because this rule calculates the auxiliary hours across all Auxiliary Durations, we must subtract the auxiliary hours from the previous events (0.3 for PROJ1 plus 0.5 for PROJ2 = 0.8) to get the Auxiliary Duration 2 amount. When we subtract 0.8 from 1, the Auxiliary Duration 2 amount is 0.2.
At the end of the day, the employee has 0.8 hours in Auxiliary Duration 1 and 0.2 hours in Auxiliary Duration 2.
Example 5
An employee is scheduled to work three 11.5 hour days for a total of 34.5 hours. The employee will be paid for 40 hours. To make sure the auxiliary hours do not exceed 5.5, a different multiplier is used depending on the day of the week. In addition, there is a daily cap on auxiliary hours.
IF:
Is Nth Scheduled Day( Pay Week, 3 )
THEN:
Add Bonus Hours With Cap( 0.16521739, Post Date, 1.9, 1, AX1 )
And
Stop Processing( )
IF:
Is Scheduled Day( )
THEN:
Add Bonus Hours With Cap( 0.15652174, Post Date, 1.8, 1, AX1 )
And
Stop Processing( )
For the first two days in the pay week, the employee earns 1.8 auxiliary hours (0.15652174 * 11.5). On the third day, the employee earns 1.9 auxiliary hours (0.16521739 * 11.5). If the employee works more than 11.5 hours on any of these days, the number of auxiliary hours earned will not exceed 1.8 or 1.9.
Click Main Menu > Configuration > Policies > Pay Policy.
Select the Pay Policy of employees who will be receiving the Auxiliary Hours, and click Modify.
From the Aux. Hours Ruleset field, select the ruleset you defined to calculate the Auxiliary Hours.
Click Save. Repeat these steps for any other Pay Policies that include Auxiliary Hours.
If event is configured to draw from a balance, both the worked hours and the auxiliary hours will draw from the balance. For example, an employee posts 8 hours of a Vacation event that draws from the Vacation balance. The Auxiliary Hours Ruleset specifies a multiplier of 0.125 with a Basis of Post Date. The employee has 8 worked hours and earns 1 Auxiliary Hour. The employee’s Vacation balance will be reduced by 9 hours. If the Vacation event is deleted or modified, the Vacation balance hours will be restored accordingly.
If an event is configured to draw from multiple balances, the transaction will split when one of the balances is depleted. For example, an employee posts a 12 hour Vacation event that draws from the Vacation balance and then from the PTO balance. The employee’s Vacation balance has 11 hours and the PTO balance has 1.1 hours. The transaction splits so that 11 hours are posted for the Vacation balance and 1 hour is posted for the PTO balance. The Vacation balance is now depleted and the PTO balance has 0.1 hours remaining.
The Auxiliary Hours Ruleset specifies a multiplier of 0.111111 with a Basis of Post Date. There are 1.2 Auxiliary Hours for the 11 hour transaction and 0.1 Auxiliary Hours for the 1 hour transaction. The 1.2 Auxiliary Hours cannot draw from the Vacation balance because it has been depleted; these Auxiliary Hours will not be covered by any balance. However, the 0.1 Auxiliary Hours will be covered by the PTO balance.
When Auxiliary Hours are calculated, they are stored in a particular Auxiliary Duration column in the trans_action_duration table (Auxiliary 1 Duration, Auxiliary 2 Duration, Auxiliary 3 Duration, Auxiliary 4 Duration, or Auxiliary 5 Duration). The Auxiliary Duration column is determined by the rule that is used to calculate the Auxiliary Hours (specifically, the Auxiliary Number parameter in the Add Bonus Hours operand).
The Auxiliary Duration and Auxiliary Pay Desg columns in the Transaction Duration form display the Auxiliary Hours and Pay Designators that have been calculated for a transaction. There are five Auxiliary Duration/Pay Desg columns (Auxiliary 1 Duration/Auxiliary 1 Pay Desg, Auxiliary 2 Duration/Auxiliary 2 Pay Desg, and so on). You may need to enable these columns in your Form Profile in order to view them in the form.
![]()
Note: You can change the name of the Auxiliary Duration columns that display on the Transaction Duration form. For example, you may want to change a column name from “Auxiliary 1 Duration” to “Bonus Hours 1 Duration.” To change the column name, use the Dictionary Label form.
The Transaction Duration Detail tab shows the Auxiliary portions of the transaction. These values can be specified in a payroll export. Note that the person must be assigned an Export Premium Policy in order to display data in this form.
![]()
Note that if the Payroll Rate is zero, the Payroll Amount will display the auxiliary hours (Auxiliary 1 Duration, Auxiliary 2 Duration, and so on, on the Transaction Duration form) as if the Payroll Rate was 1.0.
You can make Auxiliary Hours visible in the following timecard forms:
Daily Tab of Web Timecard (Self Service Time Card, Supervisor Review, and Labor Review)
Period and Weekly Tabs of Web Timecard (Self Service Time Card, Supervisor Review, and Authorized Hours)
Daily Timecard in a Client Terminal
Period and Weekly Timecard in a Client Terminal
Note: You can change the name of the Auxiliary Duration columns that display on the above forms. For example, you may want to change a column name from “Auxiliary 1 Duration” to “Bonus Hours 1 Duration.” To change the column name, use the Dictionary Label form.
You can display Auxiliary Hours columns in the Daily timecard of the following forms:
Self Service Time Card
Supervisor Review (Current Situation and Time Card Review)
Labor Review
These columns can be enabled in Form Profile.

Click Main Menu > Configuration > Form Configuration > Form Profile.
Select the Form Profile you want to modify.
On the left side of the form, expand the appropriate folders to select the form where you will show or hide the Auxiliary Duration columns.
To select the Self Service Time Card, go to Web > Self Service > Time Card. Select the Daily form.
To select the Current Situation form, go to Web > Manage > Supervisor Review > Current Situation. Select the Daily (Detail) form.
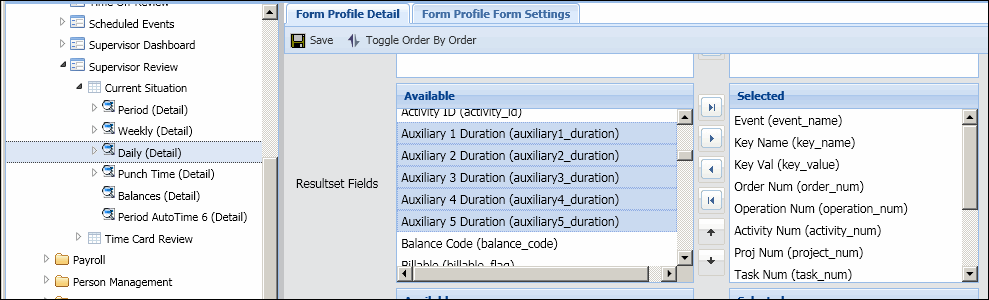
To select the Time Card Review form, go to Web > Manage > Supervisor Review > Time Card Review. Select the Daily (Detail) form.
To select the Labor Review form, go to Web > Manage > Labor Review. Select the Daily form.
On the Form Profile Detail tab on the right side of the form, go to the Resultset Fields area.
Move the Auxiliary Duration columns from Available to Selected. The items in the Selected box will be visible in the Daily timecard.
Click Save when you are done.
You can display Auxiliary Hours rows at the bottom of the Period and Weekly timecards in the following forms.
Self Service Time Card
Supervisor Review (Current Situation and Time Card Review)
Authorized Hours
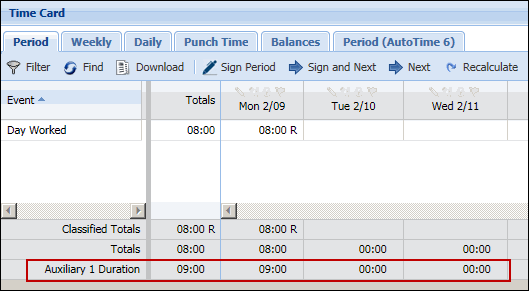
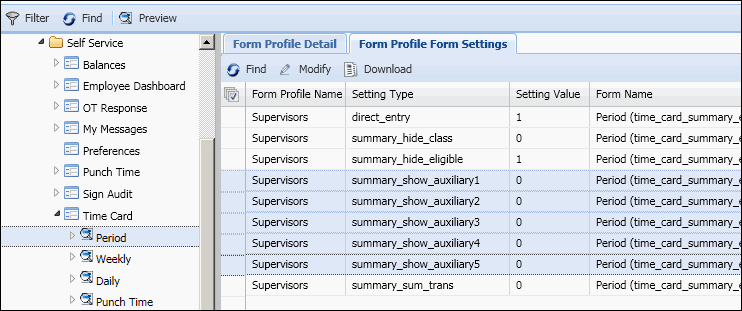
You can display up to five Auxiliary Duration rows - Auxiliary 1 Duration, Auxiliary 2 Duration, Auxiliary 3 Duration, Auxiliary 4 Duration, and Auxiliary 5 Duration. These rows are enabled by the summary_show_auxiliary settings in Form Settings.
Click Main Menu > Configuration > Form Configuration > Form Profile.
Select the Form Profile you want to modify.
On the left side of the form, expand the appropriate folders to select the form where you will show or hide the Auxiliary Duration rows.
To select the Self Service Time Card, go to Web > Self Service > Time Card. Select the Period or Weekly form.
To select the Current Situation form, go to Web > Manage > Supervisor Review > Current Situation. Select the Period (Detail) or Weekly (Detail) form.
To select the Time Card Review form, go to Web > Manage > Supervisor Review > Time Card Review. Select the Period (Detail) or Weekly (Detail) form.
To select the Authorized Hours form, go to Web > Manage > Authorized Hours. Select the Period or Weekly form.
On the Form Settings tab, select the Setting Type called summary_show_auxiliary1, summary_show_auxiliary2, and so on. Each setting corresponds to an Auxiliary Duration column. For example, select summary_show_auxiliary1 to show or hide the Auxiliary Duration 1 row in the timecard.
Click Modify.
Change the Setting Value to 1 if you want to show the Auxiliary Duration row. Change the Setting Value to 0 if you want to hide the Auxiliary Duration row.
Click Save when you are done.
You can display Auxiliary Hours columns in the client terminal's Daily Timecard. This Daily Timecard is available on client terminals and the Web Time Clock.
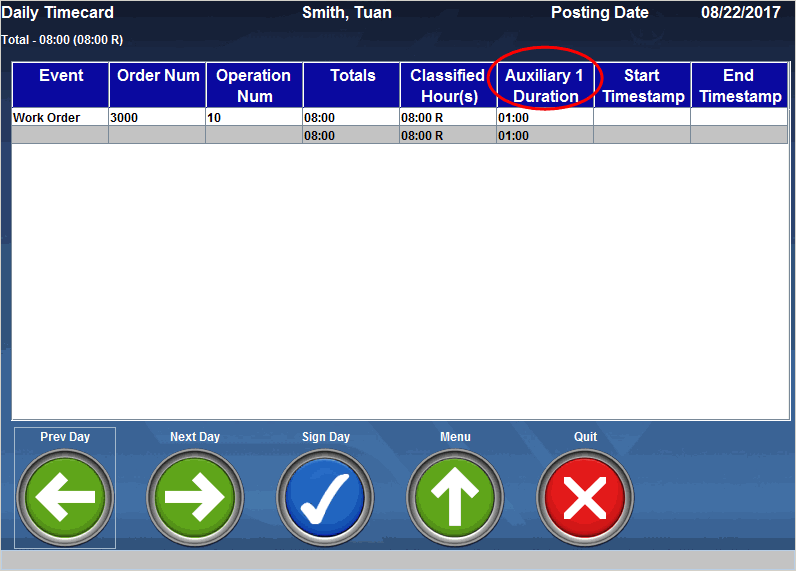
These columns can be enabled in Form Profile.
Click Main Menu > Configuration > Form Configuration > Form Profile.
Select the Form Profile you want to modify.
On the left side of the form, click Terminal Forms > Daily Timecard.
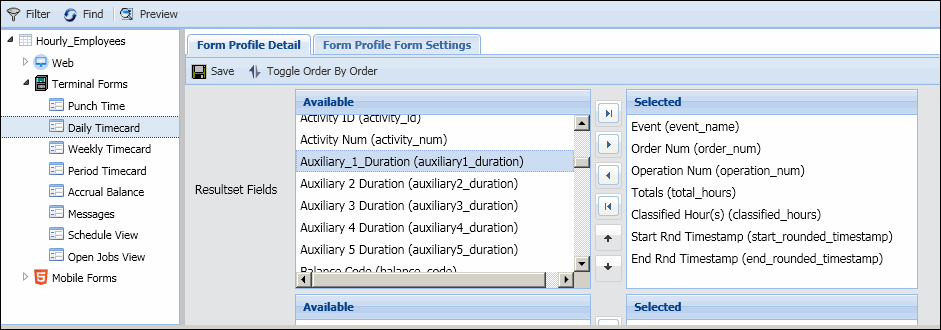
On the Form Profile Detail tab on the right side of the form, go to the Resultset Fields area.
Move the Auxiliary Duration columns from Available to Selected. The items in the Selected box will be visible in the Daily Timecard.
Click Save when you are done.
You can display Auxiliary Hours columns in a client terminal's Period and Weekly Timecards. These timecards are available on client terminals and the Web Time Clock.
The total for each Auxiliary Hours column will appear in the summary row for each day. These columns can be enabled in Form Profile.
You can also display a Grand Total row at the bottom of the period/week timecard that shows the total for each duration column. This row can be enabled in Form Settings.
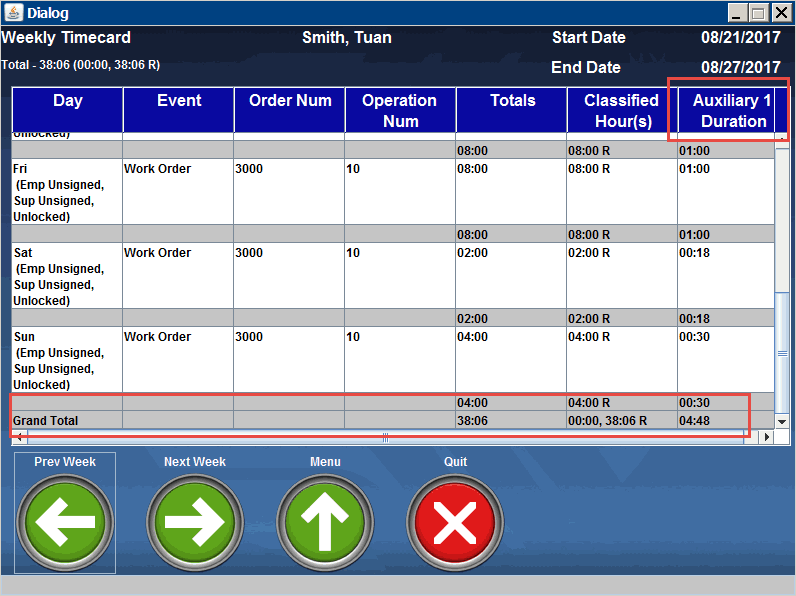
Click Main Menu > Configuration > Form Configuration > Form Profile.
Select the Form Profile you want to modify.
On the left side of the form, click Terminal Forms > Period Timecard or Weekly Timecard.
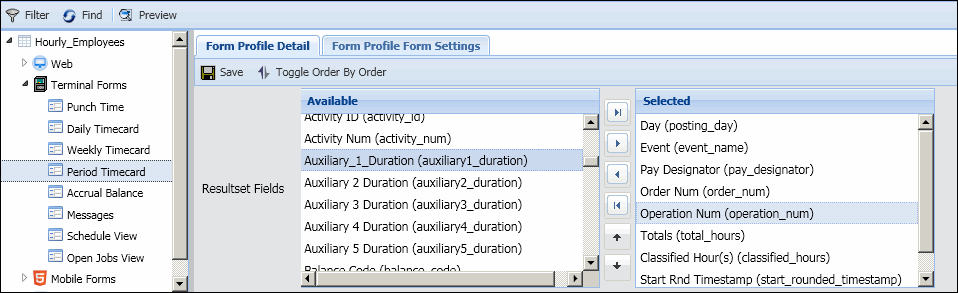
On the Form Profile Detail tab on the right side of the form, go to the Resultset Fields area.
Move the Auxiliary Duration columns from Available to Selected. The items in the Selected box will be visible in the Daily Timecard.
Click Save when you are done.
To show or hide the Grand Total row in the Period or Weekly Timecard, click the Form Settings tab.
Select the show_grand_total setting and click Modify.
Change the Setting Value to 1 if you want to show the Grand Total row. Change the Setting Value to 0 if you want to hide the Grand Total row.
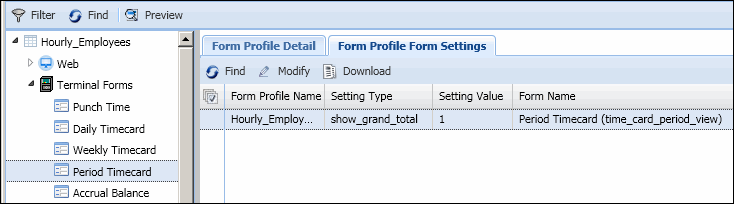
Click Save when you are done.
You can include Auxiliary Hours in your payroll export by using the following operands:
Get Balance Duration: Use this operand to export the Auxiliary Hours in a transaction that draw from a balance.
Get Auxiliary Duration: Use this operand to export the Auxiliary Hours in a transaction that do not draw from a balance.
Is Auxiliary Pay Code: Use this operand to identify Auxiliary Hours by their pay designator and the Auxiliary Duration column in the trans_action_duration table.
See Export Rules Operands for details on these operands and their parameters.
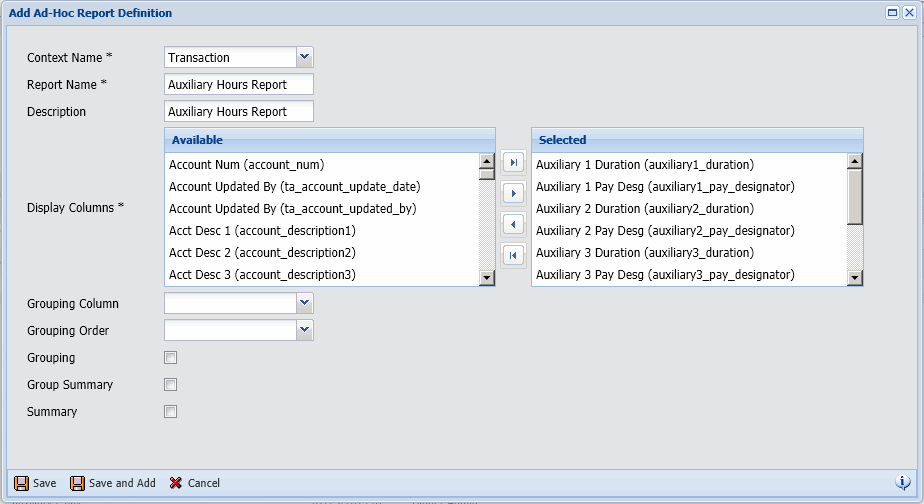
To create a report with Auxiliary Hours, use the Ad-Hoc Report Definition form.
Create a report with the Transaction context. You can select which Auxiliary Duration and Auxiliary Pay Designators to include.