.jpg)
Detail Forms: Columns, Filter, Advanced Criteria, Default Order
The Ad-Hoc Report Definition form allows you to create custom reports with person, action, or transaction data. You can select which columns to include in the report, add filters, group the data, and summarize the data. You can also use Advanced Criteria to define additional criteria that will be used to select data for the report.
The Ad-Hoc Report Definition form is used to create and preview the Ad Hoc Report. To run and print the report, use the Ad-Hoc Reports form.
See Also:
Ad-Hoc Report Definition Field Descriptions
Find an Ad Hoc Report Definition
Create an Ad Hoc Report Definition
Modify or Delete an Ad Hoc Report Definition
Copy an Ad Hoc Report Definition
Supported Columns for Ad Hoc Reports
Context Name
The report’s Context determines which table columns can be included in the report. For example, if you select the Person context, your report can include data such as Badge Number, Email Address, and Hire Date. If you select the Action context, your report can include data about specific event postings.
Available options are Action, Export Audit, Person, and Transaction. See Supported Columns for Ad Hoc Reports.
Report Name, Description
Enter the Report Name that will be used to select the report on the Ad-Hoc Reports form. The Description is optional.
Display Columns
The Available columns will depend on the Context you selected. If you want to include a column in the report, move it from the Available box to the Selected box. The columns in the Selected box will be included in the report.
You can change the order of the columns by dragging them to a different position in the Selected box. You can also change the order of the columns using the Columns tab on the Ad-Hoc Report Definition form.
Grouping Column
If you want to group the data in the report, select a Grouping Column. For example, you may define a report that lists the punches for a group of employees on a specific date. If you want the report to group the data for each employee, select Person Num as your Grouping Column.
You must also check the Grouping box to ensure the data is grouped according to the Grouping Column.
.jpg)
Grouping Order
Order in which the data in the Grouping Column will be sorted. Select Ascending (A-Z or 1-10) or Descending (Z-A or 10-1). The default value is Ascending.
Grouping
If you selected Grouping Column, you need to check the Grouping box to group the report data by the specified column. If you do not check this box, the data will not be grouped.
Group Summary
If you want to add a summary row to each Group in the report, check this box. Numeric data can be summarized (e.g., a sum of an employee’s hours worked). You will define the summary columns and methods in the Columns tab of the Ad-Hoc Report Definition form.
Summary
If you want to add a summary row for the entire report, check this box. Numeric data can be summarized (e.g., a sum of an employee’s hours worked). You will define the summary columns and methods in the Columns tab of the Ad-Hoc Report Definition form.
System Required
When this box is checked, the Ad Hoc Report Definition is system required and cannot be modified.
Update Date, Updated By
These fields display when the record was created or updated, and the person who created or updated the record.
Click the ![]() Filter icon at the top of
the form to display the Context Name
filter. Select the Context of the reports you want to view, or leave this
field blank to view all the Ad Hoc Report Definitions. Then click Find.
Filter icon at the top of
the form to display the Context Name
filter. Select the Context of the reports you want to view, or leave this
field blank to view all the Ad Hoc Report Definitions. Then click Find.
Click Main Menu > Configuration > Form Configuration > Ad-Hoc Report Def and click Add.
Select the Context Name for your report and enter a Report Name.
Use the Display Columns section to select the data you want to include in the report. Move a column from the Available box to the Selected box to include it in the report.
If you want to group the data in the report, select a Grouping Column. For example, if you want your Action report to group the data for each employee, select Person Num as your Grouping Column. You must also check the Grouping box and specify a Grouping Order for the column (Ascending or Descending).
If you want to add a summary row to each Group in the report, check the Group Summary box. Only numeric data can be summarized (e.g., a sum of an employee’s hours worked). You will define the summary columns and methods in the Columns tab of the Ad-Hoc Report Definition form.
If you want to add a summary row for the entire report, check the Summary box. Only numeric data can be summarized (e.g., a sum of an employee’s hours worked). You will define the summary columns and methods in the Columns tab of the Ad-Hoc Report Definition form.
If you want to add more than one Ad Hoc Report Definition, click Save and Add to save your settings and keep the Add window open. Or click Save to save your Ad Hoc Report Definition and return to the main form.
To modify an Ad Hoc Report Definition, select the record and click Modify. You can change all the settings except the Context Name and Report Name. Click Save when you are done.
To delete an Ad Hoc Report Definition, select the record and click Delete.
You can use the Copy button to replicate reports that are used for different sites in your company.
Select the report on the Ad Hoc Report Definition form and click Copy.
Change the Report Name.
You can change all the other settings in the report except the Context Name.
Click Save when you are done. Or click Save and Add to save the current settings and keep the Copy window open so you can duplicate the report again.
The duplicate report will have the same Filter, Advanced Criteria, and Default Order settings as the original. You can modify these settings in their respective tabs.
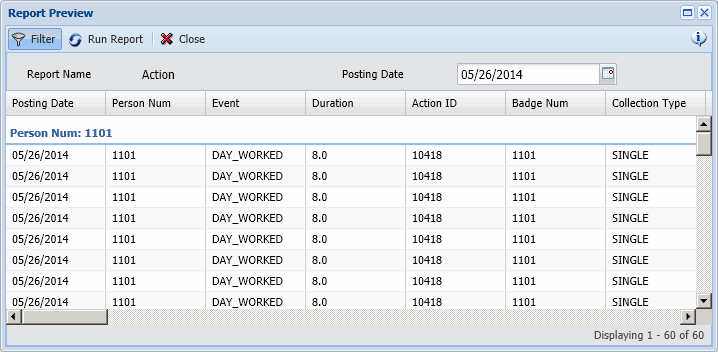
The Preview button displays the report in the same format that it will display on the Ad Hoc Reports form. Filter fields will be visible as well as any summary rows or grouping columns you have defined.

In the Report Preview window, you can change the order of the columns, show/hide columns, and change the sort order of the columns. These column configurations can also be done on the Ad-Hoc Reports form. See Configuring and Sorting Columns in the Ad-Hoc Reports Form.
The View SQL button in the Preview window displays the query used to obtain the report.
The query will be based on the filter settings, if any, that you configure in the Preview window.
If the View SQL button is not visible, you will have to enable it in your Security Role.
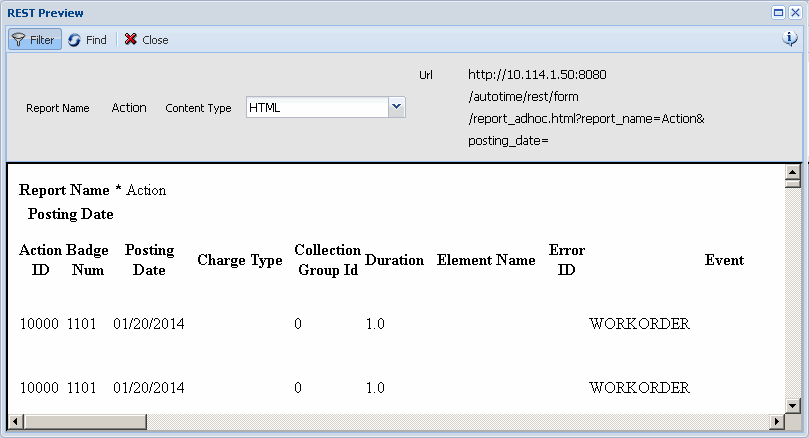
The REST Preview button displays the report in HTML, JSON, XHTML, XSD, or XML format. Filter fields, summary rows, and groupings will not be visible.
You can change the Content Type and click Find to see how the report will look in a different format.
Note: REST Preview displays better in Firefox than Internet Explorer due to browser limitations.

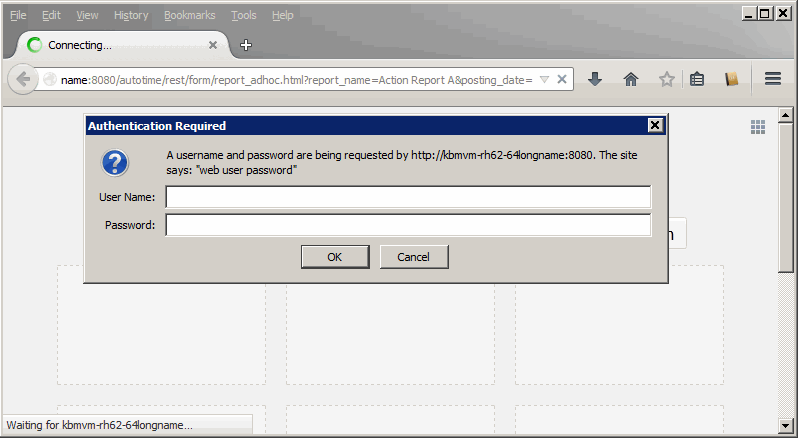
The URL displayed at the top of the REST Preview form can be used to view the report from a web browser. When you enter this URL in your browser window, you will be asked for your username and password.

Enter your Shop Floor Time User Name and Password to continue.
Your login attempts will be subject to the Password Profile that is assigned to you. These settings also apply when you log into the Shop Floor Time application. If you enter the wrong password too many times (exceeding the Max Pwd Tries setting), then your password will have to be reset before you can view the report or log into the Shop Floor Time application again. For example, your Max Pwd Tries is 5 and you have entered the wrong password 4 times when logging into the application. If you enter the wrong password 2 more times when logging into an Ad Hoc Report, you will have exceeded the Max Pwd Tries setting. The message Exceeded Login Attempts will display the next time you log into the application.
The URL displayed at the top of the REST Preview form has the following format:
http://{host}:{port}/{application}/rest/form/report_adhoc[.{content_type}]?report_name={report_name}[&{filter}]
host: The host name of the application server.
port: The port of the application server.
application: The name of the application (autotime).
content_type: Format that determines how the report data will be displayed (html, jsn, xhtml, xsd, xml).
report_name: The name of the report as defined on the Ad-Hoc Report Definition form.
filter: Each filter field must be separated by an ampersand (&). You can also include a value for the filter field (for example, &person_num=1101).
Example – URL for the html report named “Person” from localhost on port 8080:
http://localhost:8080/autotime/rest/form/report_adhoc.html?report_name=Person
Example – URL for the html report named “Action” from localhost on port 8080 for Person Number 1102:
http://localhost:8080/autotime/rest/form/report_adhoc.html?report_name=Person&person_num=1102
If your REST URL includes a date or timestamp filter, you will need to format the date you enter. The date format must match the rest_date_format or rest_datetime_format Application Settings. If the date/time you enter in the filter is not formatted according to these settings, the date filter will not be used to obtain the report data.
For example, the URL for the following Action Report includes a filter for the Posting Date:
http://kasgvm:8080/autotime/rest/form/report_adhoc.html?report_name=Action Report A&posting_date=
You want to view the report data for October 6, 2014 and the rest_date_format Application Setting is yyyy-MM-dd. Your URL would be:
http://kasgvm:8080/autotime/rest/form/report_adhoc.html?report_name=Action Report A&posting_date=2014-10-06

If you use the Advanced Criteria tab to add more specific selection criteria for the report data, the Validate button will verify that the database queries are able to run successfully.
Select the Ad Hoc Report Definition and click Validate. A Validate Successful message will display if the Advanced Criteria have been defined correctly. Otherwise an error message will display.
The columns you can include in an Ad Hoc Report will depend on the Context of your report (Action, Export Audit, Person, or Transaction).