Ad Hoc Reports Feature
Ad Hoc Reports are custom reports with person, action,
or transaction data. You can select which columns to include in the report,
add filters, group the data, and summarize the data. You can also use
Advanced Criteria to define additional criteria that will be used to select
data for the report.
The Ad-Hoc Report Definition
form is used to create and preview the Ad Hoc Report. To run and print
the report, use the Ad-Hoc Reports form.
You can use your Security
Roles to configure which employees have access to the Ad Hoc Report
forms. For example, an administrator may have access to the Ad-Hoc Report
Definition form in order to create the report. A supervisor may only need
access to the Ad Hoc Reports form so he or she can run the report.
The reports that are available in the Ad-Hoc Reports form
will depend on how the ADHOC_REPORT_NAME item is configure in the user’s
Security Data Role.
See Also:
License Requirements
Defining the Ad Hoc
Report
Preview
Viewing SQL
REST Preview
Viewing and
Printing the Ad Hoc Report
License
Requirements
This feature requires the following:
To check if the module is included
in your license and enabled:
Click Main
Menu > Configuration > System > Licensing.
On the License Modules tab,
select Adhoc Reports Viewer and Definition
under the Module Name column.
Ensure that the following check
boxes are selected: Licensed
and Module Enabled.
Defining
the Ad Hoc Report
The Ad-Hoc Report Definition
form (Main Menu > Configuration
> Form Configuration > Ad-Hoc Report Def) is used to define
the Ad Hoc Reports.
The Ad-Hoc Report Definition form has the following detail
tabs:
Columns:
You can use this form to reorder and delete the columns in the Ad
Hoc Report. If a column has numeric values and you have Summary or
Group Summary selected in your Ad Hoc Report Definition, you can modify
the summary method using this tab.
Filter:
The Filter tab is used to assign filters to an Ad Hoc Report. The
user who runs the report can use the Filter to limit the report data.
Advanced
Criteria: Use this tab to define criteria for the SQL WHERE
clause that will be used to select data for the report. For example,
you may want to create a report that shows the hours each employee
posted on a certain date, but you want to exclude Meal events. You
would create a record in the Advanced Criteria tab that specified
which event name to exclude.
Default
Order: Use this tab to define the default sort order for the
columns in the report.
Preview
The Preview
button displays the report in the same format that it will display on
the Ad Hoc Reports form. Filter fields will be visible as well as any
summary rows or grouping columns you have defined.
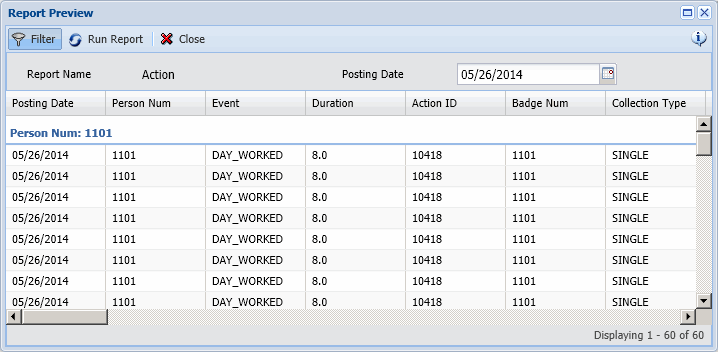
In the Report Preview window, you can change the order
of the columns, show/hide columns, and change the sort order of the columns.
These column configurations can also be done on the Ad-Hoc Reports form.
See Configuring
and Sorting Columns in the Ad-Hoc Reports Form.
Viewing SQL
The View SQL button
in the Preview window displays the query used to obtain the report.
The query will be based on the filter settings, if any,
that you configure in the Preview window.
If the View SQL
button is not visible, you will have to enable it in your Security
Role.
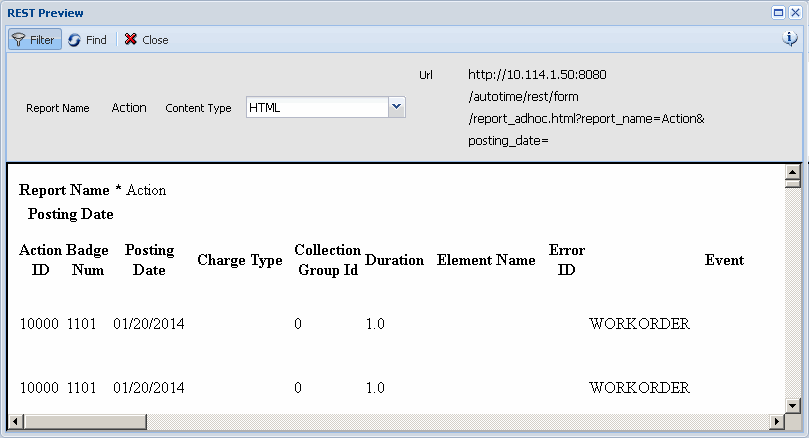
REST Preview
The REST Preview
button displays the report in HTML, JSON, XHTML, XSD, or XML format. Filter
fields, summary rows, and groupings will not be visible.
You can change the Content
Type and click Find to
see how the report will look in a different format.
Note:
REST Preview displays better in Firefox than Internet Explorer due to
browser limitations.
View the REST Report in a Web Browser
The URL
displayed at the top of the REST Preview form can be used to view the
report from a web browser. When you enter this URL in your browser window,
you will be asked for your username and password.

Enter your Shop Floor Time User Name and Password to continue.
Your login attempts will be subject to the Password
Profile that is assigned to you. These settings also apply when you
log into the Shop Floor Time application. If you enter the wrong password
too many times (exceeding the Max Pwd
Tries setting), then your password will have to be reset before
you can view the report or log
into the Shop Floor Time application again. For example, your Max Pwd
Tries is 5 and you have entered the wrong password 4 times when logging
into the application. If you enter the wrong password 2 more times when
logging into an Ad Hoc Report, you will have exceeded the Max Pwd Tries
setting. The message Exceeded Login
Attempts will display the next time you log into the application.
Format of the REST URL
The URL displayed
at the top of the REST Preview form has the following format:
http://{host}:{port}/{application}/rest/form/report_adhoc[.{content_type}]?report_name={report_name}[&{filter}]
host: The host
name of the application server.
port: The port
of the application server.
application: The
name of the application (autotime).
content_type: Format
that determines how the report data will be displayed (html, jsn, xhtml,
xsd, xml).
report_name: The
name of the report as defined on the Ad-Hoc Report Definition form.
filter: Each filter
field must be separated by an ampersand (&). You can also include
a value for the filter field (for example, &person_num=1101).
Example – URL for the html report named “Person” from
localhost on port 8080:
http://localhost:8080/autotime/rest/form/report_adhoc.html?report_name=Person
Example – URL for the html report named “Action” from
localhost on port 8080 for Person Number 1102:
http://localhost:8080/autotime/rest/form/report_adhoc.html?report_name=Person&person_num=1102
Formatting the Date Filter in a REST Report
If your REST URL includes a date or timestamp filter, you
will need to format the date you enter. The date format must match the
rest_date_format or rest_datetime_format
Application Settings. If the date/time you
enter in the filter is not formatted according to these settings, the
date filter will not be used to obtain the report data.
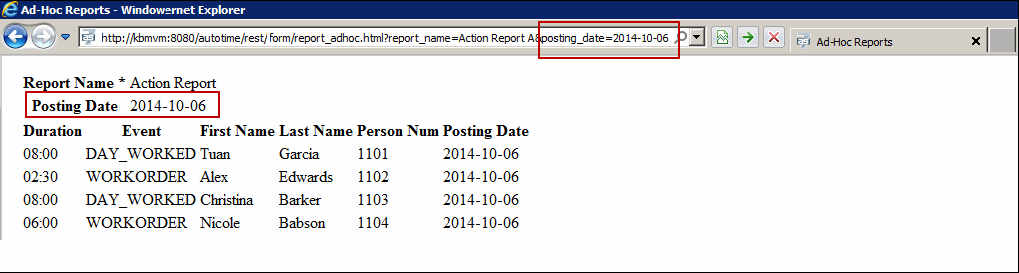
For example, the URL for the following Action Report includes
a filter for the Posting Date:
http://kasgvm:8080/autotime/rest/form/report_adhoc.html?report_name=Action
Report A&posting_date=
You want to view the report data for October 6, 2014 and
the rest_date_format Application Setting is yyyy-MM-dd.
Your URL would be:
http://kasgvm:8080/autotime/rest/form/report_adhoc.html?report_name=Action
Report A&posting_date=2014-10-06
Viewing
and Printing the Ad Hoc Report
The Ad-Hoc Reports form
(Main Menu > Reporting > Ad-Hoc
Reports) allows you to view and print reports created on the Ad-Hoc
Report Definition form.
You can configure which employees can access this form
by enabling it or disabling it in a Security
Role.
You can define which Ad Hoc Reports a user can access by
configuring the ADHOC_REPORT_NAME item in the user’s Security
Data Role.
Once you run the report, you can click Print
Report to display your browser’s Print form and print the report.
You can also click Download to
open or save the report as a .CSV file.