Job Codes
A Job Code is a type of charge element that can be assigned
to a person to represent the type of work a person does. A Job Code can
also be assigned a Payroll Rate and a Labor Rate. You can define your
Job Codes using the Charge Element form or you can import them. You can
also export the Job Codes on transactions for payroll purposes.
A transaction’s Job Code will come from the Employee Assignment
of the person who posts the transaction. It can also come from a Job Code
event prompt or a Transient Assignment event. The Job Code event prompt
or Transient Assignment event will override the person’s assigned Job
Code on the transaction.
See Also:
License Requirements
Defining Job Codes
Assigning Job Codes
Configuring
the Job Code Event Prompt
Transfer Job Code (Transient
Assignment) Event
Exporting Job Codes
License
Requirements
This feature requires the
following:
To check if the module is included in your license and
enabled:
Click Main
Menu > Configuration > System > Licensing.
On the License
Modules tab, select the Module Name
called Pay Rates.
The following boxes must be
checked: Licensed and Module Enabled.
Defining Job
Codes
You can define your Job Codes and rates using the Charge
Element form or you can import them.
On the Charge Element
form, click Add and select the Charge Type and Element Name JOB_CODE. Job Codes have only one
level. In the Element Value field, enter the name of the Job Code (e.g.,
General Labor).
To add rates to the Job Code, use the Element
Premium/Rate tab. You can add a PAYROLL_RATE
and a LABOR_RATE. These options
are system-defined. You can view them in the Premium Master form.
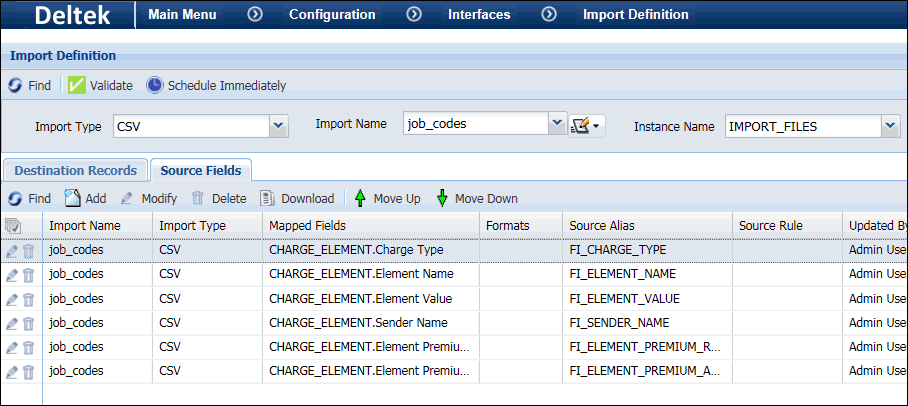
To import Job Codes, you need to define an Import
Definition with the Charge Element
context.
Create a .csv file with the
job codes you want to import. This file must include the Charge Type,
Element Name, Element Value, and Sender Name.
Use the Import
Definition form to create an import with the Charge
Element context.
Include the payroll and labor rate for each job code if needed.
Configure an instance of the
IMPORT_FILES service
that includes your import definition.
You can run the IMPORT_FILES
service via a schedule. You can also run it immediately using the
Service Monitor form or the Schedule Immediately button on the Import
Definition form.
The imported job
codes will be visible on the Charge Element form.
Assigning
Job Codes
You can assign a Job Code to a person using the Assignment
tab of the Employee form. You can also import these assignments. This
Job Code and its rates will be associated with all the transactions the
person posts (unless the override Job Code event prompt is used).
On the Employee form,
select a person record and click the Assignment
tab. Click Add and select the Assignment Type JOB_CODE. For the
Assignment Value, select the name of the Job Code.
To import Job Code assignments, you need to define an Import Definition with the Employee
Assignment context.
Create a .csv file with the
job code assignments you want to import. This file must include the
Assignment Type, Assignment Value, and Person Number.
Use the Import
Definition form to create an import with the Employee Assignment
context.
Configure an instance of the
IMPORT_FILES service
that includes your import definition.
You can run the IMPORT_FILES
service via a schedule. You can also run it immediately using the
Service Monitor form or the Schedule Immediately button on the Import
Definition form.
The imported job code assignments
will be visible on the Assignment tab of the Employee form.
Configuring
the Job Code Event Prompt
You can add the Job Code prompt to your attendance and
labor events (except CLOCK events). When the user enters a Job Code with
this prompt, the value entered will override the user’s assigned Job Code.
The Job Code for the event will be the one entered by the user at the
event prompt.
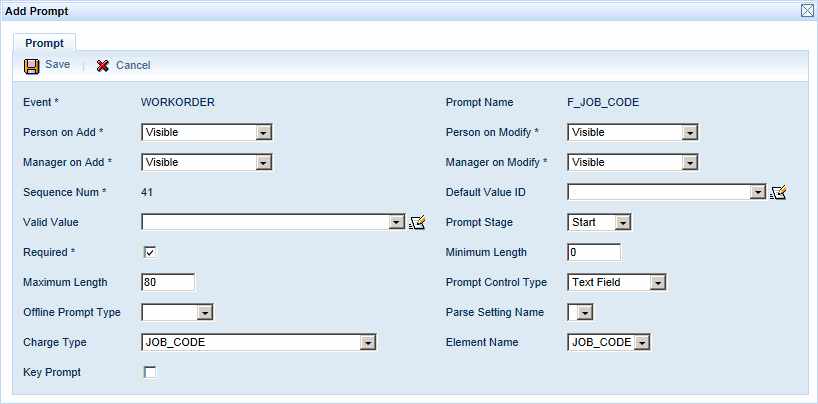
To add the Job Code prompt to an event, go
to the Events form (Main Menu
> Configuration > Event > Events). On the Prompt tab, click Add
and select the F_JOB_CODE prompt.
You can view Job Code Rates on the Transaction
Rate form.
Transfer
Job Code Event
You can use a Transient
Assignment event to assign a Job Code to an employee for part of a
day. The application includes two Transient Assignment events for assigning
a Job Code: TRANSFER_JOB_CODE
and TRANSFER_JOB_CODE_IMMEDIATE.
For example, a supervisor asks an employee to perform cleanup
tasks for the remainder of a work day. The Job Code for these tasks is
Scrub Crew and it has a Pay Rate
of 25.00/hour. The employee posts a TRANSFER_JOB_CODE_IMMEDIATE event
and selects the Scrub Crew Job
Code. The employee continues his cleanup duties; this Job Code remains
in effect until the employee clocks out for the day. If the employee forgets
to post the Transfer Job Code event, his supervisor will correct the timecard
the next day. The supervisor will use Add Punch Pair to post a TRANSFER_JOB_CODE_IMMEDIATE
event to the employee’s timecard and select the Scrub
Crew Job Code, ensuring the employee is paid correctly for the
hours he performed cleanup.
Exporting
Job Codes
You can export the Job Codes on transactions for payroll
purposes. You will need to add the JOB_CODE field to your Export Definition,
and you will need to configure an Export Rule to get the Job Codes from
the transactions.
To define an Export Rule, use the Calc Rule and Rulesets
forms.
Export Rule Operands:
The Get Trans Action
Data Field operand has been updated to allow the selection of Job
Codes.
A new Export Rule operand, Get
Transaction Rate, can be used to get the rate for a particular
Job Code.
Paid Rate Operands:
Two operands have been added to find the rate for a specific
Job Code in a transaction. Get Transaction
Rate finds the rate for a specific rate type (e.g., Job Code) in
a transaction. Has Transaction Rate
checks to see if a transaction has a specific rate type (e.g., a Job Code).