Parse Setting
Detail Form: Parse
Setting Detail
The Parse Setting form is used to configure how event prompt
input data is recorded and analyzed by barcode scanners and magnetic stripe
readers that are attached to a client terminal. When an event prompt includes
a Parse Setting, the system will check to see if a Barcode Prefix is required
or if the prompt value has been concatenated. If the Parse Setting includes
a Barcode Prefix, the system will check to see that the correct prefix
has been scanned or typed in the event prompt field. If the Parse Setting
includes Detail records, the system will split the concatenated prompt
value across multiple prompts (e.g., scanning a combined work order/operation
number will populate the work order and operation prompts with the correct
values).
Once you define your Parse Setting, you will need to assign
it to an event prompt using the Prompts tab on the Events form.
See Also:
Enable the PVE Plugin
Parse
Setting Field Descriptions
Find
a Parse Setting
Add
a Parse Setting
Copy,
Modify, or Delete a Parse Setting
Assign
the Parse Setting to an Event Prompt
Support
Non-Printing Characters in Parse Setting
Enable
the PVE Plugin
You must enable the PVE Plugin
called PROCESS_PARSE_SETTING in order to use this feature.
Click Main
Menu > Configuration > System > PVE Plugin.
Select the PROCESS_PARSE_SETTING
record and click Modify.
Check the Enabled
box and click Save.
Parse
Setting Field Descriptions
Parse Setting Name
Name of the Parse Setting.
Description
Description of the Parse Setting.
Barcode Prefix
One or more characters that must be added to the beginning
of a prompt value for it to be validated. The Barcode Prefix can be up
to 10 characters long.
Make sure the scanner connected to your terminal is configured
to add the same Barcode Prefix to event prompt values.
When an event prompt includes a Parse Setting with a Barcode
Prefix, the system will check to see that the correct prefix has been
scanned or typed in the event prompt field on the client terminal.
If the event prompt value that you scanned or typed does
not include this prefix, an error message may display (depending on the
Barcode Pre Required setting).
If the Barcode Prefix is a non-printing
character, the user will not be able to type the value in the prompt
field and will have to scan it instead. This feature can be used to ensure
users will scan values instead of typing them (e.g., to prevent a user
from entering another user’s badge number).
Note: The &
and \ characters cannot be used as a Barcode Prefix.
Barcode Pre Length
Number of characters of the Barcode Prefix. Automatically
updated by the system. For example, if you enter XX in the Barcode Prefix
field, the Barcode Pre Length will be 2.
Barcode Pre Required
Check this box if the Barcode Prefix is required. If the
user scans or types a value that does not include this prefix, an error
message will display and the prompt value will not be validated.
Do not check this box if your Parse Setting includes Detail
records for concatenated barcodes.
If you want to ensure that the user will scan a barcode
for the prompt value instead of typing it, use a non-printing character
as your Barcode Prefix and check this box. Refer to the Example in Support
Non-Printing Characters in Parse Setting for more information.
Update Date, Updated By
These fields display when the record was created or updated,
and the person who created or updated the record.
Find a
Parse Setting
Click Main
Menu > Configuration > Event > Parse Setting.
The available settings appear in the middle of the
form.
To select a specific setting,
select it from the Parse Setting
Name filter field. If necessary, click the  Filter button to display this field. Then click Find.
Add a Parse
Setting
Click Main
Menu > Configuration > Event > Parse Setting and click
Add.
Enter values in the Parse
Setting Name, Description,
Barcode Prefix, and Barcode Pre Required fields.
Note: The
& and \ characters cannot be used as a Barcode Prefix.
Click Save.
If you are planning to use concatenated
barcodes (e.g., scanning a combined work order/operation number will
populate the work order and operation prompts with the correct values),
navigate to the Parse Setting Detail
tab to add detail records.
When you are done creating your
Parse Setting record, assign
it to an event prompt via the Prompt tab of the Events form.
Copy,
Modify, or Delete a Parse Setting
To duplicate a Parse Setting,
select the record and click Copy.
Change the settings as necessary and click Save or Save and Add.
To modify a Parse Setting, select
the record and click Modify.
You can change all the settings except the Parse Setting Name. Click
Save when you are done.
To delete a Parse Setting, select
the record and click Delete.
You cannot delete a Parse Setting that has been assigned
to an event prompt.
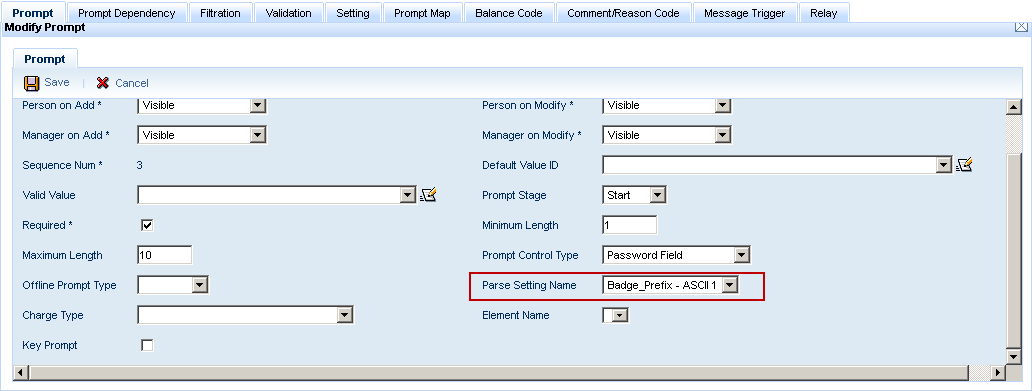
Assign
the Parse Setting to an Event Prompt
Click Main
Menu > Configuration > Event > Events and select the
event that will use the Parse Setting.
For example:
If the Badge Number prompt requires a Barcode Prefix,
select the Login event that is assigned to your Terminal Profile.
If you want to use a concatenated value for the
Order and Operation prompts (scanning a combined work order/operation
number will populate the work order and operation prompts with the
correct values), select the Work Order event that includes these prompts.
On the Prompt
tab of the Events form, select the event prompt that will use
the Parse Setting.
For example, select the F_BADGE_NUM prompt for the
Login event. Or, if your Parse Setting Details specify a concatenated
value for the Order and Operation prompts, select the first prompt
in the sequence (e.g., F_ORDER_NUM). See Parse
Setting Detail for more information.
Click Modify.
In the Parse
Setting Name field, select the Parse Setting that will be used
for this prompt.
Click Save.