Detail Form: Settings
The InTouch Config form defines the settings used by InTouch terminals with Shop Floor Time. The InTouch Config settings can be assigned to an InTouch terminal as a Terminal Setting or a Terminal Profile Setting.
An InTouch Config record has required settings that display in the top half of the form. The Settings tab allows you to include additional configuration settings.
After you update the settings in this form, you need to use the Reload Configuration button on the Terminal Monitor form to send your changes to the terminal.
See Also:
Upgrading – Importing the InTouch Config Settings
The DEFAULT record on the InTouch Config form is a system-required record that cannot be deleted. However, you can use the Copy button to duplicate this record (or any other record on the form) and then modify the duplicate as necessary. The original record's Badge Format and Settings configurations will also be included in the duplicate record.
To add a new InTouch Config record, click Add. Enter a Configuration Name for the record and modify the settings as needed. Click Save or Save and Add when you are done.
Use the Modify button on the InTouch Config form to change the required settings that display in the top half of the form. You can modify each option on the Settings tab individually. Click Save when you are done.
To delete an InTouch Config record, select the record in the top half of the form and click Delete. You cannot delete an InTouch Config record that has been assigned to a Terminal or Terminal Profile setting. You also cannot delete the System Required DEFAULT InTouch Config record.
To add settings to an InTouch Config record, select the record in the top half of the form and then click the Settings tab in the bottom half of the form.
After you update the settings on the InTouch Config form, you need to use the Reload Configuration button on the Terminal Monitor form to send your changes to the affected terminals.
This section explains the settings in the top half of the InTouch Config form. Additional settings can be added on modified on the Settings tab of this form.
Soft Key Start Post
This setting determines where the first soft key will display on the InTouch terminal screen. The default value is 9, which is the first button on the second page of the terminal, where the offline buttons display. Position 1 is reserved for the Scan Badge button and should not be used.
The images that display for the offline buttons can be configured on the Terminal Event Image form.
Number of seconds after which kiosk events will time out and stop displaying on the terminal. Kiosk events are view-only events - such as Accruals View, Messages View, Open Jobs View, and Time Card View - that display information to the user.
Length of time an error message (red background) or a warning message (yellow background) will appear (e.g., Invalid Badge).
The value is in tenths of a second. For example, a value of 30 would indicate 3 seconds
Length of time a success message (green background) will appear (e.g., Clock In Successful).
The value is in tenths of a second. For example, a value of 50 would indicate 5 seconds.
Data Resp Duration
This setting is currently not used.
Date Display Format
Date and time format for the terminal (e.g., Day/Month/Year = DMY). Select DMY, MDY, YDM, or YMD.
Month Format
Determines how months will appear in the date field on the terminal. Select MMM to display a three-letter abbreviation for the month (JAN, FEB, MAR, etc.). Select MMMM to display the full name of the month.
Day Format
Determines how days will appear in the date field on the terminal. Select d to display a single digit for days 1-9. Select dd to display two digits for all days (e.g., 01, 02, 10, 11, etc.).
Year Format
Determines whether a two-digit (yy) or four-digit (yyyy) will appear in the date field on the terminal.
Date Separator
Determines which character is used to separate the day, month, and year in the date field on the terminal. You can select a dash (-) or no character.
Time Format
Determines how the time will display on the terminal. Select 12hour to display 12-hour time (a.m./p.m.). Select 24hour to display time in a 24-hour format (e.g., 1:00 a.m. in 24-hour format is 13:00).
Template Dist (min)
How often (in minutes) the terminal will check the Shop Floor Time application server for new fingerprint templates.
Use the Settings tab to add, modify, or delete the settings explained below to an InTouch Config record.
Alphanumeric Badges
Requires version 03.00.03.76 or later of the InTouch terminal firmware.
The default value for this setting is false, meaning only numeric badges will be recognized.
To allow the use of alphabet characters in a badge, change this Setting Value to true.
If employees will be typing their badge numbers at the terminal instead of scanning a badge, you need to set Scan Badge Allow Key Pad to true.
You can also remove characters from the onscreen keyboard using the Badge Disable Characters setting.
Alt Submit Button
Requires version 03.00.03.76 or later of the InTouch terminal firmware.
When this setting is true (the default setting), a button will display at the bottom of the screen that allows you to submit the form without scrolling down to the end of the list of prompts.
If this setting is false, the last prompt will be a button with the default value of the Change Action prompt. You will need to use this button or the Change Action prompt to submit your action.
Note: If Show Multi Buttons In Form is set to true, action buttons will display at the bottom of the screen regardless of the Alt Submit Button setting.
If you receive one or more badge configuration files from Deltek, the Shop Floor Time application server can use these files to automatically generate the settings that your InTouch terminals will need to read the badges.
In the Badge Configuration File setting, enter the names of the badge configuration files you received from Kronos, separated by commas. You can include multiple configuration files, up to 100 characters total for the field.
Make sure you place the badge configuration files in your AUTOTIME_HOME folder. The Badge Configuration File setting will not save unless the specified files are in your AUTOTIME_HOME folder.
Note: You can also use the Badge Format window on the InTouch Config form to update these badge settings. The data that you enter in the Badge Format window will override the data in the files specified in the Badge Configuration File setting.
Requires version 03.00.03.76 or later of the InTouch terminal firmware.
If there are certain characters you want to prevent employees from typing in their badge numbers, use this setting to specify them. These characters will not appear on the keyboard that is used to type the badge number.
This setting is used with the Badge Pad To Length setting. The badge number that is scanned or entered will be padded from the left with this character to a specified length (the Badge Pad To Length).
This setting will pad the badge number from the left with the Badge Pad Character to a specified length.
For example, a company’s badge numbers have the letter “B” followed by the employee/person number. However, the actual physical badges that are scanned only include the person number. When employee 1101 scans his badge (1101) at the terminal, the badge number is not recognized (it is missing the B). However, if the settings shown below are used, the badge will be recognized and the terminal will return the correct badge number (B1101) to Shop Floor Time:
Badge Pad Character = B
Badge Pad To Length = 5
Badge Trim To Length = 5
Badge Trim To Length
This setting will trim the scanned badge number from the left to a specified length.
For example, a company has assigned each employee a five-digit badge number in Shop Floor Time. The badges the employees scan, however, have 10 digits. The company sets the Badge Trim To Length setting to 5. When an employee scans a badge with the number 9876511001, the terminal trims the first five digits (98765) and sends the correct badge number (11001) to Shop Floor Time.
Barcode Symbologies
Use this setting to define the barcode symbologies used to encode data into your barcodes.
You can enter any of the following barcode symbologies. If you need to specify more than one, separate them with spaces.
code3of9
i2of5
upc_A
upc_E
code128
ean_8
ean_13
codabar
Horizontal Layout
Requires version 03.00.03.76 or later of the InTouch terminal firmware.
Set Horizontal Layout to true (the default setting) to display the event prompt and its response on the same line. You can view each prompt and response on a single horizontal line.
If this setting is false, you must select a prompt to view its response.
Leading Zero Badges
If your badge numbers begin with zeroes, you need to set Leading Zero Badges to true.
If this setting is false (the default setting), the terminal will not recognize badge numbers that begin with zeroes.
Listbox Type
Indicates the type of list box that will appear in the terminal. The default setting is the recommended setting. Do not change this setting.
By default, this setting is true, which enables the onscreen keyboard and allows employees to type their badge numbers.
To prevent employees from entering their badge numbers using an onscreen keyboard, you need to change this setting to false. If you change this setting to false, when employees select Scan Badge or try to post an event, a message will appear telling them to use their badges or place a finger on the sensor.
Show Cancel Button
Requires version 03.00.03.76 or later of the InTouch terminal firmware.
The default value for this setting is true, meaning the Cancel option will always appear on screen. Refer to the picture below for an example. If you select Cancel, you will return to the Scan Badge screen.
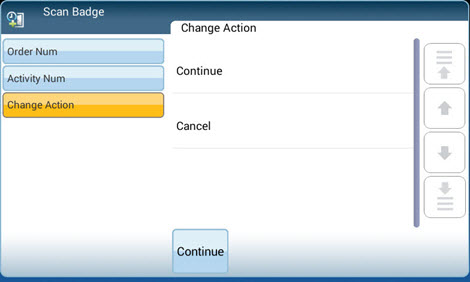
To remove the Cancel button, change this setting value to false.
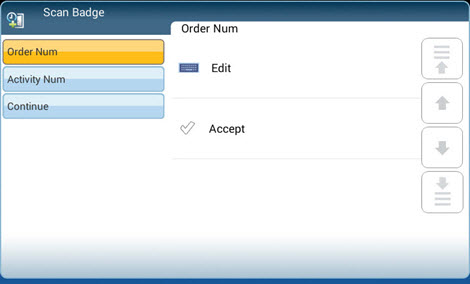
Requires version 03.00.03.76 or later of the InTouch terminal firmware.
The default value for this setting is true, meaning that after you scan your badge, the available events will appear as icons.
![]()
To display the events in a listbox, change this setting value to false.
![]()
This setting controls whether a keyboard will appear automatically for event prompts that have text-entry fields.
If Show Keyboard is false (the default setting), the keyboard will not appear for any text-entry prompts.
If Show Keyboard is true, the keyboard will appear for all text-entry prompts.
You can also show or hide the keyboard for specific event prompts. For example, you may only want to display the keyboard for Work Order events so that users can type the Order, Operation, and Activity number. To do so, you need to configure this event name and prompts on the Prompt Setting form.
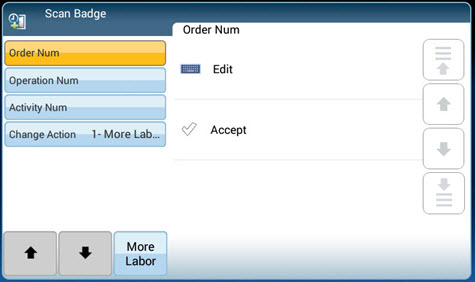
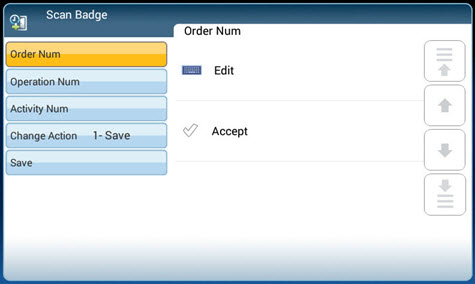
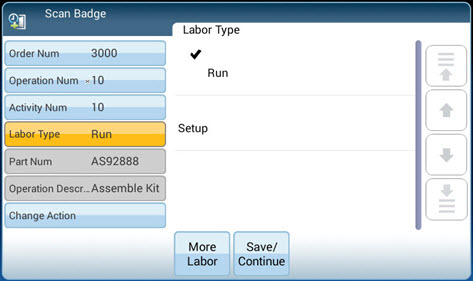
When this option is set to true, the action buttons will appear at the bottom of the screen to the right of the list of prompts. In the illustration below, a Batch Labor is being started and the user can select More Labor to add a labor to the batch or Save/Continue start the labor without adding more labor.
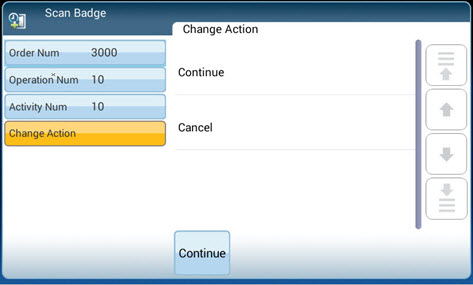
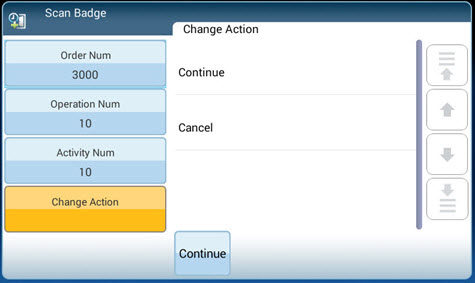
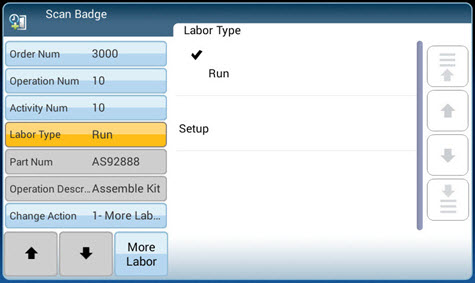
In the illustration below, Show Multi Buttons In Form is set to false. The user must select the Change Action prompt to view all the available actions (in this case, More Labor and Save/Continue).
Requires version 03.00.03.76 or later of the InTouch terminal firmware.
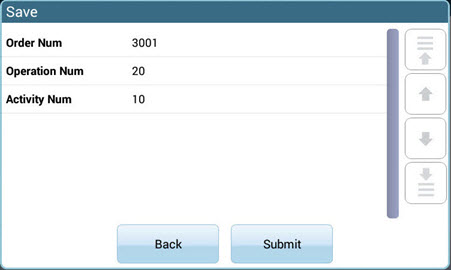
When this setting is true, and you select an option from the Change Action prompt (e.g., Save or More Labor), a Submit screen will appear. The Submit screen allows you to check your prompt values and the action before submitting.
Select Submit to post the event with the values shown in this screen. If you want to change any of the prompt values, select Back.
If you do not want to display the Submit screen, change this setting to false.
You can use the Badge Format window on the InTouch Config form to update the badge settings in your InTouch Config record. The data that you enter in the Badge Format window will override the data in the files specified in the Badge Configuration File setting.
To use the Badge Format window:
Use a text editor to open the badge configuration file you received from Kronos.
Select and copy all the text in the file.
Click the Badge Format button on the InTouch Config form.
Paste this text into the Badge Format window for the InTouch Config record you want to modify.
In the Badge Format window, click Validate to convert the data to the proper XML format.
Click Save.
Note: The text you save in the Badge Format window will take precedence over the badge configuration files specified in the Badge Configuration File setting.
If you are upgrading from Shop Floor Time 1.2, and you used InTouch terminals with these versions of the application, make sure you place your AutoTimeInTouchConnectorConfig.xml file in the AUTOTIME_HOME folder before you start the Shop Floor Time application server. Shop Floor Time will read the settings from this file and import the device configurations into the application.
The device settings will be visible in the InTouch Config form and will be named with the DID of the device record. For example, if a device record in the AutotimeInTouchConnectorConfig.xml file is for DID 222222, then the InTouch Config record will be named INTOUCH_222222. If a device record in the AutotimeInTouchConnectorConfig.xml file is for DID *, then the InTouch Config record will be named INTOUCH_DEFAULT.
Once you have imported the device settings, you can assign them to your Terminals or Terminal Profiles using the INTOUCH_CONFIGURATION setting.