This section explains how to configure and use Kronos InTouch terminals with the Shop Floor Time application.
You will need to create terminal records and modify settings in Shop Floor Time and modify settings on the actual InTouch terminals. If your InTouch terminals have a biometric (fingerprint) reader, you will need to perform additional configurations.
Shop Floor Time has been verified to work InTouch firmware versions 3.0.3, 3.0.4, 3.0.5, and 3.0.6 and hardware version H4 of the Kronos InTouch terminals.
Note: The Shop Floor Time features Offline Validation and Password for Kiosk Events are not supported on the InTouch terminals.
![]()
See Also:
Upgrading – Importing the InTouch Config Settings
Configure the Application Server
Configure the InTouch Terminal Settings
Assign the InTouch Configuration to a Terminal Profile
Create the InTouch Terminal Records
Configure the Device Settings on the InTouch Terminal
Update a Terminal's Network Settings
Update the Terminal's Firmware
Modify the InTouch Log Settings
If you are upgrading from Shop Floor Time 1.2, and you used InTouch terminals with these versions of the application, make sure you place your AutoTimeInTouchConnectorConfig.xml file in the AUTOTIME_HOME folder before you start the Shop Floor Time application server. Shop Floor Time will read the settings from this file and import the device configurations into the application.
The device settings will be visible in the InTouch Config form and will be named with the DID of the device record. For example, if a device record in the AutotimeInTouchConnectorConfig.xml file is for DID 222222, then the InTouch Config record will be named INTOUCH_222222. If a device record in the AutotimeInTouchConnectorConfig.xml file is for DID *, then the InTouch Config record will be named INTOUCH_DEFAULT.
Once you have imported the device settings, you can assign them to your Terminals or Terminal Profiles using the INTOUCH_CONFIGURATION setting.
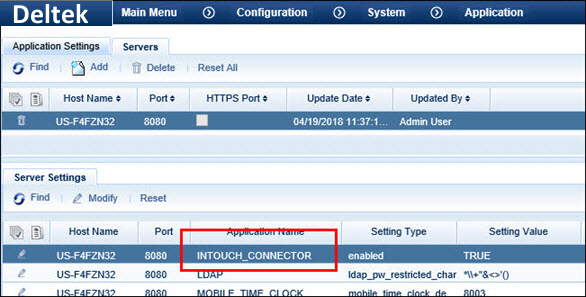
You need to configure an instance of your application server to process communications with the InTouch terminals.
To do so, go to the Servers tab on the Application form. Select the appropriate instance of the application server and on the Server Settings tab, select the INTOUCH_CONNECTOR settings. Click Modify and change the Setting Value to TRUE.
See Upgrading – Importing the InTouch Config Settings if you are upgrading from Shop Floor Time 1.2, and you used InTouch terminals with these versions of the application. You can import your device configurations from the AutoTimeInTouchConnectorConfig.xml file into the Shop Floor Time application.
Use the InTouch Config form to configure the settings that affect how the terminal presents and accepts information. For example, in this form you can configure the terminal to allow leading zeroes in badge numbers, allow alphanumeric badges, show a Cancel button, or change the way events and prompts appear on the terminal.
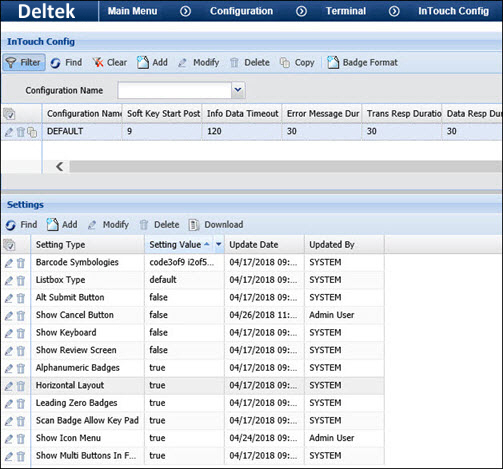
If your Shop Floor Time badge numbers have leading characters or a different length than the badge numbers scanned at the InTouch terminal, you can use the badge format settings to ensure the terminal returns the correct badge number to Shop Floor Time. If you receive a badge configuration file from Kronos, the Shop Floor Time application server can use this file to generate the badge format settings that your InTouch terminals will need to read the badges.
The configuration settings you define in this form will then be assigned to a Terminal Profile, which will then be assigned to an InTouch terminal.
Note: The Show Keyboard setting in a terminal's InTouch Config record controls whether a keyboard will appear automatically for event prompts that have text-entry fields. You can use the Prompt Setting form to change this setting for specific event prompts. See Prompt Setting for more information.
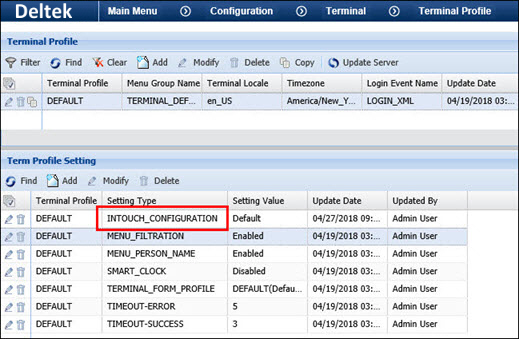
You need to assign the INTOUCH_CONFIGURATION setting to the Terminal Profile that is used by the InTouch terminals.
Go to the Terminal Profile form and select the record that is used by your InTouch terminals. On the Terminal Profile Setting tab, click Add and select the INTOUCH_CONFIGURATION setting. From the Setting Value field, select the InTouch Config record you created above.
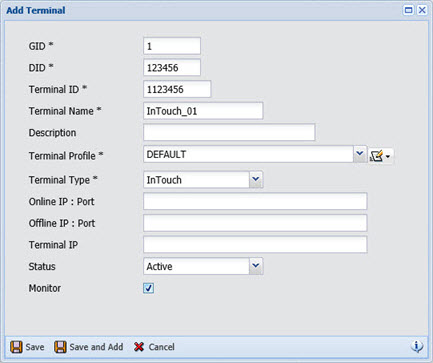
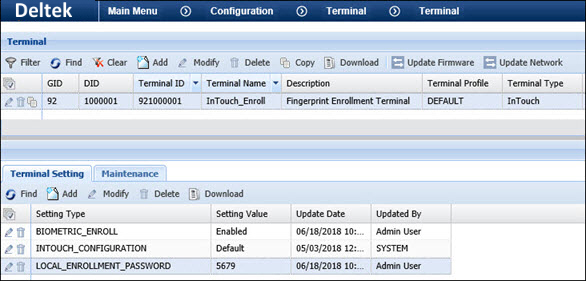
You need to create a Terminal record in Shop Floor Time for each InTouch terminal.
The Terminal Type for the InTouch terminals is InTouch.
Select the Terminal Profile that has the correct InTouch Config record and the Menu Group configured for the InTouch terminal.
The DID (Device ID) you enter in this record will also be configured on the actual InTouch terminal. For InTouch terminals, the DID must be at least 6 characters. The DID will be entered in the Device ID field when you configure the terminal.
InTouch terminals can have a Device ID with leading zeroes (e.g., 000100) but in Shop Floor Time, leading zeroes will be removed from the DID when you save the Terminal record (e.g., DID 000100 will be saved as DID 100). However, the Terminal ID will still have the leading zeroes and the InTouch terminal will recognize the DID value with leading zeroes.
On the Terminal Monitor form in the Shop Floor Time application, you can use the Reload Configuration button to reload the default configuration to the terminal. You can also use the Is Device Reachable button to check if the terminal’s IP address is reachable.
If your InTouch terminal has a fingerprint scanner, the terminal can verify an employee’s identity by a fingerprint instead of a badge.
To use this feature, you will need to
Configure a dedicated terminal for enrolling employee fingerprints.
Before employees can use biometric (fingerprint) verification on the terminal, the employees must enroll their fingerprints.
Configure all other terminals for biometric verification. When a terminal is configured only for biometric verification, employees will have to scan their fingerprints to be identified. When a terminal is configured for enrollment, employees will have to scan their badges and fingerprints to be identified.
Have employees enroll their fingerprints on the dedicated terminal.
Once an employee’s fingerprint is enrolled, it is stored by Shop Floor Time. The terminals will then request fingerprints from Shop Floor Time. When an employee uses the verification terminal, the employee will need to scan his fingerprint. If the employee scans his badge, a message will appear requiring the employee to scan his fingerprint.
You will need to create a separate Terminal record for the enrollment terminal.
This terminal will need to have the BIOMETRIC_ENROLL Terminal Setting enabled.
This terminal will also need to have the LOCAL_ENROLLMENT_PASSWORD Terminal Setting configured. You will need to enter this password when enrolling fingerprints from the terminal.
When a terminal is configured for biometric verification, employees will have to scan their fingerprints to be identified.
For these terminals, you will need to add the following Terminal Profile Settings:
Set BIOMETRIC_ENFORCE to Enabled.
Set the INTOUCH_CONFIGURATION setting to an InTouch Config record that has Template Dist (min) set to how often (in minutes) the terminals will request fingerprints from Shop Floor Time.

When a terminal has the BIOMETRIC_ENROLL setting enabled, the Enroll Employee button will appear next to the Scan Badge button.

When you select Enroll Employee, a badge number screen will appear. You need to enter the enrollment password in this screen. You defined this password earlier using the LOCAL_ENROLLMENT_PASSWORD Terminal Setting when you configured the enrollment terminal.
After you enter the enrollment password, you will need to enter the employee’s badge number. This badge number will be matched with the fingerprint scan in the next step.
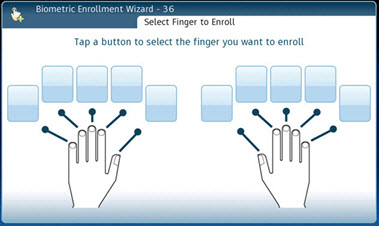
After you enter the badge number, the Enrollment Wizard will appear.
The employee needs to follow the on-screen instructions to enroll his fingerprint. Refer to your InTouch Terminal User Guide for information.
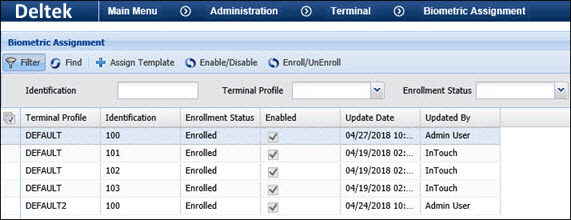
Once a fingerprint is enrolled, it will appear on the Biometric Assignment form as a fingerprint template. On the Biometric Assignment form, you can
View and change the Terminal Profiles to which the fingerprint template is assigned.
Enable or disable a fingerprint template for a specific Terminal Profile.
Unenroll (and re-enroll) a fingerprint template.
The settings that must be configured for the InTouch terminal to work with Shop Floor Time are explained below. For details about how to fully configure an InTouch terminal, refer to the terminal's InTouch Communication Format Specification document.
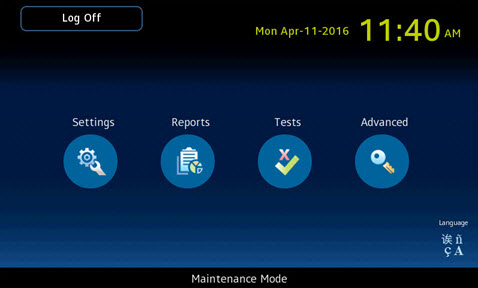
To begin, enter Maintenance Mode on the terminal.
To do so, swipe the Maintenance badge or press the Menu
key in the bottom left corner of the terminal ![]() . If
you press the Menu key on the terminal, you will have to enter a password.
The password for Maintenance Mode is 115190.
. If
you press the Menu key on the terminal, you will have to enter a password.
The password for Maintenance Mode is 115190.
In Maintenance Mode, go to Settings > Communication Settings > General Communication.
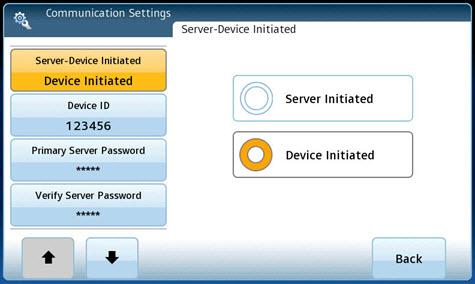
The settings you need to configure are listed on the left side of the screen. Use the arrow buttons to scroll through the list.
Select the Server-Device Initiated button and select the Device Initiated option.
Select the Device ID button and enter the terminal’s Device ID (DID). The DID you enter must be defined on the Terminal form in the Shop Floor Time application.
The Primary Server Password is not currently being used. Type six ones (111111) for this password.
Select the down arrow to view the other configuration settings.
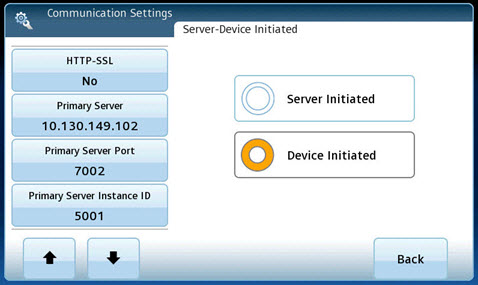
Set HTTP-SSL to No unless you are configuring Shop Floor Time to use HTTPS communication with the InTouch terminal. See HTTPS Configuration for more information.
Set the Primary Server and Primary Server Port. These values must match the server and port specified in the AutoTimeInTouchConnectorConfig.xml file.
Do not change the Primary Server Instance ID. Leave this value set to 5001.
You will need to restart the terminal after you change these settings. To do so, go back to the Maintenance Mode page and select Advanced > Restart Device.
Start the Shop Floor Time application server.
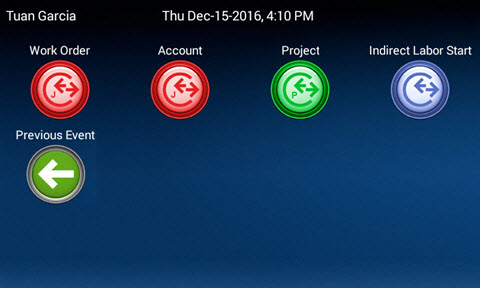
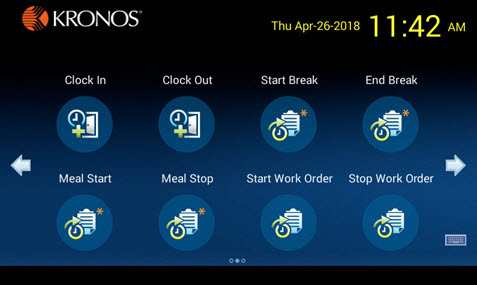
When the terminal starts, the Scan Badge icon appears.
![]()
Note:
If you select the arrows, you
will see the offline buttons. These buttons are used to post events when
Shop Floor Time is offline
![]() .
.
Swipe your badge or select Scan Badge and enter your badge number using the onscreen keyboard.
The onscreen keyboard may be disabled and you may be required to scan your badge. If the terminal is configured for biometric verification, you will need to scan your fingerprint instead.
If the application server is offline, a message will appear. You can continue to use the terminal. The data will be saved in offline files and transmitted once the system is back online.
After you scan your badge, the available events appear. Note that if you prefer to display these events in a list, you can do so by changing the Show Icon Menu setting in the InTouch Config record to false.

Select the event you want to post.
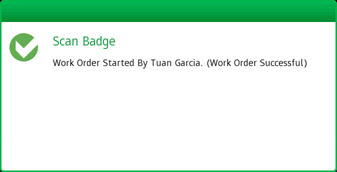
If the event you selected has no prompts (such as a Clock In), a message will appear indicating whether the event posted successfully. You will then return to the Scan Badge screen.
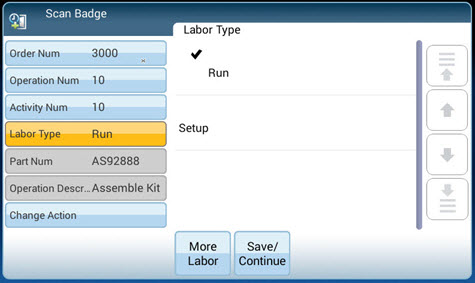
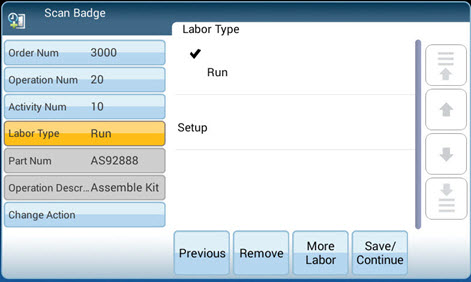
If the event you selected has prompts, you will need to respond to each one.
The prompts appear on the left side of the screen and responses appear on the right. Depending on how the event is configured, you will have to select a prompt response or enter it yourself. Use the black arrows at the bottom of the screen to scroll up and down the list of prompts.
When you respond to a prompt, the next prompt is selected (highlighted) automatically. The highlighted prompt is the one that is currently selected.
Make sure you respond to each prompt, even if you do not change it. Do not skip any prompts.
If the prompt response options appear to the right of the prompt, select one of the responses. If there are multiple prompt response options, use the arrow buttons on the right side of the screen to scroll up and down the list of options. |
|
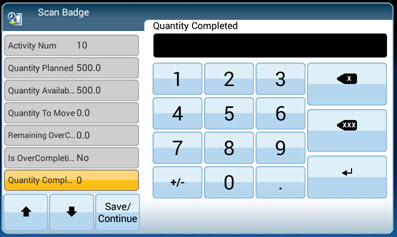
Some prompts (such as Quantity prompts) may display a numeric keypad where you can enter a value. |
|
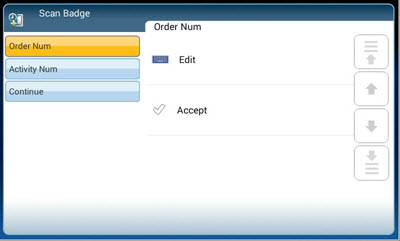
If you must enter the prompt response yourself, the Edit and Accept buttons will appear.
Select
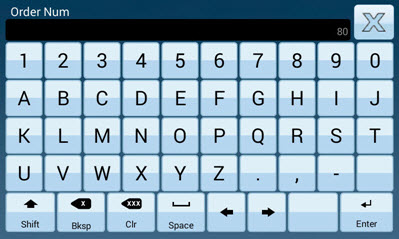
Edit to display an
alphanumeric keyboard so you can type your prompt response. The
numeric value that appears at the right end of the input field
(“80” in the image below right) indicates the maximum number of
characters allowed. As you type your response, this number will
decrease. Press Enter to save your response or press the
If you select Accept, the existing prompt value will be used. Use Accept when the prompt has a default value that you want to use. Otherwise you may accept a blank value. |
|
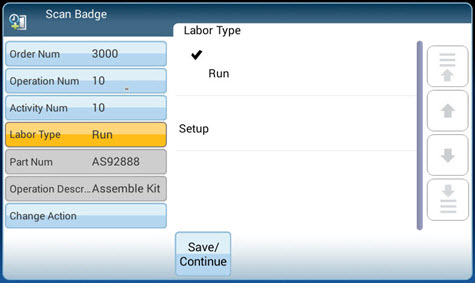
The steps for posting an event depend on how the event is configured and whether you are posting a Single, Batch, or Multi labor.
In addition, there are several settings in the InTouch Config record that affect how the prompts appear.
When you finish entering the prompt values, you can select the button at the bottom of the screen to continue. For example, if you are starting a Batch or Multi labor, the button will read More Labor. For a Single labor, the button will read Save.
You can also use the Change Action prompt if you want to cancel the event posting or select a different option. For example, the Change Action prompt will display options such as Previous and Remove when starting a Batch or Multi labor.
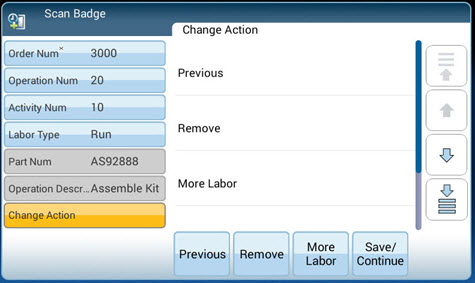
When you select an option in the Change Action prompt, the Submit screen will appear. This screen allows you to check your prompt values and the action before submitting. You can hide the Submit screen by setting Show Review Screen in the InTouch Config record to false.
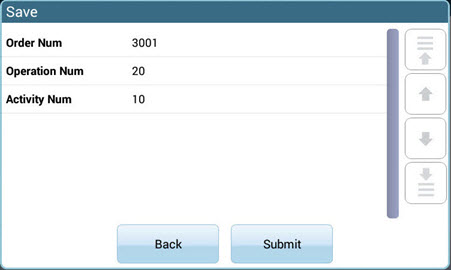
Select Submit to post the event with the values shown in this screen. If you want to change any of the prompt values, select Back.
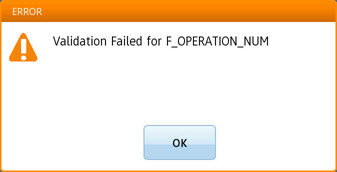
A message will indicate whether the event posted successfully or not. If an error or warning message appears because the event did not post, you will return to the prompt list so you can enter a new prompt value and submit the event again.
Note: The number of seconds that success and error/warning messages will appear is configured in the Error Message Duration and Transaction Response Duration settings of the InTouch Config record.
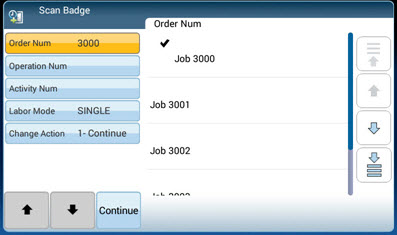
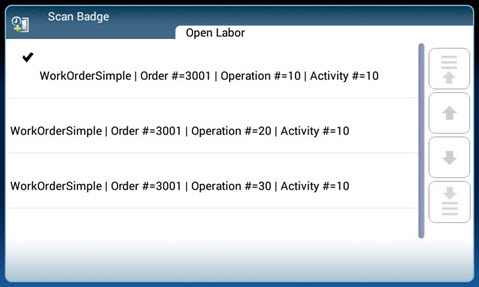
When you are posting a Batch or Multi Labor event, the More Labor prompt will appear.
When you select More Labor, you will have additional labor events to select.
Select the event for the next labor in the Batch or Multi. The prompts for that labor event will then appear (order number, operation, project number, etc.).
You can also select Previous Event to modify the labor you just added to the batch.
Once you have added the next labor to the Batch or Multi, you will have the options to Save all the labors; edit or remove the last labor you added; add More Labor; or Cancel the event.
Select Previous to edit the labor shown on screen.
Select Remove to delete the labor shown on screen.
Select More Labor to add another labor to the Batch or Multi.
Select Save to stop adding labor to the Batch or Multi and post the labors you have entered.
To return to the Scan Badge screen without posting the labors, select Cancel from the Change Action prompt.
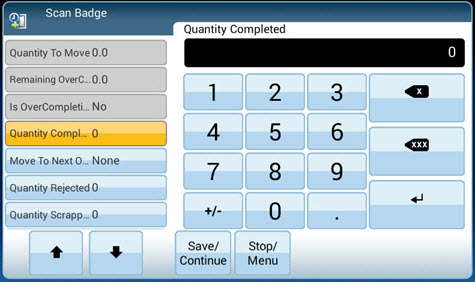
When you stop a Batch labor, you will be prompted for the quantities and movements of each labor in the batch.
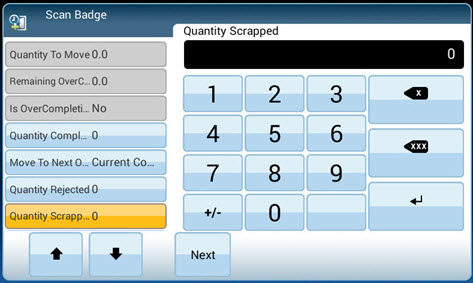
After you enter the quantities for the first labor, select Next. You will be prompted for the quantities of the second labor in the batch, and so on.
You will also have the option to edit the labor (using the Previous or Back button). Select Previous (or Back) if you want to change the quantities of the labor for which you just entered values. Select Next to continue with the next labor in the batch. Select Cancel from the Change Action prompt to return to the Scan Badge screen without stopping the labor.
Once you have entered the prompts for the last labor in the batch, you will have the following options.
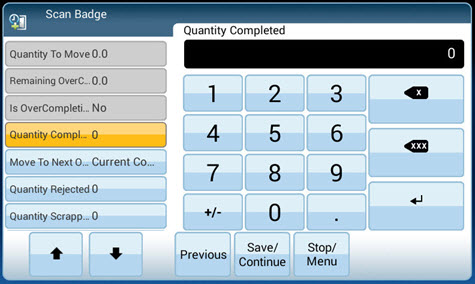
Select Previous to change the quantity values of the last labor.
Select Save/Continue to stop all the labors in the batch and return to the Scan Badge screen.
Select Stop/Menu to stop all the labors in the batch and return to the menu of events.
To return to the Scan Badge screen without stopping the labor, select Cancel from the Change Action prompt.
When you stop a Multi Labor, the individual labors will appear on screen. You must stop each of the open labors separately.
Select the labor you want to close. If there are any additional prompts (such as quantity prompts), you must respond to those also.
To close the labor and return to the Scan Badge screen, select Save/Continue.
To close the labor and return to the menu of events, select Stop/Menu. You may want to use this option if you will be stopping more than one labor in the Multi Labor.
To return to the Scan Badge screen without stopping the labor, select Cancel from the Change Action prompt.
Once the event is posted and the labor is stopped, you will return to the Scan Badge screen or the menu of events. To close another labor in this Multi Labor, select the Stop Multi event again and repeat the above steps.
Kiosk events are view-only events - such as Accruals View, Messages View, Open Jobs View, and Time Card View - that display information to the user.
The kiosk event forms will time out and close after the number of seconds in the Info Data Timeout setting have passed.
To close a kiosk event form, select the  in the upper right corner of the screen.
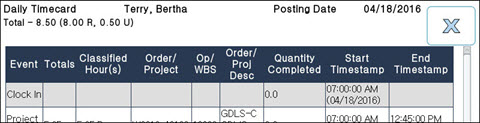
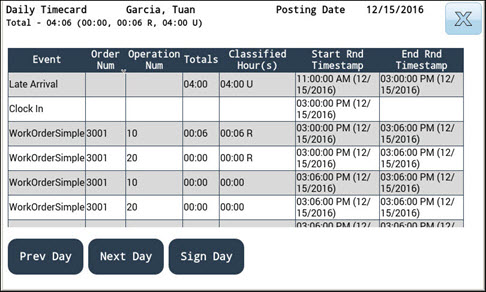
The Daily, Weekly, and Period Timecard screens do not display images for the Sign Day and Sign Week buttons. On the InTouch terminal, these buttons will display text only. You can scroll up and down the timecard using the terminal’s touch screen.
If you have pending messages, these messages will appear when you log into the InTouch terminal.
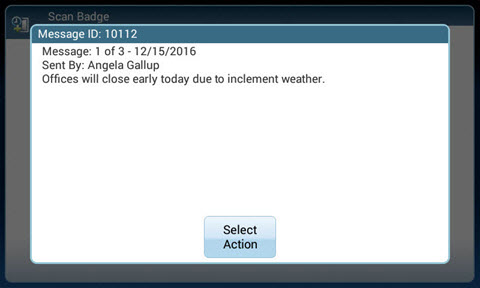
Each message will appear in a separate screen. You must click Select Action to continue.
The next screen will display options such as Acknowledge, Next, OK, or Done. The options that appear will depend on how your message settings are configured in Shop Floor Time.
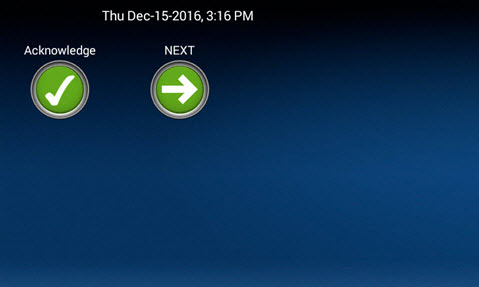
Select Acknowledge, Next, etc. and the next message (if any) will appear. When you are done viewing or acknowledging the messages, the list of events will appear.
If Shop Floor Time is not running, the following symbol appears in the terminal screen:
![]()
You can still use the terminal when it is offline. The data will be saved in offline files and transmitted once the system is back online.
When Shop Floor Time is offline, you need to use the offline buttons to post events.
Select the left or right arrow in the terminal screen to display the offline buttons.
![]()
Note: The images that display for the offline buttons can be configured on the Terminal Event Image form.
Select one of the offline buttons.
The Scan Badge prompt will appear.
Enter your Badge Number.
You can continue to use the terminal. The data will be saved in offline files and transmitted once the system is back online.
Respond to the prompts that appear on the screen. The data you enter in offline mode will not be validated at the terminal. You will not receive an error message if you enter an incorrect badge number, order number, etc.
Review and submit your event when you are done.
Once the event has been submitted, the ![]() symbol
will appear in the terminal screen, indicating there is offline data that
needs to be processed.
symbol
will appear in the terminal screen, indicating there is offline data that
needs to be processed.
![]()
The offline data will be sent to Shop Floor Time once the application server is running again.
If you need to change the network communication settings for one or more of your InTouch terminals, you can use the Update Network button on the Terminal form.
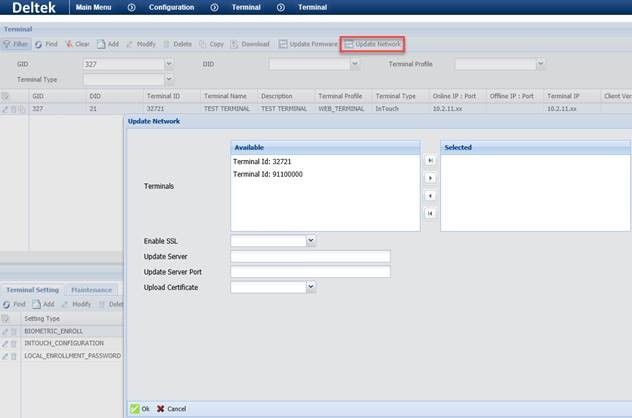
When a terminal is online, you can use this form to:
Enable or disable SSL (HTTPS communication) between one or more terminals and the Shop Floor Time application server
Change the Shop Floor Time application server with which the terminals communicate
Upload an SSL certificate
Select the Terminals you want to modify by moving them from the Available box to the Selected box. Use the remaining fields to change their settings.
When you click OK, your network setting changes will be saved. One or more UPDATE records (for example, UPDATE_SERVER_NAME and UPDATE_SERVER_PORT) will appear on the Maintenance tab on the Terminal form with the Status Ready.
The selected terminals will be updated the next time they perform status checks with the application server. When the update is complete, the UPDATE records on the Maintenance tab will have the Status Complete.
When a firmware update is available for your InTouch terminals, you can use the Update Firmware button on the Terminal form to send this updated firmware to one or more terminals. To do so:
Place the firmware file inside the firmware folder in your AUTOTIME_HOME folder.
On the Terminal form, click the Update Firmware button.
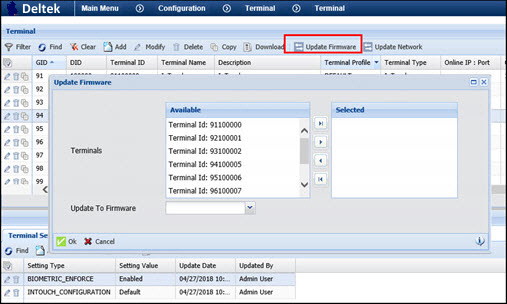
Select the InTouch terminals you want to update. Move them from the Available box to the Selected box.
In the Update To Firmware field, select the firmware file. The available options are in the firmware folder in your AUTOTIME_HOME folder.
Click OK.
An UPDATE_TO_FIRMWARE record will appear on the Maintenance tab on the Terminal form with the Status Ready.
The next time the terminal performs a status check, the application server will trigger the firmware update and begin sending files to the terminal. Once the terminal receives all the files it needs for the update, the terminal will become unusable until the update is complete. When the update is complete, the UPDATE_TO_FIRMWARE record on the Maintenance tab will have the Status Complete.
To change the amount of data that will be recorded in the log file for the InTouch terminals, use the Log Settings form.
There is a log file for the INTOUCH_CONNECTOR and a log file for each InTouch terminal. InTouch terminals use the INTOUCH_CONNECTOR to communicate with Shop Floor Time.
To change the log level for the INTOUCH_CONNECTOR, use the Modules tab.
To change the log level for a specific InTouch terminal, use the Terminals tab.
The log files for the INTOUCH_CONNECTOR and the InTouch terminals are located in the \logs folder in your AUTOTIME_HOME folder.
You can configure Shop Floor Time to communicate with the InTouch terminals using HTTPS.
To do so, you need to do the following:
Obtain an SSL certificate file and keystore file. These files are used to secure the connection between Shop Floor Time and the InTouch terminal.
Copy the keystore file to the appropriate folder for your Shop Floor Time application server.
Configure your Shop Floor Time application server to use HTTPS communication. This configuration will depend on the type of application server you have (JBoss EAP 7, WebLogic 12, etc.). Refer to your application server's documentation for more information.
Note: Make sure your Shop Floor Time application server still accepts HTTP requests so that the server can send the SSL certificate to the InTouch terminal during the initial SSL configuration. If you are planning to close the server’s HTTP port, wait until this configuration is complete and the InTouch terminal is connecting to the Shop Floor Time with HTTPS.
Copy the certificate file you obtained in step 1 to the AUTOTIME_HOME\certificate folder.
Start the Shop Floor Time application server and log into the Shop Floor Time web application.
On the Servers tab of the Application form, add or select the record for the Host Name that has the INTOUCH_CONNECTOR enabled. Make sure the HTTPS Port box is checked.
Make sure you have a Terminal record – with the Terminal Type InTouch – for each terminal that will use HTTPS. Create these terminal records if necessary.
Once you have completed the above steps, you need to configure each InTouch terminal to use HTTPS communication.
If necessary, start the Shop Floor Time application server.
Place the InTouch terminal in Maintenance Mode and go to Settings > Communication Settings > General Communication.
Set the Device ID to the DID of an InTouch terminal (you may have created these Terminal records in step 7 above).
Change the Primary Server Port to the Shop Floor Time application server's HTTP port.
Make sure the HTTP-SSL option is set to No. If HTTP-SSL is set to Yes, the terminal will not be able to connect and you will not be able to complete the next step.
In the Review screen, click Submit to save your changes.
Restart the InTouch terminal and verify that it can connect to Shop Floor Time.
Repeat steps 1-7 for each InTouch terminal that will use HTTPS communication.
Send the certificate file and the HTTPS configuration to the terminals. To do so, go to the Terminal form and click the Update Network button. Select the InTouch terminals you want to configure for HTTPS communication. Set Enable SSL to true. In the Upload Certificate field, select the certificate file you placed in your AUTOTIME_HOME folder. Click Save.
Once the communication settings are updated, the InTouch terminal will connect to Shop Floor Time using HTTPS.