
The process of requesting a change and having the change approved requires several steps and usually involves multiple people. This topic describes each step of the change request process in detail, based on the default workflow steps.
Configure Open Plan to use with Model Changes
Configure Open Plan access rights
Sync Cobra and Open Plan before starting a change request
Model Changes concepts and procedures

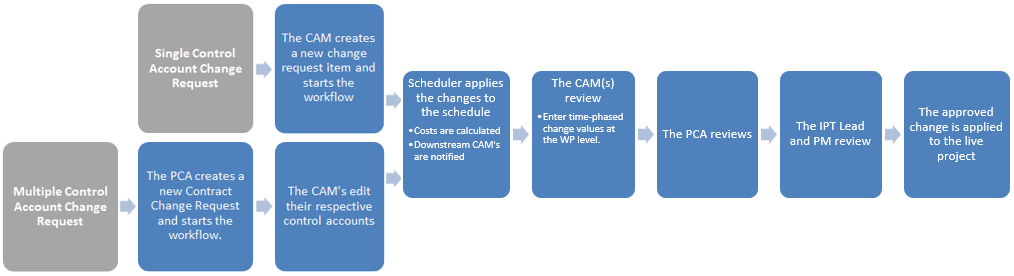
Single Control Account Change Request |
|
The CAM creates a new change request and starts the workflow steps |
Related Topics |
Select a Workflow TypeThe CAM typically originates the change request, but it can also be originated by anyone such as a work package manager. PM Compass provides a number of default change request types that can be edited or copied. Deltek strongly recommends that you copy and rename the change request types that you want to use so that you can easily go back to the original default types if you need to without having to restore anything. Use Administration » Workflow Type Configuration to complete this task.The change request forms allow the originator to select the project and control account, and to document general information about the change request. |
How to...Create a Budget Change Request Integrate your Cost and Schedule
Learn more about... |
Cost ActionsUse the Cost Actions dialog box to perform actions such as deleting, replanning, and moving workflow packages. To delete all the costs associated with a work package, you must use the Cost Actions dialog box to delete the work package before submitting the change to the Scheduler. Using Cost Actions before the scheduler steps ensures that changes to activities linked to the work packages are added to the change baseline and merged into the project baseline, and that changes are included in the analysis performed by the Scheduler. |
Learn more about... |
Edit Cost and Schedule Data in the Change Details ViewAfter entering the information, the CAM clicks the Change Details button to access the Change Details view. The Change Details view displays control accounts, work packages, and activities in the schedule, and the view allows the CAM to add, edit, or delete schedule data or work package costs. Use this view to add the activities and/or work packages required for the change request. These change requests do not affect the source project at this stage. After the change request is approved, the source project is updated with the information entered in this view. At this step, the costs associated with resource assignments on the activity have not yet been calculated. A subsequent step requires the CAM to approve the change request, at which time the costs are calculated. After entering the requested changes, the CAM clicks Workflow View to save and access the form. |
Learn more about...Loading Changes into the Cost System as Additives or Replacements Rules for Editing Change Details Data Storing Cost and Schedule Change Request Data |
Start the WorkflowClicking the Start Workflow menu option on the toolbar submits the change request and starts the workflow steps. After the workflow starts any assignee on the workflow can edit the control accounts in Change Details. |
How to...Set Step Notification Defaults
Learn more about... |
Multiple Control Account Change Request |
|
The PCA creates a new Contract Change Request and starts the workflow steps |
Related Topics |
Budget Change Request for Multiple Control AccountsThe PCA typically originates the Contract Change Request; however, it can also be originated by someone such as the contract administrator. PM Compass provides a default Contract Change Request that can be edited or copied. Deltek strongly recommends that you copy and rename the Contract Change Requests that you want to use so that you can easily go back to the original defaults if you need to without having to restore anything. Use Administration » Workflow Type Configuration to complete this task.The Contract Change Request allows the originator to select the project and describe the change request. They can select one or more control accounts and enter the change in the Change Details view and start the workflow. They can add additional control accounts to the workflow when the workflow is in New or In Review status. However, after the sandbox is created, they cannot remove any control accounts that were previously added and saved. When the originator clicks Save or clicks the Change Details button, PM Compass adds the control accounts and child workflows to the Details grid and the sandbox. For information about adding and removing control accounts to a workflow, see "Add Multiple Control Accounts to a Change Request" in Related Topics.Cost System-Only Forecast Change Request for Multiple Control AccountsThe CAM uses a Forecast Change Request (FCR) to create a cost system-only forecast change request involving multiple control accounts. This change request has a single step. When the change request is submitted and the PCA approves the changes, they are automatically applied to the Cobra forecast. For more information, see "Forecast Change Request Workflow" in Related Topics. |
How to...Add Multiple Control Accounts to a Change Request Create a Contract Change Request Create a Forecast Change Request Integrate your Cost and Schedule Modify a Workflow Type to Support Selecting Control Accounts in Open Plan View Unapproved Requests from the Same Change Management Category
Learn more about...Contract Change Request Workflow Forecast Change Request Workflow The "Multiple Control Accounts: Generate This Workflow Type" Field |
Start the WorkflowAfter the workflow starts, if a step includes an approver such as the Control Account manager (CAM), the CAM's for all selected control accounts must approve or add/edit the detailed changes for work assigned to them before the change request moves to the next step. The originator can edit Change Details data before you start the workflow steps. After the workflow is started, any assignee on the workflow can edit the control accounts in Change Details. When additional control accounts are added and the user clicks Save or the Change Details button, PM Compass adds the control accounts and child workflows to the Details grid and the sandbox. The Status bar indicates that PM Compass is adding the child workflows. The Control Account Child Change RequestsBy default, a Control Account Change is automatically generated for each control account selected on the Contract Change Request. This child workflow contains the cost details for the change amount related to the specific control account and is useful when viewing important change requests for a control account in the dashboard. There are no workflow steps and there is no approval process at the child level. Unapproved Change Management Requests CheckWhen you create a new Contract Change Request and click Start Workflow, PM Compass checks to see if any of the control accounts you selected are currently part of another In-Progress change request in the same change management category. If they are, a warning message displays: "The Control Account has unapproved Change Management workflows. Do you want to continue?" When this occurs, Deltek recommends that you use the Search dialog box or use the Workflow List report to find all unapproved workflows with the same control account to be sure there's no overlap in the two change requests with the same control account. For more information, see "Modify the Workflow List Report to Find Unapproved Workflows" in Related Topics. |
Learn more about...Modify the Workflow List Report to Find Unapproved Workflows |
Related Topics |
|
Cost ActionsUse the Cost Actions dialog box to perform such actions deleting, replanning, and moving workflow packages. To delete all the costs associated with a work package, you must use the Cost Actions dialog box to delete the work package before submitting the change to the Scheduler. Using Cost Actions before the scheduler steps ensures that changes to activities linked to the work packages are added to the change baseline and merged into the project baseline, and that changes are included in the analysis performed by the Scheduler. Edit Cost and Schedule Data in the Change Details ViewAfter logging into PM Compass, each CAM should use the Workflow List View to find workflows assigned to them. When you display the Form View of the workflow, click the Change Details button to access the Change Details view. This view displays information for all control accounts that are selected on the workflow form; however, each CAM can only edit their own control account information. This is based on the assignment for that step in the workflow. If the assignment is stored in a control account-level field (for example, CAM), only the control accounts with that assignment (or their delegate) can edit the data in that control account. Using the Change Details view, the CAM can expand their control account node to see the work packages and activities defining the work. At this step in the workflow, the costs associated with resource assignments on the activity have not yet been calculated. After the scheduler approves, the costs are calculated and the CAM will have the opportunity to approve the change request, at which time they will see the calculated costs. When the first CAM saves their changes, the sandbox (or temporary project) is created. After all CAM’s have edited the workflow and submitted the workflow to the scheduler, the workflow is progressed at the parent level and the change request moves on to the Scheduler. Where is the Changed Data Stored?When you make changes in the Change Details view, PM Compass stores the changes in the Change Action table. You can see the log of changes by clicking the Change Log button on the workflow form. When Apply Changes is executed, PM Compass looks at the changes listed in the Change Action table and applies those changes to the live project. |
How to...View the Workflows Assigned to You Learn more about...Loading Changes into the Cost System as Additives or Replacements Storing Cost and Schedule Change Request Data Integrating with Microsoft Excel
|
Single / Multiple Control Account Change Request |
|
Related Topics |
|
If the Workflow Type Configuration option Create, Edit, or Delete Activities is selected, the workflow must contain a step for the scheduler to model the changes in Open Plan. During this step, changes entered in the Change Details view are applied in the Model Changes view, allowing the scheduler to see the effects of the requested change on the full schedule and make subsequent changes if necessary. When the scheduler approves the change, the workflow step actions run schedule integration to calculate the costs of the change at the work package level. Using Model Changes to approve a change request has several advantages:
|
How to...Configure Open Plan to Use with Model Changes
Learn more about... |
Select the Open Plan Schedule Associated with the Change RequestBefore you access Model Changes, you need to open the Open Plan schedule associated with the change requests. After opening the project in Open Plan, you can select the associated workflows by clicking the Add-In menu option in Open Plan or navigating to Model Changes in PM Compass.
TIP: If you access Model Changes before opening the Open Plan schedule, after you open the schedule, click Refresh in Model Changes to see the workflows associated with the active schedule.Using Open Plan Master Projects
For more information about master projects, see "Using Open Plan Master Projects" in Related Topics. |
How to...Configure Open Plan to Use with Model Changes Learn more about...Model Changes Common Concepts and Procedures Using Open Plan Master Projects Workflows That Fail During a Modeling Session
|
The Model Changes ViewThe Workflows grid displays all workflows associated with the active schedule in Open Plan that are not complete. An active schedule is one that you have open and are currently viewing in Open Plan (that is, the tab that is currently selected/active). If the active schedule is a master project, you must also open the subprojects if you want them to be considered active and to see the related workflows in Model Changes. PM Compass filters the workflow list based on the entry in the Workflow Type field that s on the right in the grid header. You can filter the list further using the Search field. The Scheduler can create the workflows from the Model Changes List View. The Scheduler then enters all changes directly into the schedule during the modeling session. If there are workflows that do not include changes to the schedule, the Scheduler can approve those workflows from the Model Changes view. If the workflow has been started, the Assignments grid displays the currently assigned users as well as the next step assignee (if the Next Step Assignee Can Edit Current Step option is selected) for the selected workflow. When you change from one active schedule to another in Open Plan and you click Refresh in Model Changes, PM Compass updates the list of workflows in the grid. |
Learn more about... |
Select the Workflows that you want to Model in Open PlanSelect the workflow rows (the entire row) that you want to model in Open Plan and click Load Changes. If any of the selected workflows have not yet started, PM Compass automatically starts them but does not send any notifications. Any changes that are already saved in the change request are added to the schedule. The Open Plan schedule is set to the Model Changes mode and the system calculates Time Now, runs Time Analysis, and updates the status date on the workflow forms. Time now is the beginning of the current period and is calculated using the Cobra calendar associated with the first workflow's project. For more information about Time Now, see "Determining Time Now for Time Analysis and Updating the Status Date" in Related Topics.When the change is loaded, the PMC Change Number field on the activity is updated to indicate which workflow contained the change. If there is more than one workflow, the workflow numbers display separated by a comma. You can click the Change Log button to see the list of all changes that were applied to the workflows. After Time Analysis is complete, PM Compass displays the Modeling Session List View with the loaded workflows. |
Learn more about...Change Management Fields in Open Plan Determining Time Now for Time Analysis and Updating the Status Date |
Modeling SessionThe Modeling Session view displays the list of workflows that you selected in the Model Changes List View for modeling in Open Plan. If the workflow is not currently assigned to you, the workflow will appear disabled (light grey), and you will not be able to mark it active. In this view, you specify the workflow to which your changes in Open Plan will be applied by clicking Mark Active. If this step of the workflow has a schedule integration step action and there are schedule changes in the Change log, you must approve the workflow in this view. The active workflow is the one to which the changes that you make in Open Plan are applied. You can make a different workflow active by selecting the row and clicking Mark Active or by clicking Form View. You can only have one active workflow at a time. If your active project in Open Plan is a master schedule, you will only be able to edit the subproject associated with the active workflow. After the Scheduler approves the workflow, you can no longer make changes to the schedule. After you select the active workflow, you can start making changes in Open Plan. At this point, the Scheduler can see the effect of the change request on the entire schedule including deliverables or target dates in the schedule and can use all the Open Plan custom views and processes to analyze the data. When you change an activity, the PMC Change Number column in Open Plan is populated with the change number of the active workflow. If there are two or more workflows that make a change to the same activity during a single modeling session, all change numbers display in the PMC Change Number column and are listed comma delimited. When you add a new activity to the Open Plan project, the baseline dates are automatically updated. If you have many activities to one work package, PM Compass automatically includes all the activities linked to the work package in the change baseline. By default, when you change an activity duration or add a target date to an activity, all the activities linked to the same work package get new baseline dates. If you do not want to update the baseline dates on an activity, enter a No or N in the PMC Update Baseline Dates field. When you click Save in PM Compass or click Mark Active for a different workflow, the changes made in Open Plan are saved to the workflow in PM Compass. When you add a new activity to the Open Plan project, you should populate the linking fields (WBS, OBS, work package ID, and so on) so that when you run the integration, the work package dates (and costs, if there are resource assignments on the activity) are applied to the correct work package. If the activity is not linked to a work package, it is considered a "schedule-only change". If you do not populate the linking fields, make sure that the linking field milestone ID is also not populated. Any activity not linked to a work package that does have the milestone ID linking field populated will not be displayed in the generated BCR Analysis report. If you want to delete, replan, or move workflow packages using the Cost Actions dialog box, you must perform these actions before starting the workflow. Aside from being the only way to delete all the costs associated with a work package. It further ensures that changes to the activities linked to work packages are added to the change baseline and merged into the project baseline, and that changes are included in the analysis performed by the Scheduler.The Cost Class field in Open Plan is used by PM Compass to store the change number. When in the Change Details view, only row-per-resource is displayed regardless of the entry in the Cost Class field.Open Plan provides a backup view called Model Changes where you can associate an Open Plan project to display and view the Open Plan fields required during a modelling session.For more information, see "Using the Backup Model Changes View in Open Plan".For more information about the PMC fields, see "Change Management Fields in Open Plan" in Related Topics. |
Learn more about...Automatically Updating the Baseline Dates in a Modeling Session Change Details on Form Tab of Workflow Type Configuration Change Management Fields in Open Plan Checking for Schedule Updates While Modeling Changes Editing Project Data While Modeling in Open Plan Helpful Open Plan Fields to add to your Open Plan view Recording Activity Step Changes in the Change Log Relationships and Modeling Changes Rules for Editing Activity Resource Assignments during a Modeling Session Workflows that Fail During a Modeling Session
|
Submit for ReviewWhile you are in this view, you can let the next step assignee see the changes that you made to the schedule before you approve the workflow. This allows them to see the changes before you approve the workflow and hopefully reduces the chance that they will reject the workflow when it moves to their step for approval. You do this by selecting the workflow and clicking Submit for Review in the Workflow Actions menu. For more information, see "Submit for Review Workflow Action" in Related Topics.PM Compass executes the step actions on the current step that include "on Submit for Review" in the description. The workflow does not advance at this time. If you have added the Submit for Review Notification step action (Workflow Type Configuration » Workflow Steps Tab), PM Compass sends an email and/or dashboard alert to the next step assignee with a hyperlink to the cost data in a spreadsheet (if configured) and lets them know that they can review the changes that you made to the schedule. You can edit the email content in Step Notification Defaults. For more information, see "Configure Submit for Review" in Related Topics.This feature is useful when used in conjunction with Next Step Assignee Can Edit Current Step. |
Learn more about...Next Step Assignee Can Edit Current Step Submit for Review Workflow Action
|
Approve or Reject a WorkflowApprove a WorkflowBefore approving a workflow, the Scheduler should run Time Analysis. When the Scheduler approves a change request, the following occurs:
For more information about saving the Change Log details, see "Export the Change Details Report And/Or Change Logs" in Related Topics.Reject a WorkflowIf the Scheduler needs to reject a workflow, they must exit the Modeling Session view and reject it from the Model Changes view. When a change request is rejected, the default workflow settings assign the change request back to the originator. If the scheduler rejects it after making and saving changes, the changes made to the schedule are still saved and can be seen in the PM Compass Change Details view and in the Change Log dialog box. |
Learn more about...Export the Change Details Report And/Or Change Logs
|
How to Exit a Modeling SessionWhen you are finished with a Modeling Session, click Model Changes or any other menu option in the left navigation pane. You will be prompted to close the Open Plan schedule and end your modeling session. If you close the Open Plan schedule from within Open Plan, the connection to PM Compass is lost and your changes are not saved. |
Learn more about... |
Related Topics |
|
The workflow step for the scheduler to approve the change includes a cost system process step action to run schedule integration. When a change request includes changes to resources on an activity, the CAM cannot see the costs associated with the added resources. This step action in the workflow calculates the costs associated with the resources so that they can be viewed from the change request at the work package level. The Cost System Process step action runs the Cobra schedule integration process (using Cobra's API) which calls the Integration Wizard. The configuration file selected in the Schedule Integration Configuration field is passed to Cobra’s Integration Wizard to update the temporary Cobra project with the Change Baseline created by Open Plan. After schedule integration has run, the change request is updated.
|
How to...Use the Links Tab to View Cobra Errors View the Rate File Used to Calculate the Costs for a Change Request
Learn more about...Change Details on Form tab (Workflow Type Configuration) Cobra Integration Wizard Configuration File Settings Completing the Process When a Workflow Fails The "Cost System Process = Schedule Integration" Step Action |
Related Topics |
|
The next step is for the CAM (or each CAM for a Contract Change Request) to approve the change request now that the costs are displayed on the Costs tab and the totals are on the change request form. The CAM can approve the change request or make changes before approving. The changes that can be made are based on the settings in the workflow steps. The default In-Progress step status of this step is In Review. The CAM can edit two types of data without the change request having to go back to the schedule and cost system:
For a Contract Change Request, a CAM cannot add new control accounts after the workflow steps are started and the change request has been to the scheduler. While they can edit work package costs in this step, the related control account would need to have been added to the change request before starting the workflow steps. The changes made in the cost and schedule can be viewed by clicking the Change Log button to display the Change Log dialog box. For more information about saving the Change Log details, see "Export the Change Details Report And/Or Change Logs" in Related Topics.A CAM cannot change activities in the schedule during this step without sending the change request back to the scheduler to be re-applied and have the costs recalculated. If the review action is not triggered by clicking Edit Schedule, the CAM selects the workflow action of Approve to move the change request on to the next step. Editing the ScheduleIf the CAM needs to make changes to activities in the schedule, they must click the Edit Schedule button on the Change Details toolbar. This enables the activities and notifies the workflow that the change must be submitted back to the scheduler. If a work package milestone is linked to an activity and the CAM changes the milestone ID on the activity, they must delete the incorrect work package milestone. Deleting activities will not delete the work package milestone. For a Contract Change Request, if one CAM makes a change to the request, the entire contract change request is sent back to the scheduler. Approving a Change RequestWhen the CAM approves a change request, and the change class is a budget class, PM Compass checks for negative undistributed budget, negative management reserve, and negative BAC for the work package. If any of the checks fail, a warning message displays if you are approving in Form View or an email is sent if you are approving in List View. For more information, see "System Checks When a Change Request is Approved" in Related Topics.Example of What Happens When One CAM Rejects a Contract Change RequestThere are three CAM's assigned to a Contract Change Request.
When the change request is rejected, schedule integration runs and the time phasing that the first CAM performed is lost because the new change could affect the dates. The work package update that the second CAM completed is retained, and the change request goes back to the scheduler to reapply the change. |
How to...Export the Change Details Report And/Or Change Logs
Learn more about...Change Class in Workflow Type Configuration Date Calculation Differences in Open Plan and PM Compass Editing the Schedule after the Scheduler Applies the Change Rules for Editing Change Details Data System Checks when a Change Request is Approved Automatically Updating the Baseline Dates in a Modeling Session
|
Related Topics |
|
The default In-Progress status for this step is In Review. This setting allows the Project Controls Analyst (PCA) to make minor changes to the costs without rejecting the change request. For example, the PCA might select an appropriate resource code, add required codes to the work package, or even change costs by switching out resource codes. If the PCA should only approve or reject a change request and not have the ability to make any changes, change the workflow status to In Approval. Tip: If the scheduler and PCA are the same person, you may want to move the PCA step so that it follows the scheduler step. That way the scheduler/PCA can approve the schedule and see the costs before the change request is sent to the CAM. If you change the workflow steps and review action, confirm that the review action is set to send the change request back to the person who is applying the schedule. |
Learn more about...
|
Related Topics |
|
The default In-Progress status of the change request is In Approval and the IPT and PM cannot edit any data. If the change request is approved, it moves on to the scheduler. If it is rejected, it goes back to the originator. |
Learn more about... |
Related Topics |
|
The last step completes the change request and commits the changes to the live project. The workflow portion of the process is automatically sent to the scheduled process queue to be executed on the Process Server. When you click Complete on the change request Workflow Actions menu, the following step actions are scheduled to run on the process server (they run in the order documented and always go to the system queue):
For a detailed description of the above step actions, see "The Change Management Step Actions" in Related Topics.Tip: Whosever role it is to complete the change request should be familiar with both Open Plan and Cobra so that they can resolve any errors that occur during processing. It may be helpful to create a special responsibility at the project level to which you assign this complete step. That way the person completing change requests can verify that the change goes in correctly and can correct any issues.For more information, see "Completing the Process When a Change Request Fails" in Related Topics. |
How to...Complete the Process When a Change Request Fails Export the Change Details Report and/or the Cost and Schedule Change Logs Learn more about...Applying Changes to the Live Project Change Management Step Actions Completing a Change When the Calendar has been Advanced System Checks when a Change Request is Approved System checks when a Workflow is Completed
|
Related Topics |
|
To allow you to complete multiple workflows at once, the Open Plan project is opened in Shared mode during the Complete step. The results of the Time Analysis are not saved to the database when the project is open in Shared mode. PM Compass reads the data saved in the database; therefore, after the workflows are complete, you must open the Open Plan project in Exclusive mode, run Time Analysis, and save the project so that the correct dates display in the PM Compass views. You can also use an Open Plan batch process to perform this task. |
Learn more about...How Cost and Schedule Progress Workflows are Created
|
Reporting on Approved Change Requests |
Related Topics |
BCR Analysis ReportThe purpose of the BCR Analysis report is to confirm that the change request data has been correctly added to Cobra and Open Plan as well as providing summary and detailed information about the changes processed in a particular period. The report displays before and after data for change requests processed for a period and highlights any discrepancies; that is, things that didn't get processed as planned. Work Authorization ReportThe Work Authorization report uses the change requests. This report displays the Initial Work Authorization followed by all approved change requests. The benefit of using this report (instead of creating a new Initial Work Authorization) is that you only need to have one set of approvals for a change request. In addition, the report shows the initial work authorization followed by the approved changes. To track all changes to the project, it is important not to make changes to the budget in the live Open Plan and Cobra projects. The change management process and reporting assumes that all changes need to be approved, and PM Compass will be used to change the budget. |
How to....Run a Contract Change report
Learn more about...
|