The Daily tab on the Supervisor Review and Labor Review forms allows supervisors to view, modify, and enter transactions on a specific employee’s timecard. The Daily tab displays the timecard for the employee selected on the Current Situation, Time Card Review, or Labor Review form.
If you have been assigned a Supervision Date Policy, this policy will determine which of your employees and which dates you can view, sign, or post events for in the supervisor timecard. If you have not been assigned a Supervision Date Policy, the supervisor timecard can only be used to view, sign, or post events for the employees that you currently have authority over.
The Daily tab displays events that were posted during a single day, and the total hours for the single day. You can also sign/unsign specific days and adjust elapsed and punched transactions. Note that you cannot modify transactions posted automatically from a person's schedule, such as Late Arrivals, Early Departures, Gap Events, and Outside Gap Events.
The fields that are visible on the Daily tab are based on the Form Profile of the logged-in user, not the Form Profile of the employee whose timecard is showing.
If an employee does not have an effective Pay Policy for the date selected in this tab, then no timecard data will be shown.
The tasks that can be performed on the Daily tab (Find, Next, Sign, etc.) must be enabled in the logged in supervisor’s Security Role in order for them to display on the form. Additionally, if you have been assigned a Supervisor Role, the actions that you can carry out in this form will depend on the Functional Areas that have been assigned to your role. See Supervisor Role for more information.
Note: Supervisors cannot post time for employees that are inactive or terminated. However, supervisors who have a Security Data Role with a SUPERVISOR_ADMIN item may modify and cancel inactive and terminated employees' transactions.
See Also:
How Daily Timecard Data is Displayed
Recalculate/Unrestricted Recalculate
Modifying Timecard Transactions
Deleting Timecard Transactions
The fields that are visible on the Daily tab are based on the Form Profile of the logged-in user, not the Form Profile of the employee whose timecard is showing. You can show or hide these fields by modifying your Form Profile.
The Daily tab of the timecard has two sections: a Filter section and the timecard section. The Filter section is used to select which day to display (see “Find Records” below).
You can show or hide fields in this tab by modifying your Form Profile.
You can change the names of these fields using the Dictionary Label form.
The Filter fields appear when you click the ![]() Filter button on the Daily
tab. To show or hide the Filter fields, edit the Selection
Criteria in your Form Profile.
Filter button on the Daily
tab. To show or hide the Filter fields, edit the Selection
Criteria in your Form Profile.
By default, the Name, Employee, Status, and Posting Date fields will appear in the Filter section. You must enable the other fields listed below in your Form Profile if you want them to display.
Name, Employee
These read-only fields display the Name and Person Number of the employee whose record is selected.
Status
Indicates whether the day has been signed by the employee or supervisor; if the day has been payroll locked; or if an automatic clock out was posted by the ATTENDANCE service.
![]() indicates the
employee signed the timecard.
indicates the
employee signed the timecard.
![]() indicates the
supervisor signed the timecard.
indicates the
supervisor signed the timecard.
![]() indicates the
day is locked for payroll. A grayed out
indicates the
day is locked for payroll. A grayed out ![]() icon indicates
the day is not locked for payroll.
icon indicates
the day is not locked for payroll.
 indicates an automatic
clock out was posted by the ATTENDANCE service.
indicates an automatic
clock out was posted by the ATTENDANCE service.
For split
days in 9-80 schedules, the sign and
payroll lock Status icons may have half indicators (part of the icon is
grayed out). This icon indicates only the first or second half of the
day was signed or payroll locked. For example, ![]() indicates
a supervisor signature is only on the first half of a split day. The
indicates
a supervisor signature is only on the first half of a split day. The ![]() icon indicates an employee signature is only on the
second half of a split day. The
icon indicates an employee signature is only on the
second half of a split day. The ![]() icon indicates only the second half of a split day is payroll locked.
icon indicates only the second half of a split day is payroll locked.
Posting Date
Determines the day that is displayed on the Daily tab.
The date you enter can be past, present (today), or in the future. The default Posting Date is the current date.
Note: If you search for records in the Period, Weekly, or Punch Time tab using a different Effective Date or Posting Date, this new date will display on the Daily tab as well.
Click the  and
and  buttons to scroll to the previous or next day. Click the
 ![]() button to display a calendar from which you can select another date.
button to display a calendar from which you can select another date.
Employee Type
Identifies the employee category (Administrator, Contractor, Employee, etc.). Defined in the person’s Employment Profile. This field will display the Employee Type from the Employment Profile that is in effect on the Effective Date selected in the Filter section. If there is no Employment Profile record for the specified Effective Date, the field will be blank.
Full Time/Part Time
Employee’s work agreement with the company. Used for benefit calculations and by the various policy and group guidelines to which the employee will be assigned. Also used to determine work schedules, pay rates, benefit eligibility, etc. Valid entries are Full Time, Part Time.
Defined in the person’s Employment Profile. This field will display the Full Time/Part Time setting from the Employment Profile that is in effect on the Effective Date selected in the Filter section. If there is no Employment Profile record for the specified Effective Date, the field will be blank.
Classification Type
Indicates how the employee is paid.
HOURLY employees are paid by the hour.
SALARIED employees are paid a salary instead of an hourly rate.
NONEXEMPT refers to employees who are entitled to overtime pay.
Defined in the person’s Employment Profile. This field will display the Classification Type from the Employment Profile that is in effect on the Effective Date selected in the Filter section. If there is no Employment Profile record for the specified Effective Date, the field will be blank.
Policy Group
Indicates the Policy Group to which the person belongs. Policy Groups are defined on the Employee Group form and employees are assigned to Policy Groups using the Employee Group Member tab.
This field will display the Policy Group to which the person is assigned on the Effective Date selected in the Filter section. If the person is not a member of a Policy Group on the specified Effective Date, the field will be blank.
Default Schedule
Displays the Schedule Cycle to which the person is assigned on the Effective Date selected in the Filter section. If the person does not have a default Schedule Cycle assignment on the specified Effective Date, the field will be blank.
Note that only the Schedule Cycle in the person’s default Assignment record will be shown. If the Schedule Cycle is defined in an Override assignment, it will not be displayed.
AdHoc Assignment 3
Displays the Charge Element with Charge Type ASSIGNMENT3 to which this person is assigned on the Effective Date selected in the Filter section. If the person is not assigned to an ASSIGNMENT3 Charge Type on the specified Effective Date, the field will be blank.
Note that only the ASSIGNMENT3 Charge Type in the person’s default Assignment record will be shown. If the ASSIGNMENT3 Charge Type is defined in an Override assignment, it will not be displayed.
Default Shift
Displays the Shift to which this person is assigned on the Effective Date selected in the Filter section. If the person is not assigned to a Shift on the specified Effective Date, the field will be blank.
Note that only the Shift in the person’s default Assignment record will be shown. If the Shift is defined in an Override assignment, it will not be displayed.
AdHoc Assignment 1
Displays the Charge Element with Charge Type ASSIGNMENT1 to which this person is assigned on the Effective Date selected in the Filter section. If the person is not assigned to an ASSIGNMENT1 Charge Type on the specified Effective Date, the field will be blank.
Note that only the ASSIGNMENT1 Charge Type in the person’s default Assignment record will be shown. If the ASSIGNMENT1 Charge Type is defined in an Override assignment, it will not be displayed.
AdHoc Assignment 4
Displays the Charge Element with Charge Type ASSIGNMENT4 to which this person is assigned on the Effective Date selected in the Filter section. If the person is not assigned to an ASSIGNMENT4 Charge Type on the specified Effective Date, the field will be blank.
Note that only the ASSIGNMENT4 Charge Type in the person’s default Assignment record will be shown. If the ASSIGNMENT4 Charge Type is defined in an Override assignment, it will not be displayed.
By default, the fields listed below will appear in the timecard section. You can also enable additional fields below in your Form Profile (Resultset Fields section) if you want them to display.
See “How Daily Timecard Data is Displayed” below for more information on how to view the timecard data.
Event: Name of the event that was posted.
Key Name, Key Val: Lists the prompts and values associated with the Event (such as Order Number and Operation Number). For example, Key Name = /F_ORDER_NUM/F_OPERATION_NUM/F_ACTIVITY_NUM and Key Value = /3000/10/10.
Order Num, Operation Num, Activity Num: Will display the work order, operation, and activity numbers, if any, for this event. These values are defined on the Charge Element form.
Project Num, Task Num: Will display the project and task numbers, if any, for this event. These values are defined on the Charge Element form.
Indirect Charges: Will display the indirect charge number, if any, for this event. This value is defined on the Charge Element form.
Classification: Hours classification and Shift for the event posting.
Start, End Rounded Timestamp: Start and end times of the event based, rounded based on Clock Policy.
Click the ![]() Filter
button at the top of the Daily tab to display the filter area.
Filter
button at the top of the Daily tab to display the filter area.
The filter area displays information about the employee whose record was selected on the Current Situation, Time Card Review, or Labor Review form. You can change the Posting Date of the day you want to view.
Click Find after you select your Posting Date.
The fields that are visible on the Daily tab are based on the Form Profile of the logged-in user, not the Form Profile of the employee whose timecard is showing. You can show or hide these fields by modifying your Form Profile.
The left grid of the Daily timecard displays the charge items and descriptions. The right grid displays the duration details posted to the charge item, and the total hours charged to the item. If your Form Profile allows, you may also see comments and/or reason codes that were entered during a transaction.
You can scroll each side of the Daily timecard separately using the horizontal scroll bars on the bottom of the form.
The format of the hours shown on the timecard is determined by your Duration Format setting on the Preferences form. The options are CLOCK (HH:MM:SS), or DECIMAL (0.00).
Standard rounding rules apply to the timecard. Time entered in the timecard is automatically converted, stored, and displayed according to the applicable Rounding Policy. For example, if a person’s rounding interval is configured to be “Nearest Six Minutes” and the duration amount of 1:05 (one hour, five minutes) is entered into their timecard, the system will convert, store, and display the time as 1:06 (one hour, six minutes) to conform to the time rounding rules. The system applies the Rounding Policy of the person whose timecard is being modified. If a supervisor is modifying an employee’s timecard, the employee’s Rounding Policy is used. In the Self Service timecard, the logged on user’s Rounding Policy is used.
If you have the Show Adjustments box checked in your Preferences settings, the timecard will display any adjustments that have been made to elapsed or punched transactions. The adjusted hours will stay visible on the timecard, but will be grayed out with a line through the entry. The adjusted hours will not count towards the total hours. To hide the adjusted hours, uncheck the Show Adjustments box in the Preferences form.
To download the timecard records on the Daily tab, click
the ![]() Download button. Your
web browser will display a message asking if you want to open or save
the .csv file. Open the file to view it immediately or click Save to save
it to disk.
Download button. Your
web browser will display a message asking if you want to open or save
the .csv file. Open the file to view it immediately or click Save to save
it to disk.
You can sign and unsign an employee's timecard via the Sign Day/Unsign Day button on the Daily tab.
The Sign/Unsign Day button will only be visible if the Sign Policy of the employee whose timecard you are viewing has the Supervisor Sign Option enabled for Day. The Sign Day button also has to be enabled in your Security Role.
Ensure that the day you want to sign/unsign is displayed (if necessary, change the Posting Date in the filter area).
If the day has not been signed by a supervisor, the Sign Day button displays. Otherwise, the Unsign Day button displays.
Click Sign Day to add your supervisor signature to the day.
Click Sign and Next to sign the day for the selected employee and then display the timecard for the next employee listed on the Current Situation, Time Card Review, or Labor Review form.
If you are using the Time Card Check feature, and there are hours exceptions in the day, such as underreported or overreported hours, the Time Card Check pop-up form will appear. This form will list any error or warning messages that resulted from the hours exceptions. If there are any error violations in this form, the day will not be signed.
Click Unsign Day to remove your supervisor signature from the day.
If a password is required (the Supervisor Authentication on Sign setting is enabled), a pop-up form will display. Enter your login password and click OK.
When the day is supervisor signed, the ![]() icon will appear in the Status
field in the filter area of the Daily tab. If the day is a split
day, the
icon will appear in the Status
field in the filter area of the Daily tab. If the day is a split
day, the ![]() icon will display
if the supervisor only signed the first half. Likewise, the
icon will display
if the supervisor only signed the first half. Likewise, the ![]() icon will display if the
supervisor only signed the second half.
icon will display if the
supervisor only signed the second half.
![]()
The Repost Day button allows the supervisor to repost the day’s transactions when a change is made outside the timecard that affects the day’s events on the timecard (such as the deletion of an automatic lunch from an employee’s schedule).
For example, a supervisor may check an employee’s daily timecard and see that the employee has an automatic lunch posting that needs to be removed. The supervisor asks an administrator to delete the lunch from the employee’s schedule. Once the lunch is deleted from the schedule, the supervisor clicks the Repost Day button on the timecard. The day’s events repost without the automatic lunch and the other events adjust as necessary.
The Repost Day button is available on the Current Situation form as well as the Daily tab of the Supervisor Review and Labor Review forms. If the button is not visible, you will need to enable it in the supervisor's Security Role.
You can use Repost Day for multiple selected employees on the Current Situation form. The POST setting of your Supervision Date Policy will determine whether you can repost a day for a selected employee. If you do not have posting access for all the selected employees, then Repost Day will not work for any of them.
You cannot use Repost Day on a day that is Payroll Locked.
You can view the adjusted transactions in the timecard if Show Adjustments is set to ALL in your Preferences.
The Save button is used to save any hourly modifications you make directly in the grid. See Add Hours Directly to the Timecard and Modify an Elapsed Transaction Using Direct Entry.
If your Form Profile permits, you can view an event’s Comments and/or Reason Codes on the Daily tab of the timecard.

For information on how to make these columns visible, see Add Comment and Reason Code Columns to Daily Timecard.
The Comment column displays the comment text entered when the event was added, modified, or deleted.
The Comment/Reason/Desc column displays both the reason code (with its description) and the comment text entered when the event was added, modified, or deleted.
The Reason Code column displays the reason code selected when the event was added, modified, or deleted.
The Reason Code/Desc column displays the reason code (with its description) selected when the event was added, modified, or deleted.
If your Security Role permits, you can also
add, modify, and delete an event’s comments and reason codes by clicking
the  icon.
icon.
![]()
See Configuration to Modify Comments and Reason Codes in Daily Timecard for information on enabling this option.
When you click the icon,
the Comment And Reason Codes pop-up form appears. Use this form to view,
add, modify,
and delete the transaction’s
comments and reason codes.
Click the ![]() Filter
button to display the Show Deleted check box. When this check
box is selected, any comments or reason codes that were deleted will display
when you click Find.
Filter
button to display the Show Deleted check box. When this check
box is selected, any comments or reason codes that were deleted will display
when you click Find.
Type
This field indicates whether the item is a COMMENT or a REASON code.
Charge Code Value
If the Type is REASON, this field displays the reason code. If the Type is COMMENT, this field will be blank.
Comment
If the Type is COMMENT, this field displays the comment text. If the Type is REASON, this field displays the reason code and its description.
Required
If this check box is selected, the reason code or comment was required when the event was posted. The configuration to require comments and reason codes is done in the Event Policy.
Record Status
This indicates whether the record is Active or Inactive.
Update Date, Updated By
These fields display when the record was created or updated, and the person who created or updated the record.
On the Comment And Reason Codes pop-up form, click Add.
The Add Comment and Reason Codes form appears.
From the Type field, select COMMENT if you are adding a comment. Select REASON if you are adding a reason code.
If you selected COMMENT as your Type, enter the comment text in the Comment box.
If you selected REASON as your Type, select the Charge Code from the drop-down menu.
If you want to add more than one comment/reason code, click Save and Add to save the current record and keep the Add Comment and Reason Codes form open. Or click Save to save the current record and return to the main form.
On the Comment And Reason Codes pop-up form, select the comment or reason code and click Modify.
The Modify Comment and Reason Codes form appears.
Modify the comment or reason code as necessary.
Click Save.
On the Comment And Reason Codes pop-up form, select the comment or reason code and click Delete.
Click OK to confirm the action.
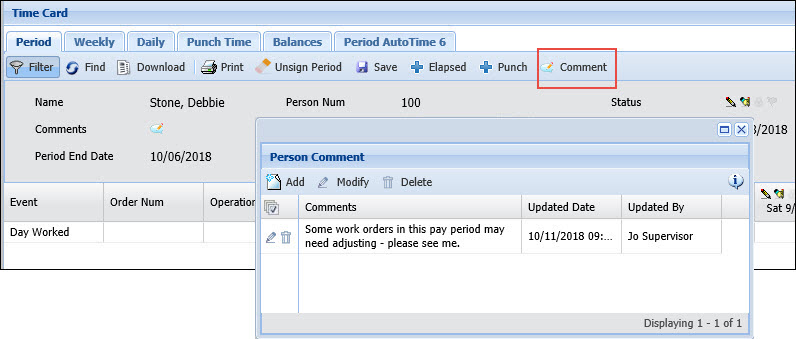
Supervisors and employees can view, add, modify, and delete comments in the timecard for a particular pay period. Unlike comments and reason codes, which are associated with a specific transaction, timecard comments are associated with a specific pay period.
If the period you are viewing in the timecard has comments,
the Comments icon in the Filter area will be enabled.
To view these comments, hover over this icon.

To add, modify, or delete timecard comments:
Go to the timecard Filter and select an Effective Date or Posting Date that is in the pay period for which you are adding, modifying or deleting the comment.
Click  .
.