This section explains how to modify transactions in the Period, Weekly, and Daily tabs of the Supervisor Review timecard (Current Situation and Time Card Review) and in the Self Service Time Card.
If you want to view the adjusted hours in the timecard,
you may need to change your Show Adjustments
Preference. Click the ![]() icon
in the top right corner of the screen to open the Preferences form. Set
Show Adjustments to USER ADJUSTMENTS
to view adjustments made by employees and supervisors. Set Show Adjustments
to ALL to include adjustments
made when the timecard is recalculated.
icon
in the top right corner of the screen to open the Preferences form. Set
Show Adjustments to USER ADJUSTMENTS
to view adjustments made by employees and supervisors. Set Show Adjustments
to ALL to include adjustments
made when the timecard is recalculated.
Note that the user’s ability to modify transactions on the timecard will depend on whether Modify is enabled for that particular timecard form in the user’s Security Role. In addition, certain Event Settings may restrict which event’s a user can modify.
You can modify elapsed and punch transactions as explained below: |
|
Modify Elapsed Transactions: Pencil icon (Daily tab only) |
Modify Punch Transactions (Daily tab only): |

If the Pencil icon is not visible, you will need to enable the Modify option in your Security Role.
The Pencil icon
is only available in the Daily tab of the timecard.
Click the pencil
icon
located to the far left of the elapsed transaction.
![]()
The Event Prompts – Elapsed pop-up form appears.
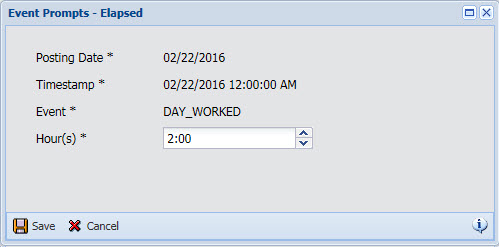
Modify the Hour(s) and other event prompts as necessary.
If the event prompt is a text field for a Level 1 Charge Element (e.g., Order Number), you can perform a filtered search for the value.
The event must have the FILTERED_SEARCH Event Setting enabled. This setting is enabled by default. In addition, the event prompt must have its Prompt Control Type set to Text Field and the event prompt must have values in the Charge Type and Element Name fields.
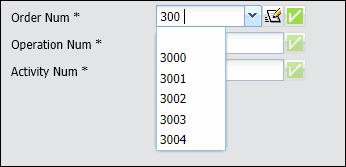
Type a minimum of three characters in the field to display matching values in the drop-down list.
Click the ![]() button
to display a pop-up form to look up a value. Use the Filter fields
in this pop-up form to select a charge element.
button
to display a pop-up form to look up a value. Use the Filter fields
in this pop-up form to select a charge element.
The available options will depend on the user’s Charge Filtration settings.
If a Reason Code field displays, select a Reason Code from the drop-down menu.
If a Comment box displays you can enter up to 80 characters in the box.
Click Save.
Click the Recalculate button to bring the timecard into compliance with your Pay Policy rules.
To modify hours directly in the timecard as shown below, the direct_entry setting must be set to “1” (enabled) for the appropriate timecard form. See Form Settings for more information.
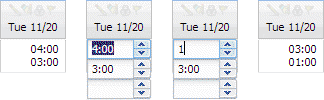
Click the grid with the hours you want to modify.
Type the new hours directly in the field.
You can enter your hours in decimal format (i.e., 2 ½ hours would be entered as “2.5”), or clock format (i.e., 2 ½ hours would be entered as "2:30:00"). The format that is displayed on the timecard will depend on your Duration Format setting in the Preferences form.
Click Save on the toolbar to save the new data.
If you navigate away from the timecard grid without clicking Save, a warning message will display that un-saved data will be lost. Make sure you click Save to keep the changes you entered in the grid.
Click the Recalculate button to bring the timecard into compliance with your Pay Policy rules.
Note: If a reason code and/or comment is required, you will not be able to modify hours directly on the timecard. Instead, the Event Prompts – Elapsed pop-up form (see above) will display. You will need to modify the event hours using this form so you can also enter the required comment or reason code.
If the Modify option is not visible, you will need to enable the Modify option in your Security Role.
Right-click the hours you want to modify and select Modify from the pop-up menu.
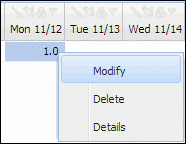
The Event Prompts – Elapsed pop-up form will appear.
Modify the Hour(s) and other event prompts as necessary.
If the event prompt is a text field for a Level 1 Charge Element (e.g., Order Number), you can perform a filtered search for the value.
The event must have the FILTERED_SEARCH Event Setting enabled. This setting is enabled by default. In addition, the event prompt must have its Prompt Control Type set to Text Field and the event prompt must have values in the Charge Type and Element Name fields.
Type a minimum of three characters in the field to display matching values in the drop-down list.
Click the ![]() button
to display a pop-up form to look up a value. Use the Filter fields
in this pop-up form to select a charge element.
button
to display a pop-up form to look up a value. Use the Filter fields
in this pop-up form to select a charge element.
The available options will depend on the user’s Charge Filtration settings.
If a Reason Code field displays, select a Reason Code from the drop-down menu.
If a Comment box displays you can enter up to 80 characters in the box.
Click Save.
Click the Recalculate button to bring the timecard into compliance with your Pay Policy rules.
If the Pencil icon is not visible, you will need to enable the Modify option in your Security Role.
In the Daily tab of the timecard, click the pencil icon located to the far left of the punch transaction.
The Event Prompts - Modify Punched form opens.
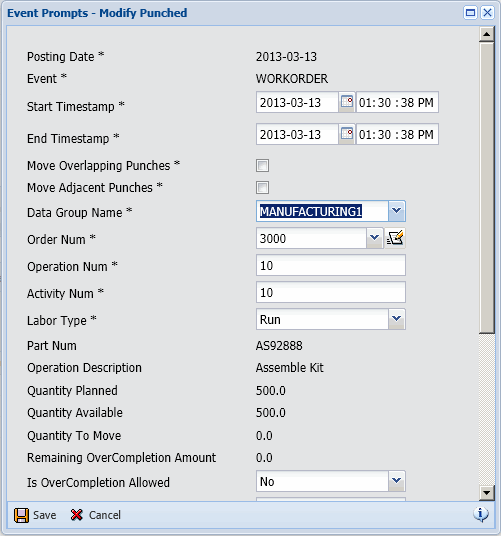
Modify the Start and End Timestamps.
Check the Move Overlapping Punches box if you want the system to automatically adjust any overlapped punches to be at the same time as the new punch.
Example: Employee Clocks In at 7 AM and starts Labor at 7:30 AM. Supervisor adjusts the Clock In to 8 AM. The Labor start now overlaps the Clock In. If Move Overlapping Punches is checked, the Labor start will automatically adjust to 8 AM as well.
Check the Move Adjacent Punches box if you want the system to move any punches that have the same time stamp as the original value of the adjusted punch. The timestamp of the adjacent punch will move to match the adjusted punch time. Move Adjacent Punches can be used to prevent gaps between labors.
Example: Employee Clocks In at 7 AM and punches the following: Labor 1 starts at 7 AM and stops at 8 AM. Labor 2 starts at 8 AM. Supervisor adjusts the start of Labor 2 to 9 AM. If Move Adjacent Punches is checked, the stop of Labor 1 would also move to 9 AM. If Move Adjacent Punches is not checked, the stop of Labor 1 would not change and a gap event would post between the labors from 8 AM to 9 AM.
Change the other prompt values as necessary.
If the event prompt is a text field for a Level 1 Charge Element (e.g., Order Number), you can perform a filtered search for the value.
The event must have the FILTERED_SEARCH Event Setting enabled. This setting is enabled by default. In addition, the event prompt must have its Prompt Control Type set to Text Field and the event prompt must have values in the Charge Type and Element Name fields.
Type a minimum of three characters in the field to display matching values in the drop-down list.
Click the ![]() button
to display a pop-up form to look up a value. Use the Filter fields
in this pop-up form to select a charge element.
button
to display a pop-up form to look up a value. Use the Filter fields
in this pop-up form to select a charge element.
The available options will depend on the user’s Charge Filtration settings.
If a Reason Code field displays, select a Reason Code from the drop-down menu.
If a Comment box displays you can enter up to 80 characters in the box.
Click Save.
Click the Recalculate button to bring the timecard into compliance with the employee's Pay Policy rules.
If the Modify option is not visible, you will need to enable the Modify option in your Security Role.
Go to the Daily tab of the timecard.
In the Duration column, right-click the hours you want to modify and choose Modify from the pop-up menu.
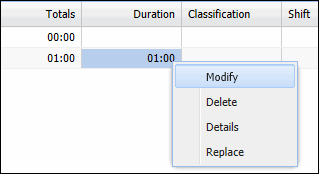
The Event Prompts - Modify Punched form opens.
Modify the fields as necessary. See Modify a Punch Transaction Using the Pencil Icon for information on the fields in this form.
Click Save.
Click the Recalculate button to bring the timecard into compliance with the employee's Pay Policy rules.
If the Pencil icon and the Modify command are not visible in the timecard, you will have to enable the Modify option in your Security Role.
Click Main Menu > Configuration > Security > Security Roles.
If necessary, click the ![]() Filter button and select the appropriate Security
Role Name.
Filter button and select the appropriate Security
Role Name.
To enable the Modify option in the supervisor timecard, go to Web: Manage: Supervisor Review: Current Situation and expand the Period, Weekly, or Daily tab.
When you enable or disable the Modify option in one supervisor timecard tab, the same setting change will be made to the other supervisor timecard tab. For example, if you enable the Modify option in the Period tab of Current Situation, the Modify option will also be enabled in the Period tab of Time Card Review.
To enable the Modify option in the employee timecard, go to Web: Self Service: Time Card and expand the Period, Weekly, or Daily tab.
Check the Modify (modify) box.
Click Save.