When a new event is created, it will use the settings defined for its Event Type. You can modify these settings on the Event Type Setting form. For some settings, you can also modify the value for a single event on the Setting tab of the Events form.
An Event Setting overrides an Event Type Setting, which overrides a Terminal Profile Setting.
Note: Some of the event setting types require event validation configuration in order to take effect.
Indicates whether the event can be posted using the Add Elapsed button in the timecard.
In addition, if the user tries to add hours to an event by entering them directly in the timecard grid, the timecard will not display the additional control to add the hours. The user will have to modify the existing hours instead.

By default, this setting is True; the Add Elapsed button can be used to post the event on the timecard. If this setting is False, the event will not be available when you use Add Elapsed in the timecard.
This setting can be applied to an Event or an Event Type; the Event setting overrides the Event Type setting.
This setting can also be included in an Event Policy using the Event Setting tab. For an employee using the Self Service Time Card, the Event Policy’s ALLOW_ELAPSED_ADD setting will override the ALLOW_ELAPSED_ADD setting for an Event or an Event Type.
This setting is part of the Event Posting Restriction feature.
Allow Elapsed Add Enable (True): The Add Elapsed button can be used to post the event on the timecard.
Allow Elapsed Add Disable (False): The event will not be available when you use Add Elapsed in the timecard.
The ALLOW_ELAPSED_ADD setting is included with the following event types:
All LABOR events
ATTENDANCE:BREAK
ATTENDANCE:HOLIDAY
ATTENDANCE:MEAL
ATTENDANCE:NO_SHOW
ATTENDANCE:SHORT_DAY
ATTENDANCE:SICK
ATTENDANCE:SUSPEND
ATTENDANCE:TIME_OFF
ATTENDANCE:VACATION
MATERIAL:MOVE
TRANSIENT:ASSIGNMENT
TRANSIENT:ASSIGNMENT_IMMEDIATE
Indicates whether an elapsed event can be deleted from the timecard.
By default, this setting is True;
the elapsed event can be deleted from the timecard. If this setting
is False, the elapsed event
cannot be deleted from the timecard. If the user right-clicks the
event’s hours in the timecard, the Delete option will not display
in the pop-up menu. On the Daily tab of the timecard, the trash can
icon  will not display next to the elapsed event.
Note: The Delete All button in the Daily tab of the supervisor timecard can still be used to delete events if ALLOW_ELAPSED_DELETE or ALLOW_PUNCH_DELETE are disabled. If you want to hide the Delete All button, you must disable it in the supervisor’s Security Role.
This setting can be applied to an Event or an Event Type; the Event setting overrides the Event Type setting.
This setting can also be included in an Event Policy using the Event Setting tab. For an employee using the Self Service Time Card, the Event Policy’s ALLOW_ELAPSED_DELETE setting will override the ALLOW_ELAPSED_DELETE setting for an Event or an Event Type.
This setting is part of the Event Posting Restriction feature.
Allow Elapsed Delete Enable (True): The elapsed event can be deleted from the timecard.
Allow Elapsed Delete
Disable (False): The elapsed event cannot be deleted from the
timecard. If the user right-clicks the event’s hours in the timecard,
the Delete option will not display in the pop-up menu. On the Daily
tab of the timecard, the trash can icon
will not display next to the elapsed event.
The ALLOW_ELAPSED_DELETE setting is included with the following event types:
All LABOR events
ATTENDANCE:BREAK
ATTENDANCE:HOLIDAY
ATTENDANCE:MEAL
ATTENDANCE:NO_SHOW
ATTENDANCE:SHORT_DAY
ATTENDANCE:SICK
ATTENDANCE:SUSPEND
ATTENDANCE:TIME_OFF
ATTENDANCE:VACATION
MATERIAL:MOVE
TRANSIENT:ASSIGNMENT
TRANSIENT:ASSIGNMENT_IMMEDIATE
Indicates whether an elapsed event can be modified in the timecard.
By default, this setting is True;
the elapsed event can be modified in the timecard. If this setting
is False, the elapsed event
cannot be modified in the timecard. If the user right-clicks the event’s
hours in the timecard, the Modify option will not display in the pop-up
menu. In addition, the user will not be able to modify the hours directly
in the timecard grid. On the Daily tab of the timecard, the modify
icon  will not display next to the elapsed event.
This setting can be applied to an Event or an Event Type; the Event setting overrides the Event Type setting.
This setting can also be included in an Event Policy using the Event Setting tab. For an employee using the Self Service Time Card, the Event Policy’s ALLOW_ELAPSED_MODIFY setting will override the ALLOW_ELAPSED_MODIFY setting for an Event or an Event Type.
This setting is part of the Event Posting Restriction feature.
Allow Elapsed Modify Enable (True): The elapsed event can be modified in the timecard.
Allow Elapsed Modify
Disable (False): The elapsed event cannot be modified in the
timecard. If the user right-clicks the event’s hours in the timecard,
the Modify option will not display in the pop-up menu. In addition,
the user will not be able to modify the hours directly in the timecard
grid. On the Daily tab of the timecard, the modify icon will not display next to
the elapsed event.
The ALLOW_ELAPSED_MODIFY setting is included with the following event types:
All LABOR events
ATTENDANCE:BREAK
ATTENDANCE:HOLIDAY
ATTENDANCE:MEAL
ATTENDANCE:NO_SHOW
ATTENDANCE:SHORT_DAY
ATTENDANCE:SICK
ATTENDANCE:SUSPEND
ATTENDANCE:TIME_OFF
ATTENDANCE:VACATION
MATERIAL:MOVE
TRANSIENT:ASSIGNMENT
TRANSIENT:ASSIGNMENT_IMMEDIATE
Indicates whether the event can be posted using the Add Punch or Add Punch Pair button in the timecard.
By default, this setting is True; the Add Punch and Add Punch Pair buttons can be used to post the event on the timecard. If this setting is False, the event will not be available when you use Add Punch and Add Punch Pair buttons in the timecard.
This setting can be applied to an Event or an Event Type; the Event setting overrides the Event Type setting.
This setting can also be included in an Event Policy using the Event Setting tab. For an employee using the Self Service Time Card, the Event Policy’s ALLOW_PUNCH_ADD setting will override the ALLOW_PUNCH_ADD setting for an Event or an Event Type.
This setting is part of the Event Posting Restriction feature.
Allow Punch Add Enable (True): The Add Punch and Add Punch Pair buttons can be used to post the event on the timecard.
Allow Punch Add Disable (False): The event will not be available when you use Add Punch and Add Punch Pair buttons in the timecard.
The ALLOW_PUNCH_ADD setting is included with the following event types:
All LABOR events
ATTENDANCE:BREAK
ATTENDANCE:CLOCK
ATTENDANCE:HOLIDAY
ATTENDANCE:MEAL
ATTENDANCE:NO_SHOW
ATTENDANCE:SHORT_DAY
ATTENDANCE:SICK
ATTENDANCE:SUSPEND
ATTENDANCE:TIME_OFF
ATTENDANCE:VACATION
MATERIAL:MOVE
TRANSIENT:ASSIGNMENT
TRANSIENT:ASSIGNMENT_IMMEDIATE
Indicates whether a punch event can be deleted from the Daily tab of the timecard.
By default, this setting is True;
the punch event can be deleted from the Daily tab of the timecard.
If this setting is False,
the punch event cannot be deleted from the Daily tab of the timecard.
If the user right-clicks the punch event’s hours in the Daily tab
of the timecard, the Delete option will not display in the pop-up
menu. In addition, the trash can icon
will not display next to the punch event.
Note: The Delete All button in the Daily tab of the supervisor timecard can still be used to delete events if ALLOW_ELAPSED_DELETE or ALLOW_PUNCH_DELETE are disabled. If you want to hide the Delete All button, you must disable it in the supervisor’s Security Role.
This setting can be applied to an Event or an Event Type; the Event setting overrides the Event Type setting.
This setting can also be included in an Event Policy using the Event Setting tab. For an employee using the Self Service Time Card, the Event Policy’s ALLOW_PUNCH_DELETE setting will override the ALLOW_PUNCH_DELETE setting for an Event or an Event Type.
This setting is part of the Event Posting Restriction feature.
Allow Punch Delete Enable (True): The elapsed event can be deleted from the timecard.
Allow Punch Delete
Disable (False): The elapsed event cannot be deleted from the
timecard. If the user right-clicks the punch event’s hours in the
Daily tab of the timecard, the Delete option will not display in the
pop-up menu. In addition, the trash can icon
will not display next to the punch event.
The ALLOW_PUNCH_DELETE setting is included with the following event types:
All LABOR events
ATTENDANCE:BREAK
ATTENDANCE:CLOCK
ATTENDANCE:HOLIDAY
ATTENDANCE:MEAL
ATTENDANCE:NO_SHOW
ATTENDANCE:SHORT_DAY
ATTENDANCE:SICK
ATTENDANCE:SUSPEND
ATTENDANCE:TIME_OFF
ATTENDANCE:VACATION
MATERIAL:MOVE
TRANSIENT:ASSIGNMENT
TRANSIENT:ASSIGNMENT_IMMEDIATE
Indicates whether to allow a modification to a punch event that occurs as a result of another punch event being modified or deleted. For example, you need to change the end timestamp of a Labor event and this change will cause an automatic Meal event’s start time to be changed. If ALLOW_PUNCH_INDIRECT is set to False for the automatic Meal event, then you will not be able to modify the Labor event because doing so will affect the automatic Meal event’s start time.
By default, this setting is True; the system will allow modification of a punch event that occurs as a result of the user modifying or deleting another punch event. If this setting is False, the system will display a message that indirect adjustments are not allowed for the event that has this setting.
This setting can also be included in an Event Policy using the Event Setting tab. For an employee using the Self Service Time Card, the Event Policy’s ALLOW_PUNCH_INDIRECT setting will override the ALLOW_PUNCH_INDIRECT setting for an Event or an Event Type.
This setting is part of the Event Posting Restriction feature.
Allow Punch Indirect Enable (True): The system will allow modification of a punch event that occurs as a result of the user modifying or deleting another punch event.
Allow Punch Indirect Disable (False): The system will not allow modification of a punch event that occurs as a result of the user modifying or deleting another punch event. For example, you need to change the end timestamp of a Labor event and this change will cause an automatic Meal event’s start time to be changed. If ALLOW_PUNCH_INDIRECT is set to False for the automatic Meal event, when you try to change the Labor event’s end timestamp, an error will display that indirect adjustments are not allowed for the Meal event.
The ALLOW_PUNCH_INDIRECT setting is included with the following event types:
All LABOR events
ATTENDANCE:BREAK
ATTENDANCE:CLOCK
ATTENDANCE:HOLIDAY
ATTENDANCE:MEAL
ATTENDANCE:NO_SHOW
ATTENDANCE:SHORT_DAY
ATTENDANCE:SICK
ATTENDANCE:SUSPEND
ATTENDANCE:TIME_OFF
ATTENDANCE:VACATION
MATERIAL:MOVE
TRANSIENT:ASSIGNMENT
TRANSIENT:ASSIGNMENT_IMMEDIATE
Indicates whether a punch event can be modified in the timecard.
By default, this setting is True;
the punch event can be modified in the Daily tab of the timecard.
If this setting is False,
the punch event cannot be modified in the Daily tab of the timecard.
If the user right-clicks the punch event’s hours in the Daily tab
of the timecard, the Modify option will not display in the pop-up
menu. In addition, the modify icon will not display
next to the punch event.
This setting can be applied to an Event or an Event Type; the Event setting overrides the Event Type setting.
This setting can also be included in an Event Policy using the Event Setting tab. For an employee using the Self Service Time Card, the Event Policy’s ALLOW_PUNCH_MODIFY setting will override the ALLOW_PUNCH_MODIFY setting for an Event or an Event Type.
This setting is part of the Event Posting Restriction feature.
Allow Punch Modify Enable (True): The punch event can be modified in the Daily tab of the timecard.
Allow Punch Modify
Disable (False): The punch event cannot be modified in the
Daily tab of the timecard. If the user right-clicks the punch event’s
hours in the Daily tab of the timecard, the Modify option will not
display in the pop-up menu. In addition, the modify icon will not display next to
the punch event.
The ALLOW_PUNCH_MODIFY setting is included with the following event types:
All LABOR events
ATTENDANCE:BREAK
ATTENDANCE:CLOCK
ATTENDANCE:HOLIDAY
ATTENDANCE:MEAL
ATTENDANCE:NO_SHOW
ATTENDANCE:SHORT_DAY
ATTENDANCE:SICK
ATTENDANCE:SUSPEND
ATTENDANCE:TIME_OFF
ATTENDANCE:VACATION
MATERIAL:MOVE
TRANSIENT:ASSIGNMENT
TRANSIENT:ASSIGNMENT_IMMEDIATE
Indicates whether Replace Punch can be used on a punch event in the Daily tab of the timecard.
By default, this setting is True;
Replace Punch can be used on the punch event in the Daily tab of the
timecard. If this setting is False,
Replace Punch cannot be used on the punch event. If the user right-clicks
the punch event’s hours in the Daily tab of the timecard, the Replace
option will not display in the pop-up menu. In addition, the Replace
Punch icon  will not display next to the punch event.
This setting can be applied to an Event or an Event Type; the Event setting overrides the Event Type setting.
This setting can also be included in an Event Policy using the Event Setting tab. For an employee using the Self Service Time Card, the Event Policy’s ALLOW_PUNCH_REPLACE setting will override the ALLOW_PUNCH_REPLACE setting for an Event or an Event Type.
This setting is part of the Event Posting Restriction feature.
Allow Punch Replace Enable (True): Replace Punch can be used on the punch event in the Daily tab of the timecard.
Allow Punch Replace
Disable (False): Replace Punch cannot be used on the punch
event. If the user right-clicks the punch event’s hours in the Daily
tab of the timecard, the Replace option will not display in the pop-up
menu. In addition, the Replace Punch icon will
not display next to the punch event.
The ALLOW_PUNCH_REPLACE setting is included with the following event types:
All LABOR events
ATTENDANCE:BREAK
ATTENDANCE:EARLY_DEPARTURE
ATTENDANCE:HOLIDAY
ATTENDANCE:LATE_ARRIVAL
ATTENDANCE:MEAL
ATTENDANCE:NO_SHOW
ATTENDANCE:OUTSIDE_GAP
ATTENDANCE:SHORT_DAY
ATTENDANCE:SICK
ATTENDANCE:SUSPEND
ATTENDANCE:TIME_OFF
ATTENDANCE:VACATION
MATERIAL:MOVE
TRANSIENT:ASSIGNMENT
TRANSIENT:ASSIGNMENT_IMMEDIATE
Determines the background color that will display on the timecard when the event posts on the timecard and the event is selected (and takes precedence) in the logged in user's Color Policy.
The color is defined using a hexadecimal notation (HEX) for the combination of Red, Green, and Blue color values (RGB).
The lowest value that can be given to one of the light sources is 0 (in HEX: 00). The highest value is 255 (in HEX: FF).
HEX values are specified as 3 pairs of two-digit numbers, starting with a # sign.
The BACKGROUND_COLOR setting is included with the following event types:
All LABOR events
All ATTENDANCE events
MATERIAL:MOVE
TRANSIENT:ASSIGNMENT
TRANSIENT:ASSIGNMENT_IMMEDIATE
Determines whether the event can be posted automatically or not. For LATE_ARRIVAL, EARLY_DEPARTURE, and OUTSIDE_GAP events, CALCULATED_AUTOMATIC is set to TRUE and cannot be modified.
TRUE: Do not show start prompts.
FALSE: Show Start Prompts.
The CALCULATED_AUTOMATIC setting is included with the following event types:
ATTENDANCE:EARLY_DEPARTURE
ATTENDANCE:LATE_ARRIVAL
ATTENDANCE:OUTSIDE_GAP
LABOR:DAY_WORKED
Determines which value will be listed as the Charge Location in the Transaction Location tab when you are posting an event for a specific charge element (e.g., a work order event).
The Setting Value is an Event Prompt the system uses to determine the Charge Element and thus the Location value used for the Charge Element.
For example, CHARGE_ELEMENT_LOCATION is set to F_OPERATION_NUM and you are posting a Work Order event for Order 1001/Operation 10. The Location Element Node (defined in the Charge Element form) for Work Order 1001/Operation 10 is DEPT_A. In the Transaction Location tab, the Charge Location will be DEPT_A.
The Charge Source for these records in the Transaction Location tab will be CHARGE_ELEMENT.
If you select NONE as your Setting Value, the Charge Location in the Transaction Location form will be the same as the Current Location.
The CHARGE_ELEMENT_LOCATION setting is included with the following event types:
LABOR:ACCOUNT
LABOR:DAY_WORKED
LABOR:INDIRECT
LABOR:PROJECT
LABOR:WORKORDER
TRANSIENT:ASSIGNMENT
TRANSIENT:ASSIGNMENT_IMMEDIATE
Determines the Location Type in the Transaction Location tab for which the Charge Location field will contain the CHARGE_ELEMENT_LOCATION (see above).
The Setting Value can be set to HR, Financial, and/or Manufacturing (see the Valid Values below).
For example, CHARGE_ELEMENT_LOCATION is set to F_OPERATION_NUM and CHARGE_ELEMENT_LOCATION_APPLICABILITY is set to Financial. You are posting a Work Order event for Order 1001/Operation 10. The Location Element Node (defined in the Charge Element form) for Work Order 1001/Operation 10 is DEPT_A. In the Transaction Location tab, the Charge Location will be DEPT_A for the record with the Location Type of Financial.
The Charge Source for these records in the Transaction Location tab will be CHARGE_ELEMENT.
If you select NONE as your Setting Value, the Charge Location in the Transaction Location form will be the same as the Current Location.
Financial
HR
HR, Financial
HR, Manufacturing
HR, Manufacturing, Financial
Manufacturing
Manufacturing, Financial
None (default value)
The CHARGE_ELEMENT_LOCATION_APPLICABILITY setting is included with the following event types:
LABOR:ACCOUNT
LABOR:DAY_WORKED
LABOR:INDIRECT
LABOR:PROJECT
LABOR:WORKORDER
TRANSIENT:ASSIGNMENT
TRANSIENT:ASSIGNMENT_IMMEDIATE
This setting determines whether a labor event can be posted for a single project/work order, a batch of projects/work orders that start and stop at the same time, or multiple projects/work orders that start and stop at different times.
Available options are SINGLE, BATCH, MULTI and their combinations (see "Valid Values" below).
SINGLE: A person can only include a single labor (project/work order) when posting the event.
BATCH: A person can include multiple labors (projects/work orders) that start and stop at the same time when posting the event. When the person finishes the batch, the person reports the quantity (if any) for each labor in the batch. Each labor in the batch will have the same start and end timestamp.
MULTI: A person can include multiple labors (projects/work orders) that start and stop at different times when posting the event. As the person finishes each labor, the person reports the quantity (if any) for that labor. Each individual labor will start and stop at a different time.
When adding labors to a Batch or Multi, you can select events that also include the COLLECTION_TYPE Setting of BATCH or MULTI. If the setting Disallow Mixed Events in Batch and Multi is True, you can only add the same event to the Batch or Multi labor.
The prompting sequence for Batch and Multi labor depends on the PROMPT_TYPE setting for the Terminal Profile where the event is posted. For example, if a person adds a work order to a Multi labor and the terminal’s PROMPT_TYPE is STARTSTART, the person will have the option to start a new labor or add to the open labor. If the person chooses to start a new labor, the person will be prompted to close the open labor first. However, if the terminal’s PROMPT_TYPE is STARTSTOP, the person will only have the options to close the open labor or add to the open labor. The option to start a new labor will not be available until the open labor is closed.
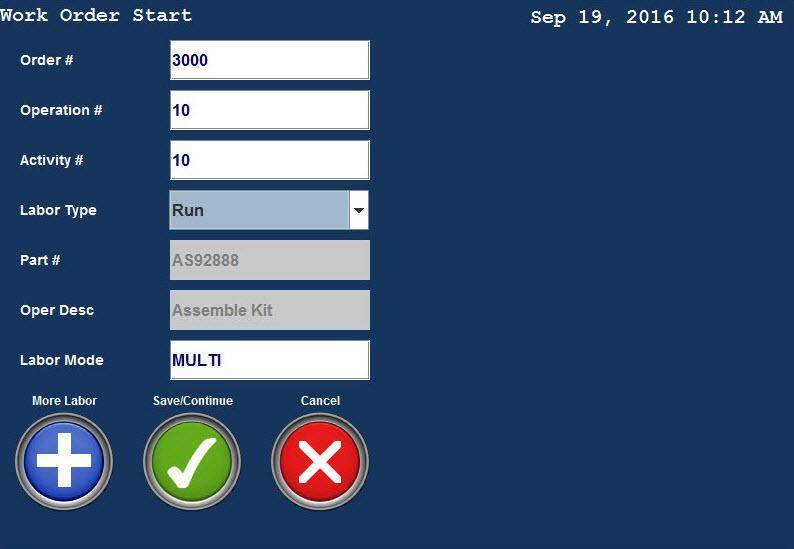
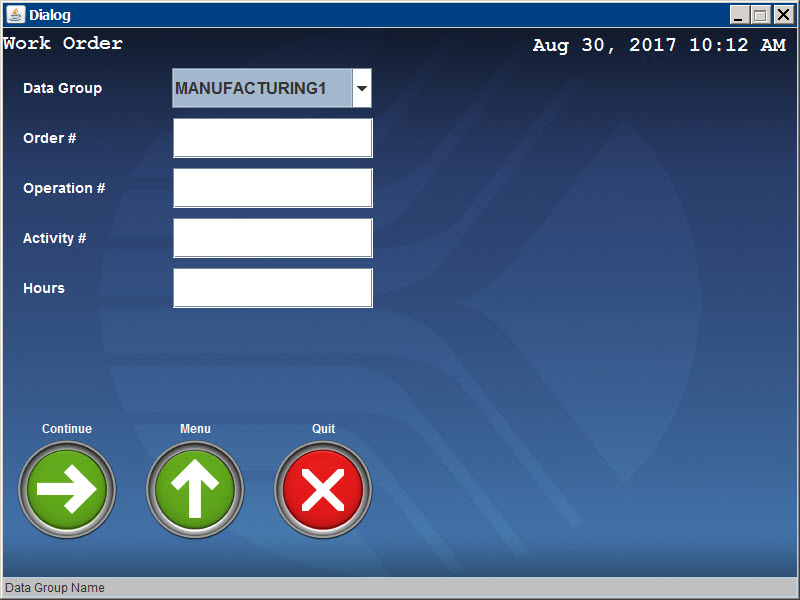
In the illustration below, a person is posting a Work Order and has the option to post a Single, Batch, or Multi labor. The terminal’s PROMPT_TYPE is StartStop.
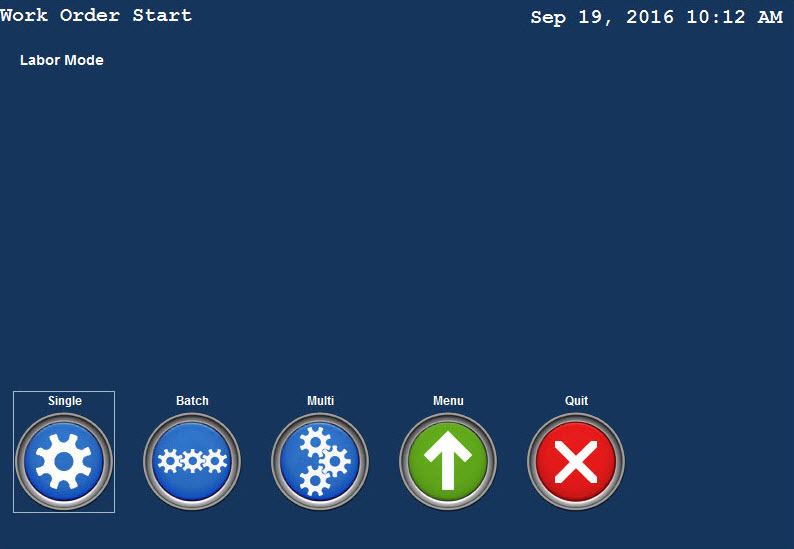
The person selects Multi. After the first work order is entered, the person can click More Labor to add another work order or project, or click Save/Continue to save the first labor only.
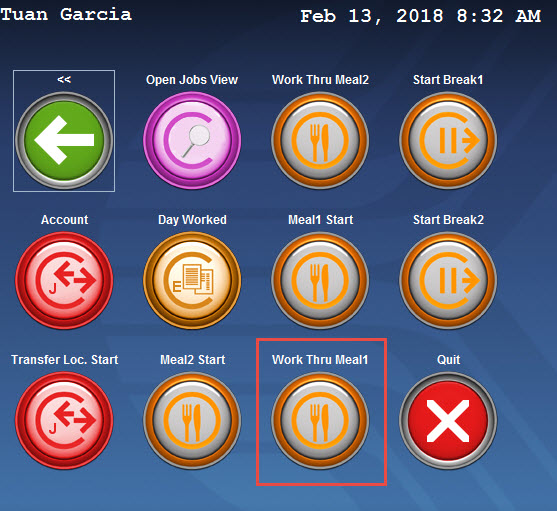
Later that day, the person wants to add another work order or project to the Multi labor, and uses the Open Labor button on the terminal to do so.
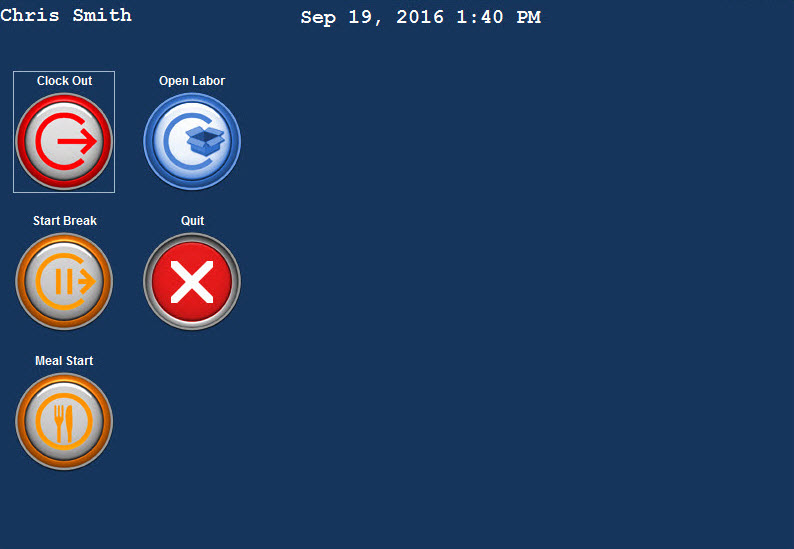
In the Open Labor screen, the person can stop the Multi or add to it.
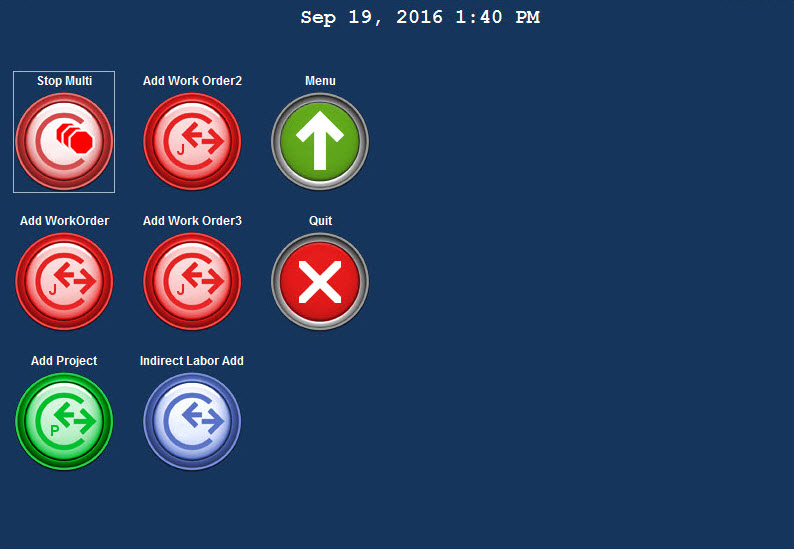
BATCH: Only Batch labor collection is allowed.
BATCH_MULTI: Both Batch and Multi labor collections are allowed.
MULTI: Only Multi labor collection is allowed.
SINGLE: Only Single labor collection is allowed.
SINGLE_BATCH: Both Single and Batch labor collections are allowed.
SINGLE_BATCH_MULTI: Single, Batch, and Multi labor collections are allowed.
SINGLE_MULTI: Both Single and Multi labor collections are allowed.
The COLLECTION_TYPE setting is included with the following event types:
LABOR:ACCOUNT
LABOR:INDIRECT
LABOR:PROJECT
LABOR:WORKORDER
These settings indicate whether the event hours will count toward daily, period, or weekly overtime. These settings are available for Attendance events (except ATTENDANCE:CLOCK events) and Labor events.
Counts to OT: The event hours will count toward overtime for the day, pay period, or pay week.
Does Not Count to OT: The event hours will not count toward overtime for the day, pay period, or pay week.
The COUNTS_TO_OT settings are included with the following event types:
All LABOR events
All ATTENDANCE events except CLOCK and SUSPEND
TRANSIENT:ASSIGNMENT
See Time Division for Batch and Multi Labor for more information.
When a Batch or Multi labor event is posted, the duration for each of the individual labors is determined by the DIV_METHOD setting for the event.
The Divide by Job method determines the duration for each labor in the Batch or Multi based on the number of individual labors, with each individual labor contributing the same amount.
The Divide by Quantity method determines the duration for each labor in the Batch or Multi based on the Quantity Complete of each individual labor. If a labor’s Quantity Complete is zero or left blank, the labor’s Quantity Accepted will be used instead.
The Divide by Quantity times Standard method determines the duration for each labor in the Batch or Multi based on the Quantity Complete and either the Labor Standard Per Piece (if the Labor Type is Run) or the Setup Standard Hours (if the Labor Type is Setup) of each individual labor. If a labor’s Quantity Complete is zero or left blank, the labor’s Quantity Accepted will be used instead.
The Divide by Standard method determines the duration for each labor in the Batch or Multi based on either the Labor Standard Per Piece (if the Labor Type is Run) or the Setup Standard Hours (if the Labor Type is Setup) of each individual labor.
Each DIV_METHOD calculates the duration of the individual labors by first dividing the labor’s contribution (job, quantity, quantity times standard, or standard) by the total number of contributions for all the labors that are running. For a Batch labor, the total number of contributions for all the labors is used to determine the ratio. For a Multi labor, the ratio uses only the labors that are running at the time.
Divide by Job
Divide by Quantity
Divide by Quantity times Standard
Divide by Standard
The DIV_METHOD setting is included with the following event types:
LABOR:ACCOUNT
LABOR:INDIRECT
LABOR:PROJECT
LABOR:WORKORDER
TRANSIENT:ASSIGNMENT
TRANSIENT:ASSIGNMENT_IMMEDIATE
This setting type is available for LABOR:WORKORDER events.
This setting is used to prevent an Operation’s Quantity Available from being updated when a transaction is cancelled.
The default value for this setting is False.
When this setting is False, and a transaction for this Work Order event is cancelled, the corresponding Operation’s Quantity Available will be updated accordingly.
When this setting is True, and a transaction for this Work Order event is cancelled, the corresponding Operation’s Quantity Available will not be updated.
You can use this setting with the Event Validation called Work Order No Move Keep Available Validation, which prevents an Operation’s Quantity Available from being updated when a transaction is posted.
This setting can be applied to an Event or an Event Type; the Event setting overrides the Event Type setting.
Determines whether the event's start prompts will be read-only or hidden when the user stops the labor.
The default value for this setting is FALSE, meaning the start prompts will be visible as read-only fields when the labor is stopped. If you change this setting to TRUE, the event's start prompts will not be visible when the user stops the labor.
An individual event prompt can also have a Prompt Setting called Show Start Prompt On Stop. This setting determines whether a start prompt will be hidden or read-only when the labor stops. The Show Start Prompt On Stop prompt setting is often used for a work queue event, to hide the prompt that displays the work queue grid when the labor stops, and show the prompts that were hidden during labor start when the work queue grid was visible.
TRUE (Do not show start prompts): When the user stops a labor, the start prompts will be hidden.
FALSE (Show start prompts): When the user stops a labor, the start prompts will appear as read-only fields.
The DONT_SHOW_START_PROMPT setting is included with the following event types:
ATTENDANCE:BREAK
ATTENDANCE:CLOCK
ATTENDANCE:MEAL
ATTENDANCE:SUSPEND
LABOR:ACCOUNT
LABOR:DAY_WORKED
LABOR:PROJECT
LABOR:WORKORDER
TRANSIENT:ASSIGNMENT
TRANSIENT:ASSIGNMENT_IMMEDIATE
Determines if the event is available as an elapsed event on the Web.
TRUE: Elapsed on Web Enable.
FALSE: Elapsed on Web Disable.
The ELAPSED_ON_WEB setting is included with the following event types:
All LABOR events
ATTENDANCE:BREAK
ATTENDANCE:HOLIDAY
ATTENDANCE:MEAL
ATTENDANCE:NO_SHOW
ATTENDANCE:OUTSIDE_GAP
ATTENDANCE:SHORT_DAY
ATTENDANCE:SICK
ATTENDANCE:SUSPEND
ATTENDANCE:TIME_OFF
ATTENDANCE:VACATION
MATERIAL:MOVE
TRANSIENT:ASSIGNMENT
TRANSIENT:ASSIGNMENT_IMMEDIATE
This setting is available for ATTENDANCE:BREAK and ATTENDANCE:MEAL events.
If the event has PUNCH_ELAPSED_ON_TERMINAL set to BOTH, you need to use the ELAPSED_TERMINAL_LABEL setting to define the label for the elapsed version of the event.
When PUNCH_ELAPSED_ON_TERMINAL is set to BOTH, an elapsed version of the meal or break can be posted with a zero duration from the terminal. If you are using California Meal Rules, employees will post this elapsed event when they want to work through the meal or break.
You will also need to enable the PUNCH_AND_ELAPSED_FILTER PVE Plugin to display the elapsed and punch versions of the event on the terminal. See California Meal Rules for more information.
This setting applies only when the event has the F_EVENT_LOCATION event prompt.
Determines the Location Type in the Transaction Location tab for which the Charge Location field will contain the value entered in the Event Location prompt.
For example, a person has Person Assignments for HOME_LOCATION_HR and HOME_LOCATION_FINANCIAL. The person posts an event that has the EVENT_LOCATION_APPLICABILITY setting of HR. When the person posts the event, he selects 1001 from the Event Location prompt. The Transaction Location tab shows that for the record with Location Type HR, the Charge Location value is 1001. For the Location Type Financial, however, the Charge Location value is the HOME_LOCATION_FINANCIAL value in the person’s assignment.
Make sure the option you select for EVENT_LOCATION_APPLICABILITY is also specified in the EVENT_LOCATION_SOURCE setting (see below). For example, if your EVENT_LOCATION_APPLICABILITY setting is HR, Manufacturing, then the EVENT_LOCATION_SOURCE should be Manufacturing or HR.
Financial
HR
HR, Financial
HR, Manufacturing
HR, Manufacturing, Financial
Manufacturing
Manufacturing, Financial
None (default value)
The EVENT_LOCATION_APPLICABILITY setting is included with the following event types:
All LABOR events
ATTENDANCE:BREAK
ATTENDANCE:CLOCK
ATTENDANCE:HOLIDAY
ATTENDANCE:MEAL
ATTENDANCE:OUTSIDE_GAP
ATTENDANCE:SICK
ATTENDANCE:TIME_OFF
ATTENDANCE:VACATION
MATERIAL:MOVE
TRANSIENT:ASSIGNMENT
TRANSIENT:ASSIGNMENT_IMMEDIATE
This setting applies only when the event has the F_EVENT_LOCATION event prompt.
The EVENT_LOCATION_SOURCE setting determines the source for the values that display to the user for the Event Location prompt. Select HR, Financial, or Manufacturing.
When you define the F_EVENT_LOCATION prompt, set the Valid Values to Event Location Valid Values. You also need to add an Event Validation record to the event with Validation Type and Validation Stage set to Prompt Validation and the Std Validation ID of Generic Charge Location Validation.
When a user posts the event with these prompts, the available options for the Event Location will correspond to HR, Financial, or Manufacturing locations defined in the organizational hierarchy.
Make sure the option you select for EVENT_LOCATION_APPLICABILITY (see above) is also specified in the EVENT_LOCATION_SOURCE setting. For example, if your EVENT_LOCATION_APPLICABILITY setting is HR, Manufacturing, then the EVENT_LOCATION_SOURCE should be Manufacturing or HR.
Financial
HR
Manufacturing
The EVENT_LOCATION_SOURCE setting is included with the following event types:
All LABOR events
ATTENDANCE:BREAK
ATTENDANCE:CLOCK
ATTENDANCE:HOLIDAY
ATTENDANCE:MEAL
ATTENDANCE:OUTSIDE_GAP
ATTENDANCE:SICK
ATTENDANCE:TIME_OFF
ATTENDANCE:VACATION
MATERIAL:MOVE
TRANSIENT:ASSIGNMENT
TRANSIENT:ASSIGNMENT_IMMEDIATE
Available for LABOR and MATERIAL:MOVE events only.
Indicates whether a filtered search can be performed on an event prompt for a Level 1 Charge Element (e.g., Order Number).
When FILTERED_SEARCH is True, the user
can type a minimum of three characters in the field to display matching
values in the drop-down list. The user can also use the ![]() button to display
a pop-up form to look up a value. The available options will depend
on the user’s Charge Filtration settings.
button to display
a pop-up form to look up a value. The available options will depend
on the user’s Charge Filtration settings.
|
|
FILTERED_SEARCH enabled |
FILTERED_SEARCH disabled |
When FILTERED_SEARCH is disabled, the value that is entered in the event prompt will still be validated against the person’s Charge Filtration settings.
In addition to enabling the FILTERED_SEARCH Event Setting, the event prompt must also have its Prompt Control Type set to Text Field and the event prompt must have values in the Charge Type and Element Name fields.
Filtered Search Enable (True): A filtered search can be performed on the event’s prompt for a Level 1 Charge Element (e.g., Order Number).
Filtered Search Disable (False): A filtered search cannot be performed on the event’s prompt for a Level 1 Charge Element (e.g., Order Number).
The FILTERED_SEARCH setting is included with the following event types:
All LABOR events
MATERIAL:MOVE
Determines the foreground (text) color that will display on the timecard when the event posts on the timecard and the event is selected (and takes precedence) in the logged in user's Color Policy.
The color is defined using a hexadecimal notation (HEX) for the combination of Red, Green, and Blue color values (RGB).
The lowest value that can be given to one of the light sources is 0 (in HEX: 00). The highest value is 255 (in HEX: FF.
HEX values are specified as 3 pairs of two-digit numbers, starting with a # sign.
The FOREGROUND_COLOR setting is included with the following event types:
All LABOR events
All ATTENDANCE events
MATERIAL:MOVE
TRANSIENT:ASSIGNMENT
TRANSIENT:ASSIGNMENT_IMMEDIATE
Determines whether the event can be posted on a date in the future. For elapsed events, a future date is at least one day later than the current date. For punch events, a transaction is considered to have a future date when its timestamp is later than the current timestamp.
This setting applies to Attendance, Time-Off, and Labor events.
Events posted by the ATTENDANCE service or GENERATE_SUPPORTING_EVENT service will not be affected by this setting.
You can set this option to Allow, Disallow, or Current Pay Period. The default value is Allow.
To use the FUTURE_POST event setting, you must enable the FUTURE_POST_VALIDATION record in the PVE Plugin form. To do so:
1. Click Main Menu > Configuration > System > PVE Plugin.
2. Select FUTURE_POST_VALIDATION and click Modify.
3. Check the Enabled box and click Save.
4. Restart the application server.
Allow (default value): Future posting is allowed. The event can be posted before, after, and on the current date and timestamp.
Disallow: Future posting is not allowed. The event can only be posted on the current date/timestamp or earlier.
Current Pay Period: Future posting is only allowed in the current pay period. The event can be posted on a date in the future as long as the date is in the current pay period.
The FUTURE_POST setting is included with the following event types:
All ATTENDANCE events except SUSPEND
All LABOR events
TRANSIENT:ASSIGNMENT
TRANSIENT:ASSIGNMENT_IMMEDIATE
Attendance Points for Events Posted Manually
This setting applies penalty points to the event when the event is posted to the timecard using the Add Elapsed or Replace Punch options.
This setting does not apply when the event is posted by the ATTENDANCE service or if the elapsed transaction is modified.
The MANUAL_POINTS setting can be used to override the penalty points that are normally posted via the employee’s Attendance Policy.
For example, an employee clocks in late and automatically receives a Late Arrival event with 2 penalty points. The employee’s supervisor uses the Replace Punch feature to replace the Late Arrival event with a time-off event called “Excused Absence.” The Excused Absence event has MANUAL_POINTS set to 1. When the Excused Absence event posts, the employee receives 1 penalty point instead of 2.
Numeric value of zero (or NONE) or greater.
To apply penalty points to the event when it is posted manually, enter the number of points in the Setting Value field.
If you do not want to apply penalty points to the event when it is posted manually, enter zero (0) or NONE in the Setting Value field.
The MANUAL_POINTS setting is included with the following event types:
ATTENDANCE:HOLIDAY
ATTENDANCE:NO_SHOW
ATTENDANCE:SHORT_DAY
ATTENDANCE:SICK
ATTENDANCE:TIME_OFF
ATTENDANCE:VACATION
Note: The MAXIMUM_DURATION restriction will only apply to events posted via elapsed entry. This setting will not apply to punch events (i.e., events posted with a start and stop time).
Maximum amount of time that a user can post for the event (via elapsed entry) on a given post date.
For example, an event’s MAXIMUM_DURATION is set to 8:00 (8 hours). A user posts 4 hours for this event in the morning, and a few minutes later the user tries to post the event for 5 hours. An error message will display because the event’s MAXIMUM_DURATION was exceeded.
Enter the number of hours and minutes in HH:MM format. A value of 0 (zero) means there is no maximum duration restriction for the event.
The MAXIMUM_DURATION setting is included with the following event types:
All LABOR events
ATTENDANCE:BREAK
ATTENDANCE:HOLIDAY
ATTENDANCE:MEAL
ATTENDANCE:OUTSIDE_GAP
ATTENDANCE:SICK
ATTENDANCE:SUSPEND
ATTENDANCE:TIME_OFF
ATTENDANCE:VACATION
TRANSIENT:ASSIGNMENT
Note: The MAXIMUM_DURATION_BY_EVENT_SUBTYPE restriction will only apply to events posted via elapsed entry. This setting will not apply to punch events (i.e., events posted with a start and stop time).
This setting can only be modified for an event subtype (via the Event Type Setting form) and cannot be modified for individual events.
MAXIMUM_DURATION_BY_EVENT_SUBTYPE is the maximum amount of time that a user can post for the event subtype (via elapsed entry) on a given post date.
For example, the ATTENDANCE:BREAK event subtype has the MAXIMUM_DURATION_BY_EVENT_SUBTYPE setting of 2:00 (2 hours). A user posts 2 hours for the BREAK1 event in the morning, and a few minutes later the user tries to post the BREAK2 event for 0.5 hours (both BREAK1 and BREAK2 are ATTENDANCE:BREAK events). An error message will display because the event subtype’s MAXIMUM_DURATION_BY_EVENT_SUBTYPE was exceeded.
Enter the number of hours and minutes in HH:MM format. A value of 0 (zero) means there is no maximum duration restriction for the event subtype.
The MAXIMUM_DURATION_BY_EVENT_SUBTYPE setting is included with the following event types:
All LABOR events
ATTENDANCE:BREAK
ATTENDANCE:HOLIDAY
ATTENDANCE:MEAL
ATTENDANCE:OUTSIDE_GAP
ATTENDANCE:SICK
ATTENDANCE:SUSPEND
ATTENDANCE:TIME_OFF
ATTENDANCE:VACATION
TRANSIENT:ASSIGNMENT
Minimum amount of time that must post for the event (via elapsed entry) in a single transaction. For example, if an event’s MINIMUM_DURATION is set to 2:00 (two hours) and a user attempts to post 1 hour for the event, an error message will display.
This setting can also be used with the Meal Restriction feature, which ensures that a punch employee using a shop floor terminal will remain punched out for a meal event for a minimum length of time.
Enter the number of hours and minutes in HH:MM format. A value of 0 (zero) means there is no minimum duration requirement for the event.
The MINIMUM_DURATION setting is included with the following event types:
All LABOR events
ATTENDANCE:BREAK
ATTENDANCE:HOLIDAY
ATTENDANCE:MEAL
ATTENDANCE:OUTSIDE_GAP
ATTENDANCE:SICK
ATTENDANCE:SUSPEND
ATTENDANCE:TIME_OFF
ATTENDANCE:VACATION
TRANSIENT:ASSIGNMENT
This setting is available for ATTENDANCE:MEAL and ATTENDANCE:BREAK events. It determines the minimum amount of time that will be posted for these events. This setting is entered in HH:MM format (e.g., 30 minutes is 00:30). This setting only affects punch events.
If the total time for the event (based on its start and stop times) is less than this setting, the stop timestamp will be changed so that the minimum punch duration is met.
For example, an employee punches out for lunch at 12:00:00 p.m. and punches in from lunch at 12:17:05 p.m. If the MINIMUM_PUNCH_DURATION is set to 00:00, the timestamp for the return from lunch would be rounded to 12:17:00 p.m. When the MINIMUM_PUNCH_DURATION is set to 00:30 (30 minutes), the timestamp for the return from lunch will be rounded to 12:30:00 p.m.
HH:MM
Default value is 00:00 (no minimum punch duration)
The MINIMUM_PUNCH_DURATION setting is included with the following event types:
ATTENDANCE:BREAK
ATTENDANCE:MEAL
This setting will enable or disable the Minimum Repeat Event feature. This feature checks to see if a user is trying to post the same event in succession. For example, you can use this feature to prevent users from clocking in and then immediately clocking out by double-swiping.
When MINIMUM_REPEAT is enabled, you must also define the MINIMUM_REPEAT_EVENT_DURATION setting. This setting defines the minimum duration that must pass before the event can be posted again. You must also add the “Minimum Repeat Event Duration Action Validation” to your event. These configurations are explained below.
The MINIMUM_REPEAT setting is available for the following Event Types:
ATTENDANCE:CLOCK
ATTENDANCE:MEAL
ATTENDANCE:BREAK
The MINIMUM_REPEAT setting is available at the Event Type and the Event level. It is recommended that you configure this setting at the event level, so that you can specify the individual events to which the setting applies.
Note: The Minimum Repeat Event validation will be applied when the server processes Offline punches.
MINIMUM_REPEAT can be set to one of the following options:
Disabled
The Minimum Repeat Event feature is disabled.
Event Name
The system checks for the MINIMUM_REPEAT_EVENT_DURATION between events with the same name. This setting will prevent users from accidentally clocking in/out with a double-swipe.
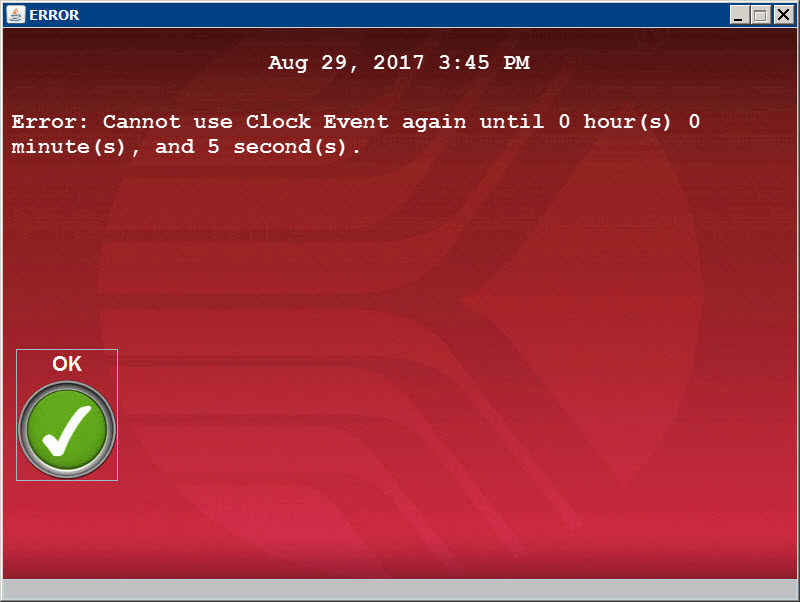
For example, a terminal is configured for clock-ins and clock-outs only. The terminal’s CLOCK event has MINIMUM_REPEAT set to Event Name and MINIMUM_REPEAT_EVENT_DURATION is set to 10 seconds. A user scans his badge to clock in and immediately (5 seconds later), scans his badge again to make sure he is clocked in. The terminal displays an error message that the CLOCK event cannot be used for another 5 seconds.
Event Name and Stage
The system checks for the MINIMUM_REPEAT_EVENT_DURATION between events with same name and stage. This setting will prevent users from consecutive Clock-Ins and Clock-Outs.
For example, a terminal’s CLOCK event has both a Start (clock in) stage and an End (clock out) stage. MINIMUM_REPEAT is set to Event Name and Stage and the MINIMUM_REPEAT_EVENT_DURATION is 1 minute. Immediately after Clock In, a user scans her badge again and accidentally Clocks Out. The user scans her badge to clock back in, but because the 1 minute duration has not yet passed, the system displays an error message that the event cannot be posted for the remaining minutes/seconds.
Event Type
The system checks for the MINIMUM_REPEAT_EVENT_DURATION between events with same Event Type. This setting can be used when you have events with different names and stages, but the same Event Type.
For example, you may have an event called Job Clock In and an event called Clock Out. Both events are ATTENDANCE:CLOCK type events. However, the events have different names and stages. You do not want users to clock out until at least 15 minutes after they have clocked in. If a user posts a Job Clock In event, and one minute later tries to post the Clock Out event, the clock out will fail.
In addition to configuring the MINIMUM_REPEAT and MINIMUM_REPEAT_EVENT_DURATION settings, you must also add the “Minimum Repeat Event Duration Action Validation” validation to your event.
In the Events form (Main Menu > Configuration > Event > Events) select the Event and click the Validation tab.
Click Add and select Event Validation as your Validation Type.
For the Validation Stage, select Post Validation.
From the Std Validation ID field, select Minimum Repeat Event Duration Action Validation.
Click Save.
If necessary, use the Move Up or Move Down button to make the Minimum Repeat Event Duration Action Validation record the last record in the list.
This setting is used with the MINIMUM_REPEAT setting (see above). It defines the minimum amount of time that must pass after the event posts until it can be posted again.
This time period is expressed as HH:MM:SS. If this duration value is greater than zero but the MINIMUM_REPEAT setting is Disabled, the feature will be disabled.
In addition to configuring the MINIMUM_REPEAT setting, you must also add the “Minimum Repeat Event Duration Action Validation” to your event. See "Minimum Repeat Event Validation" in the MINIMUM_REPEAT setting description (above) for more information.
The MINIMUM_REPEAT_EVENT_DURATION setting is available for the following Event Types:
ATTENDANCE:CLOCK
ATTENDANCE:MEAL
ATTENDANCE:BREAK
The MINIMUM_REPEAT_EVENT_DURATION setting is available at the Event Type and the Event level. It is recommended that you configure this setting at the event level, so that you can specify the individual events to which the setting applies.
Note: The Minimum Repeat Event validation will be applied when the server processes Offline punches. See Minimum Repeat Event for an example of this offline validation.
Defines the pay code that is used when exporting the event to a payroll system. This setting overrides the Pay Code defined for the hours classification in Hours Class Group Details, provided the Override box is not checked for that hours classification.
For example, a Vacation event has the PAY_DESIGNATOR setting of "VAC." An employee posts a vacation event for 8.0 R and 1.0 O hours; the Pay Codes for these hours are REG and OVT respectively. If Override is not checked for the R and O hours classifications, then all nine hours will export with the pay code "VAC." If Override is checked for the O hours classification, then 8.0 hours will export with the "VAC" pay code and 1.0 hours will export with the "OVT" pay code.
The PAY_DESIGNATOR setting is included with the following event types:
All LABOR events
ATTENDANCE:BREAK
ATTENDANCE:EARLY_DEPARTURE
ATTENDANCE:HOLIDAY
ATTENDANCE:LATE_ARRIVAL
ATTENDANCE:MEAL
ATTENDANCE:NO_SHOW
ATTENDANCE:OUTSIDE_GAP
ATTENDANCE:SHORT_DAY
ATTENDANCE:SICK
ATTENDANCE:TIME_OFF
ATTENDANCE:VACATION
TRANSIENT:ASSIGNMENT
TRANSIENT:ASSIGNMENT_IMMEDIATE
This setting determines whether the event is Paid, Unpaid, or Paid with Balance.
The PAY_INDICATOR setting is used by the Is Unpaid Event Pay Rule Operand to determine whether to classify an event as Unpaid. If the event's PAY_INDICATOR setting is UNPAID, the Is Unpaid Event operand will consider the event an Unpaid event. If the event's PAY_INDICATOR setting is PAID_WITH_BALANCE and there are not enough hours in the event's Leave Type Code to cover the event, the Is Unpaid Event operand will consider the event an Unpaid event.
This setting will also affect how balance units are marked when the event is configured to draw from a balance.
If an event's PAY_INDICATOR setting is PAID or PAID_WITH_BALANCE, and the event is configured to draw from a balance, the balance units will be marked as Used Paid.
If an event's PAY_INDICATOR setting is UNPAID, and the event is configured to draw from a balance, the balance units will be marked as Used Un-Paid.
PAID, UNPAID, PAID_WITH_BALANCE
The PAY_INDICATOR setting is included with the following event types:
All LABOR events
All ATTENDANCE events except CLOCK
TRANSIENT:ASSIGNMENT
Determines how the event prompts will display to the user on a client terminal. The default value is PUNCH.
PUNCH, ELAPSED, BOTH
If you set this value to PUNCH, the Hours event prompt will not display for the event. The number of hours will be based on the event’s start and stop times. Some event prompts will display when the employee starts the event, and others will display when the employee stops the event.
If you set this value to ELAPSED, the Hours prompt will display with the other event prompts. The employee will not have to start and stop the event. Instead, all the event prompts will display at once (the employee may have to click Continue or Save/Continue to view the event prompts on multiple screens).
Setting this value to ELAPSED makes the process for posting the event on the terminal the same as for posting the event in the Web timecard.
You can set PUNCH_ELAPSED_ON_TERMINAL to BOTH for ATTENDANCE:BREAK and ATTENDANCE:MEAL events only. This setting will allow an elapsed version of the event, with a zero duration, to be posted from the terminal. If you are using California Meal Rules, employees will post this elapsed event when they want to work through the meal or break.
The label for the elapsed version of the event will be defined in the ELAPSED_TERMINAL_LABEL Event Setting.
You will also need to enable the PUNCH_AND_ELAPSED_FILTER PVE Plugin to display the elapsed and punch versions of the event on the terminal. See California Meal Rules for more information.
The PUNCH_ELAPSED_ON_TERMINAL setting is included with the following event types:
All LABOR events
ATTENDANCE:BREAK
ATTENDANCE:CLOCK
ATTENDANCE:MEAL
ATTENDANCE:SICK
ATTENDANCE:SUSPEND
ATTENDANCE:TIME_OFF
ATTENDANCE:VACATION
MATERIAL:MOVE
PTO:REQUEST
TRANSIENT:ASSIGNMENT
TRANSIENT:ASSIGNMENT_IMMEDIATE
Determines if event can be posted in punch fashion on the Web.
TRUE: PUNCH_ON_WEB is allowed. The event can be posted in punch fashion on the Web.
FALSE: PUNCH_ON_WEB is not allowed. The event cannot be posted in punch fashion on the Web.
The PUNCH_ON_WEB setting is included with the following event types:
All LABOR events
ATTENDANCE:BREAK
ATTENDANCE:CLOCK
ATTENDANCE:MEAL
ATTENDANCE:SUSPEND
MATERIAL:MOVE
TRANSIENT:ASSIGNMENT
TRANSIENT:ASSIGNMENT_IMMEDIATE
The Save on Enter feature allows a user to save event information by pressing ENTER on a client terminal (instead of having to press SAVE).
ALWAYS: Event Start
START_ONLY: Event Start
STOP_ONLY: Event Stop
The SAVE_ON_ENTER setting is included with the following event types:
ATTENDANCE:BREAK
ATTENDANCE:CLOCK
ATTENDANCE:MEAL
ATTENDANCE:SUSPEND
AUTHENTICATION:CHANGE_PASSWORD
INFO:DATA
LABOR:ACCOUNT
LABOR:DAY_WORKED
LABOR:PROJECT
LABOR:WORKORDER
TRANSIENT:ASSIGNMENT
TRANSIENT:ASSIGNMENT_IMMEDIATE
Determines whether the event qualifies for a shift premium. In order to receive the shift premium, the employee must also have a default shift with a Shift Premium defined in the Shift Definition .
This setting is only available for Attendance and Labor events.
By default, the SHIFT_PREMIUM event setting is TRUE. You can set this value to FALSE if you want to specify an event that should not receive a shift premium. For example, the employee’s default shift may have a shift premium but you want to disable the shift premium for the Jury Duty event.
This setting also affects whether the LABOR_DISTRIBUTE service will create shift premium records based on an employee’s Export Premium Policy. If the Export Premium Policy includes a shift premium record, the SHIFT_PREMIUM event setting must also be TRUE for the shift premium record to be created.
TRUE: Default value. The event qualifies for a shift premium.
FALSE: The event does not qualify for a shift premium.
The SHIFT_PREMIUM setting is included with the following event types:
All LABOR events
All ATTENDANCE events except CLOCK
TRANSIENT:ASSIGNMENT
TRANSIENT:ASSIGNMENT_IMMEDIATE
Enables/disables the Smart Clock feature.
The Smart Clock feature allows the user to scan a badge (e.g., a barcode scan, card scan, proximity badge, or biometric reader) and have the system determine which type of punch event to post (Clock In, Clock Out, Meal In, Meal Out, etc.). Full functionality of Smart Clock depends on the proper implementation of schedules. If there is no schedule with margins in place, only a Clock event is allowed.
TRUE: Smart Clock Enable.
FALSE: Smart Clock Disable.
The SMART_CLOCK setting is included with the following event types:
ATTENDANCE:BREAK
ATTENDANCE:CLOCK
ATTENDANCE:MEAL
Do not continue prompting when an error/validation failure occurs on a terminal.
TRUE: Do not continue prompting when an error/validation failure occurs on a terminal.
FALSE: Continue prompting when an error/validation failure occurs on a terminal.
The STOP_EVENT_PROMPTS_ONERROR setting is included with the following event types:
ATTENDANCE:BREAK
ATTENDANCE:CLOCK
ATTENDANCE:HOLIDAY
ATTENDANCE:MEAL
ATTENDANCE:OUTSIDE_GAP
ATTENDANCE:SICK
ATTENDANCE:SUSPEND
ATTENDANCE:TIME_OFF
ATTENDANCE:VACATION
INFO:DATA
LABOR:ACCOUNT
LABOR:DAY_WORKED
LABOR:PROJECT
LABOR:WORKORDER
MATERIAL:MOVE
OT:RESPONSE_VIEW
PTO:REQUEST
PTO:REQUEST_VIEW
TRANSIENT:ASSIGNMENT
TRANSIENT:ASSIGNMENT_IMMEDIATE