The Prompt tab on the Events form is used to configure the prompts that are presented to a user when they post an event. For example, when an employee posts a Project event, they may be prompted to enter the project number and the number of hours they worked.
Each event has its own pre-defined set of prompts.
You can modify the label of any prompt (for example, change "Order Num” to “Work Order Num”). See Change Prompt Label for more information.
You can also configure which prompts will be visible to the user. For example, you may want employees to be prompted for a work order number but not an operation number. The Employee on Add, Employee on Modify, Manager on Add, and Manager on Modify settings determine if and how the prompt is displayed to the user. See below for more details.
Note that a terminal's Terminal Param Group may be restricted to only allow prompt data from certain input types.
See Also:
See Also:
Adding Prompts and Validations to an Event when using CONFIRM in Schedule Policy
Event
Identifies the event for which this prompt displays.
Prompt Name
Prompt Name identifies the prompt.
If you are adding a custom prompt, the Prompt Name field will be grayed out on the Add form. See Add a Prompt for more information.
Custom Prompt Name
This field appears on the Add Prompt pop-up form when you are adding a new event and you select Create Custom Prompt from the Add Prompt field.
Enter the name of the custom prompt you are a defining.
Note: You can define custom event prompts in this tab form and on the Custom Prompt form. However, you must use the Custom Prompt form to change the description or data type of a custom prompt.
Custom Prompt Description
This field appears on the Add Prompt pop-up form when you are adding a new event and you select Create Custom Prompt from the Add Prompt field.
Enter a description of the custom prompt you are a defining.
Custom Prompt Data Type
This field appears on the Add Prompt pop-up form when you are adding a new event and you select Create Custom Prompt from the Add Prompt field.
This setting determines what kind of data can be entered for the event prompt. Available options are Integer, Double (decimal number), and String (text).
Default Label
Text the user sees when presented with this event prompt.
Determines how the prompt is displayed to a person who is posting the event in the web timecard.
Disabled – The prompt will be hidden and the Default Value ID (see below) will not be applied. If the prompt has any Prompt Validations, these validations will not fire when the prompt is Disabled.
Hidden - The Hidden field allows you to hide prompts and use default values so the person does not have to select them. If you select Hidden, the person will not have to answer the prompt; the Default Value ID will be used. For example, if the Default Value for the Hours Class prompt is “R,” and you set this prompt to Hidden, the person will not see the Hours Class prompt when adding the event, but the R hours classification will still be applied to the event.
Hidden No Default – The prompt will be hidden and the Default Value ID will not be applied. This option is more useful for the Person on Modify setting, if you want to hide the prompt and have it keep the same value that was entered when the event was added.
Read Only - The prompt is visible, but read-only (the person cannot modify it). The Default Value ID will be applied.
Read Only No Default – The prompt is visible, but read-only. The Default Value ID will not be applied. This option is more useful for the Person on Modify setting, if you want to display a read-only field with the value entered when the event was added.
Visible - The prompt is visible and shows the Default Value ID. The person can change this value.
Visible No Default - The prompt is visible but does not display the Default Value ID. The person can change this value.
Note: If you are posting the event with Replace Punch or Add Punch Pair, the event prompts will use the Person on Add setting, not the Person on Modify setting.
Employee on Modify
Determines how the prompt is displayed to a person who is modifying the event in the web timecard.
Disabled – The prompt will be hidden and the Default Value ID (see below) will not be applied. The prompt will continue to have the value entered when the event was added. If the prompt has any Prompt Validations, these validations will not fire when the prompt is Disabled.
Hidden – The prompt will be hidden but the prompt's Default Value ID will be applied instead of the value that was entered when the event was added.
Hidden No Default – The prompt will be hidden and the Default Value ID will not be applied. This option is useful if you want to hide the prompt and have it keep the same value that was entered when the event was added.
Read Only - The prompt is visible, but read-only (the person cannot modify it). The Default Value ID will be applied instead of the value that was entered when the event was added.
Read Only No Default – The prompt is visible, but read-only. The Default Value ID will not be applied. This option is useful if you want to display a read-only field with the value entered when the event was added instead of the Default Value ID.
Visible - The prompt is visible and displays the value entered when the event was added instead of the Default Value ID. The person can change this value.
Visible No Default - The prompt is visible and displays the value entered when the event was added instead of the Default Value ID. The person can change this value.
Note: If you are posting the event with Replace Punch or Add Punch Pair, the event prompts will use the Employee on Add setting, not the Employee on Modify setting.
Determines how the prompt is displayed to a manager who is posting the event for a person he or she supervises.
Disabled – The prompt will be hidden and the Default Value ID (see below) will not be applied. If the prompt has any Prompt Validations, these validations will not fire when the prompt is Disabled.
Hidden - The Hidden field allows you to hide prompts and use default values so the manager does not have to select them. If you select Hidden, the manager will not have to answer the prompt; the Default Value ID will be used. For example, if the Default Value for the Hours Class prompt is “R,” and you set this prompt to Hidden, the manager will not see the Hours Class prompt when adding the event, but the R hours classification will still be applied to the event.
Hidden No Default – The prompt will be hidden and the Default Value ID will not be applied. This option is more useful for the Manager on Modify setting, if you want to hide the prompt and have it keep the same value that was entered when the event was added.
Read Only - The prompt is visible, but read-only (the manager cannot change it). The Default Value ID will be applied.
Read Only No Default – The prompt is visible, but read-only. The Default Value ID will not be applied. This option is more useful for the Manager on Modify setting, if you want to display a read-only field with the value entered when the event was added.
Visible - The prompt is visible and shows the Default Value ID. The manager can change this value.
Visible No Default - The prompt is visible but does not display the Default Value ID. The manager can change this value.
Note: If you are posting the event for an employee via Replace Punch or Add Punch Pair, the event prompts will use the Manager on Add setting, not the Manager on Modify setting.
Manager on Modify
Determines if or how the prompt is displayed to a manager who is modifying the event for a person he or she supervises.
Disabled – The prompt will be hidden and the Default Value ID (see below) will not be applied. The prompt will continue to have the value entered when the event was added. If the prompt has any Prompt Validations, these validations will not fire when the prompt is Disabled.
Hidden – The prompt will be hidden but the prompt's Default Value ID will be applied instead of the value that was entered when the event was added.
Hidden No Default – The prompt will be hidden and the Default Value ID will not be applied. This option is useful if you want to hide the prompt and have it keep the same value that was entered when the event was added.
Read Only - The prompt is visible, but read-only (the person cannot modify it). The Default Value ID will be shown/applied instead of the value that was entered when the event was added.
Read Only No Default – The prompt is visible, but read-only. It displays the value that was entered when the event was added instead of the Default Value ID. This option is useful if you want to display a read-only field with the value entered when the event was added instead of the Default Value ID.
Visible - The prompt is visible and displays the value entered when the event was added instead of the Default Value ID. The manager can change this value.
Visible No Default - The prompt is visible and displays the value entered when the event was added instead of the Default Value ID. The manager can change this value.
Note: If you are posting the event for an employee via Replace Punch or Add Punch Pair, the event prompts will use the Manager on Add setting, not the Manager on Modify setting.
Default Value ID
Defines a default value for the prompt. For example, you may configure the Labor Type prompt to display a default value of “Run.”
Whether or not the Default Value will be displayed or used depends on the event prompt’s display settings - Employee on Add, Employee on Modify, Manager on Add, and Manager on Modify. These settings are explained in more detail above.
Default Values are configured on the Default
Values form (Main Menu > Configuration
> Event > Default Values). You can also add, modify, delete,
or copy Default Values by clicking the ![]() button next to the Default Value ID field and selecting Add, Lookup, or
Maintain from the pop-up menu.
button next to the Default Value ID field and selecting Add, Lookup, or
Maintain from the pop-up menu.
Note: The Default Value ID you select in this field is only a description of the Default Value record; it is not the actual text presented to the user.
Valid Value
Valid Values represent the various values that a user may
choose from when the prompt uses a drop-down list. The Valid Values are
configured on the Valid Values form. You
can access the form via the ![]() button next to the Valid
Values field in the Prompt field when you add a Prompt record, or you
can navigate to Main Menu > Configuration
> Event > Valid Values.
button next to the Valid
Values field in the Prompt field when you add a Prompt record, or you
can navigate to Main Menu > Configuration
> Event > Valid Values.
Note: The Valid Value in the Prompt form reflects only the description of the Valid Value record, not the actual text presented to the user.
The Prompt Stage determines at what stage in the posting of the event that this prompt should appear. For example, the CLOCK event can be configured to have a prompt that records the employee's clock-in time (Prompt Stage = Start) and another prompt that records the employee's clock out time (Prompt Stage = Stop).
The Prompt Stage also determines when a Prompt Validation should fire. Prompt Validations are defined on the Validation tab of the Events form.
Start - The prompt appears when starting a punch event or posting an elapsed event. If the prompt has a Prompt Validation, the validation will also fire when starting a punch event or posting an elapsed event.
Stop - The prompt appears when the stopping a punch event or posting an elapsed event. If the prompt has a Prompt Validation, the validation will also fire when stopping a punch event or posting an elapsed event.
Elapsed - The prompt only appears when posting an elapsed event. If the prompt has a Prompt Validation, the validation will only fire when posting an elapsed event.
Required
When this box is checked, the user will be required to respond to the prompt in order to post the event. You can define a prompt dependency record when the Required box is checked.
Minimum Length
Minimum length of the value entered in response to the prompt.
Maximum Length
Maximum length of the value entered in response to the prompt.
Prompt Control Type
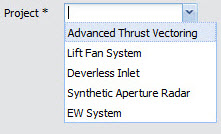
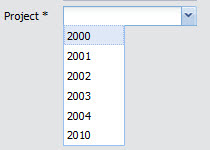
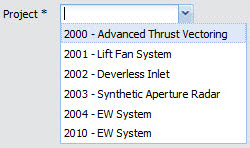
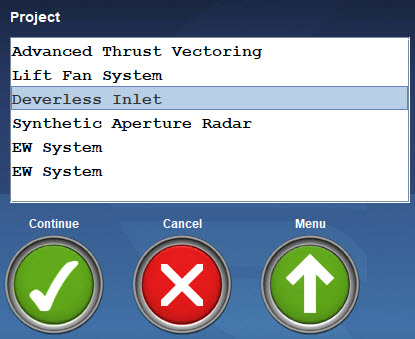
Prompt Control Type determines how the prompt is displayed to the user. The available options depend on whether you select a Valid Value for this prompt.
If you select a Valid Value (see above), your Prompt Control Type can be Combo Box Desc Only, Combo Box ID Only, Combo Box ID and Desc, List Box, List Box Single Select, List Box Multi Select, or Button List.
Combo Box Desc Only |
Drop-down list displays descriptions of the valid values. You can type a value in the text field or select a value from the list. |
|
Combo Box ID Only |
Drop-down list displays ID numbers of the valid values. You can type a value in the text field or select a value from the list. |
|
Combo Box ID and Desc |
Drop-down list displays ID numbers and descriptions of the valid values. You can type a value in the text field or select a value from the list. |
|
List Box |
Displays all the valid values in a list. This setting is typically used on client terminals. Use List Box Multi Select to allow the user to select more than one item from the list. |
|
Button List |
Displays the valid values as buttons on the client terminal. |
|
Grid Field |
Displays the valid values in a grid that is customizable via the Valid Values query. See Work Queue for more information. The Grid Field is designed for display on a web timecard or the Web Time Clock. If you are using the Mobile application, InTeract client, or InTouch terminal, the work queue jobs will be presented in a combo box. |
|
If you do not select a Valid Value, your Prompt Control Type can be Text Field, Password Field, Check box, Radio Button, Date, or Time.
Text Field |
Displays a text box where the user can type the prompt value. |
|
Password Field |
Displays a text box where the user can type the prompt value, but the value will display as bullet symbols instead of the actual alphanumeric characters. |
|
Check box |
Select this option to display a check box next to the prompt name. |
|
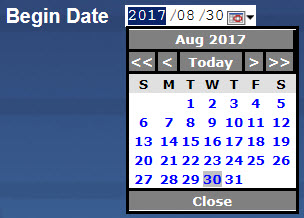
Date |
Select this option for date prompts. |
|
Time |
Select this option for timestamp prompts. |
|
The Info and Info Without Prompt Label options can be used to display help information in a B-Web 9300/9500 terminal. These options do not allow user input but instead display information. See Help Button and Message on Terminal Login Screen for more information.
The Info Prompt Control Type displays a prompt label and information based on the prompt’s Default Value ID. For example, the F_GID prompt with Prompt Control Type Info and Default Value ID Info GID will display the 9500 terminal’s GID number in the help screen.
The Info Without Prompt Label Prompt Control Type displays a message, which is defined by the prompt’s Default Value ID. For example, the 9500 terminal’s Login Event (e.g., LOGIN_XML) may include the F_HELP_MESSAGE event prompt with Prompt Control Type Info Without Prompt Label and Default Value ID Info Terminal Help Message. On the 9500 terminal’s login screen, the help message defined in this Default Value ID will display.

Note: You should only select the Info or Info Without Prompt Label option for INFO:TERMINAL or AUTHENTICATION:LOGIN events. If you use these Prompt Control Types for any other event type, the event may not function correctly.
Offline Prompt Type
Determines how the prompt is displayed to the user when the terminal is offline. The available options depend on whether you select a Valid Value for this prompt.
If you select a Valid Value for the prompt, the Offline Prompt Type can be Text Field, Combo ID and Desc, or List Box.
If you do not select a Valid Value for the prompt, the Offline Prompt Type can be Text Field.
Parse Setting Name
Parse Setting can be used for events with Event Type ID AUTHENTICATION:LOGIN. A Parse Setting allows the system to extract and use a subset of characters from input data (for example, data from a badge barcode) instead of using the entire input data. This is useful for barcode scanners and magnetic stripe readers that receive a large string of characters but only need a subset of those characters for the prompt information required. How the parse setting populates the login prompt is configured on the Parse Setting form.
To enable the Parsing feature for a prompt such as a login event, you must first create a parse setting record on the Parse Setting form for the specific prompt and then select that parse setting record here on the Prompt tab.
Charge Type
If the event prompt is for a charge element, select the corresponding Charge Type from this field. For example, if the event prompt is for a work order number, select ORDER as the Charge Type. Make sure you select the corresponding Element Name (see below) as well. These settings will ensure the correct description for the charge element appears in Transaction Details.
This field is also needed for the Charge Element Filtration feature. If you are using Charge Element Filtration, select the Charge Type that can be selected for this prompt. Available options are defined on the Charge Type form. You will specify the Element Name for the prompt using the Element Name field (see below).
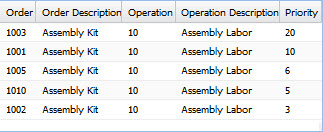
For example, if you are using Charge Element Filtration to restrict access to specific work orders and operation numbers, modify the ORDER_NUM and OPERATION_NUM prompts for your WORKORDER event. For the ORDER_NUM prompt, select ORDER as your Charge Type and ORDER as your Element Name. For the OPERATION_NUM prompt, select ORDER as your Charge Type and OPERATION as your Element Name. The event’s ORDER_NUM and OPERATION_NUM prompts will only allow values specified in your Charge Filtration Group.
Element Name
If the event prompt is for a charge element, select the corresponding Charge Type (see above) and Element Name. For example, if the event prompt is for a work order's operation number, select ORDER as the Charge Type and OPERATION as the Element Name. These settings will ensure the correct description for the charge element appears in Transaction Details.
This field is also needed for the Charge Element Filtration feature. If you are using Charge Element Filtration, you must first select the Charge Type that can be selected for this prompt (see above). Then select the Element Name that can be selected for this prompt.
For example, if you are using Charge Element Filtration to restrict access to specific work orders and operation numbers, modify the ORDER_NUM and OPERATION_NUM prompts for your WORKORDER event. For the ORDER_NUM prompt, select ORDER as your Charge Type and ORDER as your Element Name. For the OPERATION_NUM prompt, select ORDER as your Charge Type and OPERATION as your Element Name. The event’s ORDER_NUM and OPERATION_NUM prompts will only allow values specified in your Charge Filtration Group.
Key Prompt
Check this box if you want to track the prompt actions on the Action form.
When this box is checked, the Prompt Name will display in the Action Key Name field and the entered/selected value will display in the Action Key Value field.
If you set Person on Add, Person on Modify, Manager on Add, and Manager on Modify to Disabled, then the Key Prompt box will be unchecked and disabled. You cannot track the prompt’s actions if all four of these fields are disabled. At least one of these fields must not be Disabled if you want to change the Key Prompt setting.
Update Date, Updated By
These fields display when the record was created or updated, and the person who created or updated the record.
Click Main Menu > Configuration > Event > Events.
Find the Event with the prompts you want to add, view, or modify.
Click the Prompt tab on the lower half of the form. The prompts that have been defined for this event will display in the grid.
To select specific prompts, use the Prompt Name, Display, Prompt Stage, and Required fields to narrow your selection.
Click Find.
Click Main Menu > Configuration > Event > Events.
Find the Event to which you want to add a prompt.
Click the Prompt tab on the lower half of the form.
Click Add.
From the Add Prompt field, select Add Existing Prompt or Create Custom Prompt.
If you want to add an existing, system-defined prompt, select Add Existing Prompt.
If you want to define a new custom prompt, select Create Custom Prompt.
If you selected Create Custom Prompt, you must also enter the Custom Prompt Name, Custom Prompt Description, and Custom Prompt Data Type.
You can select Integer, Double (decimal number), or String (text) as the Custom Prompt Data Type.
Enter the remaining field values. See Prompt Field Descriptions for information about these fields.
Click Save when you are finished.
Click Main Menu > Configuration > Event > Events.
Find the Event with the prompt you want to copy.
Click the Prompt tab on the lower half of the form.
Select the Prompt and click Copy.
Modify the necessary fields (you cannot save a duplicate record). See Prompt Field Descriptions for information about these fields.
Click Save when you are finished.
Click Main Menu > Configuration > Event > Events.
Find the Event with the prompt you want to modify.
Click the Prompt tab on the lower half of the form.
Select the Prompt and click Modify.
Modify the necessary fields (you cannot save a duplicate record). See Prompt Field Descriptions for information about these fields.
Note: If you are modifying a custom event prompt, you cannot change the prompt’s description or data type in this form. You must use the Custom Prompt form to edit these fields.
Click Save when you are finished.
Click Main Menu > Configuration > Event > Events.
Find the Event with the prompt you want to delete.
Click the Prompt tab on the lower half of the form.
Select the Prompt and click Delete.
Click OK to confirm the action.

The order in which an event's prompts are displayed to a user is determined by the order of the records on the Prompt tab. You can change the order of the prompts by selecting a prompt and clicking the Move Up and Move Down buttons.
A prompt's label is the text the user sees when presented with the prompt. You can change the label of a prompt using the Change Prompt Label button.
Prompt labels are event-specific. When you change a prompt label, the label will only be changed for that particular event. Other events with the same prompt will have a different label. For example, if you change the prompt label "Operation Num" to "Job Num" for the Work Order event, the same prompt for the Project event will still be "Operation Num."
Note that you cannot modify labels that are listed in the Default English Dictionary. See Dictionary Label for information about creating a custom dictionary.
To change a prompt label:
Click Main Menu > Configuration > Event > Events.
Find the Event with the prompt you want to change.
Click the Prompt tab on the lower half of the form.
Select the Prompt and click Change Prompt Label.
Select a Dictionary Name.
Note: You cannot select a system dictionary such as the DEFAULT-EN-US. You must select a custom dictionary.
Click Modify.
Modify the Long Label and/or Short Label.
Click Save.
Click Main Menu > Configuration > Event > Events.
Select the Event that you want to use Confirm with. Note that you cannot make changes to any system required records. If the event is system required, you must make a copy of the event and use the new record instead.
Go to the Prompts tab and click Add.
Select the following values:
Add Prompt: Add Existing Prompt
Prompt Name: F_MARGIN_VIOLATION_START
Display: Hidden
Prompt Stage: Start
Valid Value: Select "valid values for warning" (Yes:Continue, No:Cancel)
Prompt Control Type: Combo Box Desc Only
Click Save.
Click Add on the Prompts tab.
Select the following values:
Add Prompt: Add Existing Prompt
Prompt Name: F_MARGIN_VIOLATION_END
Display: Hidden
Prompt Stage: Stop
Valid Value: Select "valid values for warning" (Yes:Continue, No:Cancel)
Prompt Control Type: Combo Box Desc Only
Select the Validation tab and click Add.
Select the following values:
Validation Type: Prompt Validation
Prompt Name: F_MARGIN_VIOLATION_START
Validation Stage: Prompt Validation
Std Validation ID: Schedule Margin Prompt Validation.
Click Save and Add.
Change the Prompt Name to F_MARGIN_VIOLATION_END.
Click Save.