This section explains how to add transactions to the Period, Weekly, and Daily tabs of the Supervisor Review timecard (Current Situation and Time Card Review) and to the Self Service Time Card.
Note that the user’s ability to add transactions to the timecard will depend on whether Add is enabled for that particular timecard form in the user’s Security Role. In addition, certain Event Settings may restrict which event’s a user can add.
You can add timecard transactions using the following methods:
The Add Elapsed button must be enabled in your Security Role in order to be visible on the timecard.
The Add Elapsed button is used to record the number of hours spent on a particular event (such as Break, Meal, Project, Sick, Day Worked, Vacation, or Work Order) after the event was completed.
Click Add Elapsed.
The Event Prompts-Elapsed pop-up form appears.

The Posting Date defaults to the Posting Date in the filter area. If necessary, select a different date to which the event will post.
If you have saved any event
favorites, you can select one from the Favorite
Name field. You can also save this event as a favorite when
you click the  button at the bottom of the form.
See Event Favorites for
more information.
button at the bottom of the form.
See Event Favorites for
more information.
Select an Event.
Enter the number of Hour(s) spent on the event. You can enter the hours in decimal format (i.e., 2 ½ hours would be entered as “2.5”) or clock format (i.e., 2 ½ hours would be entered as "2:30:00").
Note: Standard rounding rules will apply. Time entered will automatically be converted, stored, and displayed with a time precision that matches the applicable Rounding Policy. For example, if the rounding interval for a user is configured to be “Nearest six minutes”, and the user enters a duration amount of 1:05 (one hour, five minutes), upon completion of that data entry, the system will automatically convert, store, and display the time as 1:06 (one hour, six minutes, now conforming to time rounding rules).
If you selected a sick, time-off, or vacation event, the Hour(s) field will default to the person’s scheduled paid hours for the day.
If you are in the Daily tab of the Supervisor Review timecard, the Timestamp prompt will appear if the following conditions are met:
You selected a sick, time-off, or vacation event.
The employee is a PUNCH type employee.
The Posting Date is a scheduled day.
The Timestamp prompt is used to enter a start time for the attendance event. This prompt can be used to cover all or part of the day with a sick, vacation, or time-off event, in the same way that time-off is entered in the Time Off Request form. If the employee was not able to schedule the sick, vacation, or time-off event in advance, this prompt allows the supervisor to enter it manually.
For example, if an employee is unexpectedly late for work and wants to use sick time to cover these hours, the supervisor can use Add Elapsed to post the sick event with a timestamp set to the employee’s scheduled start time. This posting will prevent the employee from receiving a late clock-in and a gap event on their timecard.
The Timestamp prompt will default to the employee’s scheduled start time or the timestamp of the last punch transaction, whichever is later.
If the event has additional prompts (order number, operation number, project, etc.), answer these prompts as necessary.
Note: A
green checkmark ![]() displays when there is prompt dependency. In the illustration above,
the Order Num, Operation Num, and Activity Num prompts are dependent.
The valid Operation numbers you can enter will depend on the Order
Number you enter, and the valid Activity Numbers you can enter will
depend on the Order and Operation Number. You can click the green
checkmark to validate a prompt’s value,
as well as validate any preceding prompts that are configured for
validation.
displays when there is prompt dependency. In the illustration above,
the Order Num, Operation Num, and Activity Num prompts are dependent.
The valid Operation numbers you can enter will depend on the Order
Number you enter, and the valid Activity Numbers you can enter will
depend on the Order and Operation Number. You can click the green
checkmark to validate a prompt’s value,
as well as validate any preceding prompts that are configured for
validation.
If the event prompt is a text field for a Level 1 Charge Element (e.g., Order Number), you can perform a filtered search for the value.
The event must have the FILTERED_SEARCH Event Setting enabled. This setting is enabled by default. In addition, the event prompt must have its Prompt Control Type set to Text Field and the event prompt must have values in the Charge Type and Element Name fields.
Type a minimum of three characters in the field to display matching values in the drop-down list.
Click the ![]() button
to display a pop-up form to look up a value. Use the Filter fields
in this pop-up form to select a charge element.
button
to display a pop-up form to look up a value. Use the Filter fields
in this pop-up form to select a charge element.
The available options will depend on the user’s Charge Filtration settings.
If a Reason Code field displays, select a Reason Code from the drop-down menu.
If a Comment box displays you can enter up to 80 characters in the box.
If you only want to post this event, click Save. The event will post and you will exit the Event Prompts - Elapsed form. If you want to post additional events, click Save and Add. The event you just selected will post and the Event Prompts - Elapsed form will stay open so you can select another event.
The Add Punch button must be enabled in your Security Role in order to be visible on the timecard.
Add Punch allows you to enter events in a manner that is similar to a real-time collection terminal on the shop floor. For example, you can use Add Punch to stop an open labor or start a new labor after the last posted transaction.
Note: Add Punch allows you to add punch transactions that are in sequence with the existing transactions (like a real-time terminal). If an employee forgets to include a project or work order with a Batch or Multi labor, or the employee forgets to punch a meal or break, use Add Punch Pair to insert the punch transaction in the timecard.
In order to use Add Punch, the person whose timecard you are modifying must have their Entry Type set to PUNCHED in their Employment Profile.
Click Add Punch.
The Event Prompts-Punch dialog box displays.
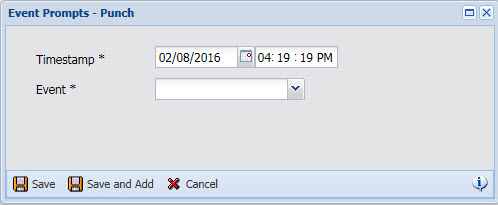
The Timestamp defaults to the Effective Date or Post Date in the timecard, and the current time. To modify the fields, click inside each field and select the new date/timestamps.
Select an Event.
If the event has any additional prompts, select the values for these prompts.
If the event prompt is a text field for a Level 1 Charge Element (e.g., Order Number), you can perform a filtered search for the value.
The event must have the FILTERED_SEARCH Event Setting enabled. This setting is enabled by default. In addition, the event prompt must have its Prompt Control Type set to Text Field and the event prompt must have values in the Charge Type and Element Name fields.
Type a minimum of three characters in the field to display matching values in the drop-down list.
Click the ![]() button
to display a pop-up form to look up a value. Use the Filter fields
in this pop-up form to select a charge element.
button
to display a pop-up form to look up a value. Use the Filter fields
in this pop-up form to select a charge element.
The available options will depend on the user’s Charge Filtration settings.
If a Reason Code field displays, select a Reason Code from the drop-down menu.
If a Comment box displays you can enter up to 80 characters in the box.
Click Save to save the record and exit. To post another event, click Save and Add.
The Add Punch Pair button must be enabled in your Security Role in order to be visible on the timecard.
If an employee forgets to include a project or work order with a Batch or Multi labor, or the employee forgets to punch a meal or break, the Add Punch Pair option allows you to insert the punch transaction in the timecard. Add Punch Pair posts the start and stop time for the event, allowing you to add a punch transaction prior to any existing transactions on a post date.
For example, an employee clocks in at 7 a.m. and begins a Multi labor with WorkOrder101. At 8 a.m. he begins WorkOrder102, but forgets to start this labor at the terminal. At 10 a.m. the employee stops the Multi labor but realizes he forgot to include WorkOrder102. He tells his supervisor he worked on WorkOrder102 from 8 a.m. to 9 a.m. The supervisor uses Add Punch Pair to insert WorkOrder102 from 8 a.m. to 9 a.m. The adjusted timecard shows 2.5 hours for WorkOrder101 and 0.5 hours for WorkOrder102. WorkOrder101 was from 7-8 a.m. and 9-10 a.m. The employee worked on both work orders from 8-9 a.m. so 0.5 hours go to each of them.
Add Punch Pair differs from the Add Punch option, which only allows you to add punch transactions that are in sequence with the existing transactions (like a real-time terminal). For example, you can only use Add Punch to stop an open labor or start a new labor after the last posted transaction, but you can use Add Punch Pair to add a work order to a closed Batch or Multi labor.
You can use Add Punch Pair to post the following events:
In order to use Add Punch Pair, the person whose timecard is being modified must have their Entry Type set to PUNCHED in their Employment Profile.
When you use Add Punch Pair, the event prompts that display will depend on the Manager on Add setting for each event prompt.
If your Schedule Policy includes the Warn setting, the warning message will not display when you use Add Punch Pair to post the event.
In the timecard, click the Add Punch Pair button.
The Event Prompts – Punch Pair form opens.
Enter the Start Timestamp and End Timestamp for the punch transaction you are adding.
Select the Event from the drop-down list.
Refer to the sections below for information on adding to a batch or multi labor.
If the event has additional prompts (order number, operation number, project, etc.), answer these prompts as necessary.
Click Save to post the event.
You can use Add Punch Pair to add a project or work order to a Batch labor that is closed. Add Punch Pair requires that you enter the start and end time of the labor, and the projects/work orders in a Batch labor must all have the same start and end time. Therefore you must wait until the Batch labor is closed, then use Add Punch Pair to add another project or work order to it.
You can use Add Punch Pair to add a project or work order to a Multi labor. To do so, enter a Start Timestamp that is within the existing Multi labor.
Note that if the Disallow Mixed Events in Batch and Multi setting is True, you can only add the same event to the Batch or Multi labor

The Add Time Mark button must be enabled in your Security Role in order to be visible on the timecard.
Add Time Mark is used to add Arrival and Departure events to the timecard. Arrival and Departure events allow employees to record their arrival and departure times during the day. These events record a timestamp entered by the employee. They can be posted any time of the day and in any order and are independent of the other punches on the timecard.
Navigate to the timecard tab where you want to post the Arrival or Departure event.
Click the Add Time Mark button.
The Event Prompts – Time Mark window will display.
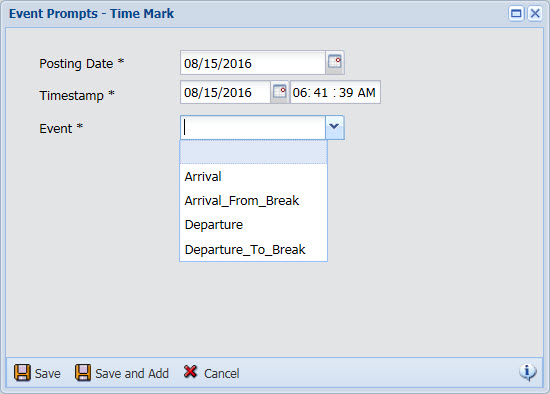
Select the Posting Date when the arrival or departure occurred. The Posting Date determines the date on the timecard where the Arrival or Departure event will display.
In the Timestamp field, enter the date and time of the arrival or departure.
From the Event field, select the Arrival or Departure event. Only Arrival and Departure events will display in this list.
If you only want to post this event, click Save. The event will post and the Event Prompts –Time Mark window will close. If you want to post additional Arrival and Departure events, click Save and Add. The event you just selected will post and the Event Prompts –Time Mark window will stay open so you can post another Arrival or Departure event.
The Arrival and Departure events you just posted will be visible on the Punch Time tab of the timecard.
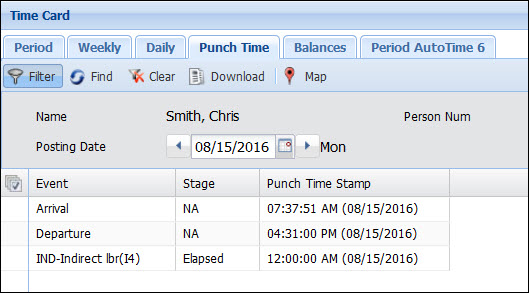
If the allow_timemark Form Setting is enabled, these events will also be visible on the Daily tab of the timecard. On the Daily tab, these events will display grouped together at the top of the timecard, above the other events.
You can add time to an existing event on the timecard by typing the hours in an empty cell in the grid. Click Save when you are done.
You can enter your hours in decimal format (i.e., 2 ½ hours would be entered as “2.5”), or clock format (i.e., 2 ½ hours would be entered as "2:30:00"). The format that is displayed on the timecard will depend on your Duration Format setting in the Preferences form.
To enter hours directly in the timecard as shown above, the direct_entry setting must be set to “1” (enabled) for the time_card_detail_supervisor form. See Form Settings for more information.
Note: Employees whose Time Entry Type is PUNCHED cannot use direct entry to add hours to the timecard.
If you navigate away from the timecard grid without clicking Save, a warning message will display that unsaved data will be lost. Make sure you click Save to keep the changes you entered in the grid.
You can copy an elapsed transaction and post a duplicate on the same day with different prompt values. For example, you may want to copy a work order event and change the operation and number of hours.
In the Period, Weekly, or Daily tab of the timecard, right-click the elapsed transaction and select Copy from the pop-up menu.
![]()
The Event Prompts – Elapsed pop-up form appears.
Modify the event prompts as necessary.
If a Reason Code field displays, select a Reason Code from the drop-down menu. If a Comment box displays you can enter up to 80 characters in the box.
Click Save.
Click the Recalculate button to bring the timecard into compliance with your Pay Policy rules.
If the Add Elapsed, Add Punch, Add Punch Pair, or Add Time Mark buttons are not visible in the timecard, you will have to enable them in your Security Role.
Click Main Menu > Configuration > Security > Security Roles.
If necessary, click the ![]() Filter button and select the appropriate Security
Role Name.
Filter button and select the appropriate Security
Role Name.
To enable the buttons in the supervisor timecard, go to Web: Manage: Supervisor Review: Current Situation and expand the Period, Weekly, or Daily tab.
When you enable or disable a button in one supervisor timecard tab, the same setting change will be made to the other supervisor timecard tab. For example, if you enable the Add Punch button in the Period tab of Current Situation, the Add Punch button will also be enabled in the Period tab of Time Card Review.
To enable the buttons in the employee timecard, go to Web: Self Service: Time Card and expand the Period, Weekly, or Daily tab.
Check the box next to the appropriate button.
Check the Add (add) box to make the Add Elapsed button visible.
Check the Punch (add_punched) box to make the Add Punch button visible.
Check the Punch Pair (insert_punch_pair) box to make the Add Punch Pair button visible.
Check the Time Mark (add_time_mark) box to make the Add Time Mark button visible.
Click Save.