Arrival and Departure events allow employees to record their arrival and departure times during the day by recording a timestamp entered by the employee. They can be posted any time of the day and in any order and are independent of the other punches on the timecard.
Arrival and Departure events are typically used by non-exempt employees to record their arrival, departure, and break times. These events are posted based on the honor system and are not validated against an employee’s schedule or other punch events. Modifying the timestamp of an Arrival or Departure event will not affect the other events on the timecard or require recalculation.
Arrival and Departure events can be posted from the Period, Weekly, or Daily tab of the timecard. They can be displayed on the Daily or Punch Time tab. On the Daily tab, these events will display grouped together at the top of the timecard, above the other events.
Arrival and Departure events can be posted from the web timecard using the Add Time Mark button. They cannot be added to a Menu Tree or posted from a terminal, the Web Time Clock, or the Mobile Client.
You can also import Arrival and Departure events using the Action import context.
To post Arrival/Departure events, you will need to configure the events and enable the Add Time Mark button on the timecard. To display the Arrival/Departure events on the Daily or Punch Time tab of the timecard, you need to enable the allow_timemark Form Setting. Arrival and Departure events can also be viewed in the Action form.
Arrival and Departure events cannot be exported or included in reports.
See Also:
Configuring the Arrival and Departure Events
Enable the Add Time Mark Button in the Timecard
Enable the allow_timemark Form Setting
Post an Arrival/Departure Event
The application comes with predefined Arrival and Departure events and a template for each event. The Event Types are ARRIVAL_DEPARTURE:END and ARRIVAL_DEPARTURE:START.
You can post the predefined Arrival and Departure events. You can also make a copy of these events or the template events and modify the duplicates.
Use the Arrival event (ARRIVAL_DEPARTURE:START) to record an arrival time or start a break.
Use the Departure event (ARRIVAL_DEPARTURE:END) to record a departure time or end a break.
To modify these events, go to the Events form.
The Arrival and Departure events have the following Event Settings:
ALLOW_ELAPSED_ADD
ALLOW_ELAPSED_DELETE
ALLOW_ELAPSED_MODIFY
To prevent employees from adding, deleting, or modifying these events, set the Event Setting to FALSE. For example, if you set ALLOW_ELAPSED_MODIFY to FALSE (Disabled), employees will not be able to modify the event.
Arrival and Departure events can be added (posted) from the Daily, Weekly, or Period tab of the timecard (as long as the Add Time Mark button is enabled on the tab). You can only modify and delete these events on the Daily tab (provided the allow_timemark Form Setting is enabled).
Normally, the Add Time Mark button will display all the Arrival and Departure events that are defined in the Events form.
To prevent all employees from adding (posting) a specific Arrival or Departure event, disable the ALLOW_ELAPSED_ADD Event Setting (explained above).
If you want to prevent specific employees from accessing specific Arrival and Departure events, you will need to use Exclusive Event Filtration:
Set the Event Filtration System Setting to EXCLUSIVE.
When Event Filtration is EXCLUSIVE, employees do not have access to the events in their Event Filtration Group but they will have access to other events in their Menu Tree.
Define an Event Filtration Employee Group and add the employees as members of this group.
On the Event Filtration form, assign the Arrival and Departure events you are restricting to the Event Filtration Employee Group you defined.

Note: You cannot add Arrival and Departure events to a Menu Tree. Arrival and Departure events can only be posted using the Add Time Mark button in the timecard.
The Add Time Mark button is used to post Arrival and Departure events. This button must be enabled in your Security Role.
The Add Time Mark button can be enabled on the Period, Weekly, and Daily tab of the timecard.
To enable the Add Time Mark button:
Click Main Menu > Configuration > Security > Security Roles.
If necessary, click the ![]() Filter
button and select the appropriate Security
Role Name.
Filter
button and select the appropriate Security
Role Name.
To enable the Add Time Mark button in the supervisor timecard, go to Web > Manage > Supervisor Review > Current Situation and expand the Period, Weekly, or Daily tab.
When you enable or disable the Add Time Mark button on one supervisor timecard tab, the same setting change will be made to the other supervisor timecard tab. For example, if you enable the Add Time Mark button on the Period tab of Current Situation, the Add Time Mark button will also be enabled on the Period tab of Time Card Review.
To enable the Add Time Mark button in the employee timecard, go to Web > Self Service > Time Card and expand the Period, Weekly, or Daily tab.
Select the Time Mark check box.
Repeat steps 3 -5 to enable the button on another tab of the timecard.
Click Save.
Users who are assigned to this Security Role will be able to use the Add Time Mark button to post Arrival and Departure events from the timecard.
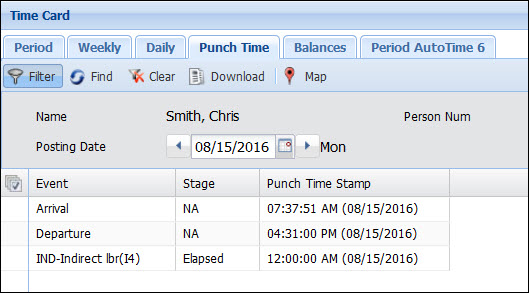
The Arrival and Departure events you post will be visible on the Punch Time tab of the timecard. You can also make these events visible on the Daily tab of the timecard by enabling the allow_timemark Form Setting.
The Arrival and Departure events you post will be visible on the Punch Time tab of the timecard.
If you also want these events to be visible on the Daily tab of the timecard, you must enable the allow_timemark Form Setting (set allow_timemark to “1”).
Click Main Menu > Configuration > Form Configuration > Form Profile.
Select the Form Profile you want to modify.
On the left side of the form, expand the appropriate folders to select the Daily timecard where you will show or hide the Arrival and Departure events.
To select the employee timecard, go to Web > Self Service > Time Card. Select the Daily tab.
To select the supervisor timecard, go to Web > Manage > Supervisor Review > Current Situation. Select the Daily tab.
Note that when you modify this setting on one supervisor timecard tab, the same setting change will be made to the other supervisor timecard tab. For example, if you modify this setting on the Daily tab of Current Situation, the same setting change will be made for the Daily tab of Time Card Review.
On the Form Settings tab, select the allow_timemark Setting Type.
Click Modify.
Change the Setting Value to 1 if you want to show the Arrival and Departure events. Change the Setting Value to 0 if you want to hide the Arrival and Departure events.
Click Save.
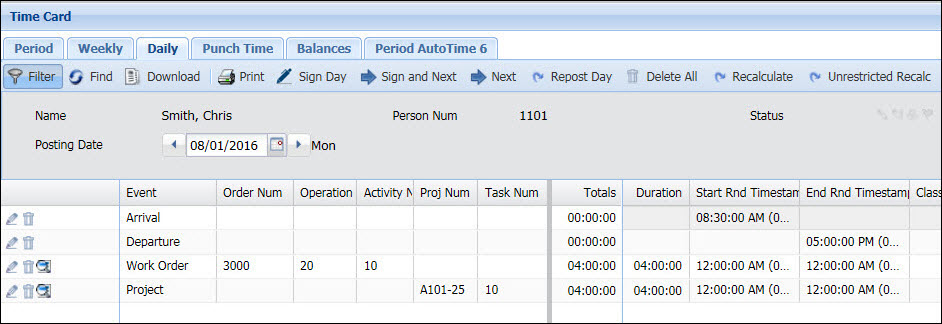
On the Daily tab, the Arrival and Departure events will display grouped together at the top of the timecard, above the other events.
To post an Arrival/Departure event in the timecard, you need to use the Add Time Mark button. If the Add Time Mark button is not visible in the timecard, you will have to enable it in your Security Role.
Note: You can also import Arrival and Departure events using the Action import context.
Navigate to the timecard tab where you want to post the Arrival or Departure event.
Click the Add Time Mark button.
The Event Prompts – Time Mark window will display.
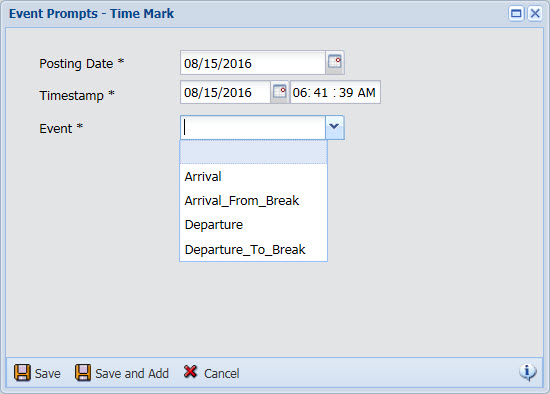
Select the Posting Date when the arrival or departure occurred. The Posting Date determines the date on the timecard where the Arrival or Departure event will display.
In the Timestamp field, enter the date and time of the arrival or departure.
From the Event field, select the Arrival or Departure event. Only Arrival and Departure events will display in this list.
If you only want to post this event, click Save. The event will post and the Event Prompts –Time Mark window will close. If you want to post additional Arrival and Departure events, click Save and Add. The event you just selected will post and the Event Prompts –Time Mark window will stay open so you can post another Arrival or Departure event.
The Arrival and Departure events you just posted will be visible on the Punch Time tab of the timecard.
If the allow_timemark Form Setting is enabled, these events will also be visible on the Daily tab of the timecard. On the Daily tab, these events will display grouped together at the top of the timecard, above the other events.