The steps in this section are based on an example where you are creating a Custom Import Mapping that imports employees.
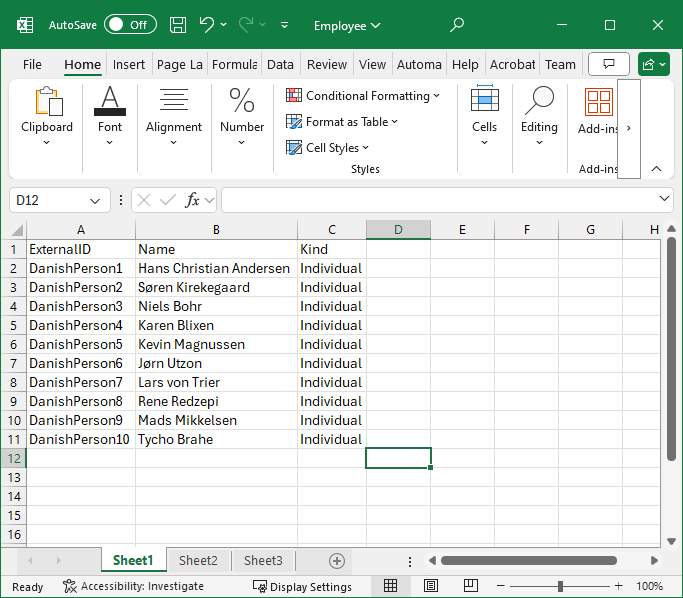
The data is stored in a file called Employees.xlsx. After the import, it is visible in the Resources view as Kind = Individual. The example file contains three columns, one line with headers, and ten additional lines with the data, as shown in the following figure.

In the Custom Import Mappings tab, you continue by doing the following:
-
In the
Import Type field, select
Excel from the drop-down list.
-
In the Local sample file path field, click the Select File button to browse for the
Employees.xlsx
file in the file system and select it.
Note: You cannot continue to step 3 until you have selected an Excel file. In the example, you already have a file, and it is therefore not a problem. However, if you are defining a new Custom Import Mapping, you might not have an Excel file yet. This presents you with a bit of a hen-and-eggs problem where you do not necessarily know the format of the Excel file before you have the mapping, but you cannot create a mapping before you have the format of the Excel file. The solution is to create an empty Excel file and use that file to get you started. It then becomes an iterative process to define the structure of the Excel file and the mapping. For more information, see
Determine the Format of the External Data.
-
Click the
Add button to open the Create Entity Mapping dialog.
-
In the
Source Tab Name - Excel field, select the sheets in the Excel file from which you want to import data from the drop-down list.
-
In the
Destination Entity Name field, select the People Planner table into which you want to import the external data from the drop-down list.
In this example, this is:
-
Click
Save when you are done defining the mapping
When you have chosen a sheet to get the data from and a table to import the data into, People Planner attempts to map the External Fields to the Internal Fields.
The list of fields can be very long because the number of available Internal Fields is long. You can use the Show only fields with mapping checkbox to toggle between showing all the possible fields and showing only the fields that have already been mapped. This is useful when you want to confirm that you have mapped the fields that you need to map.
Note: People Planner attempts to map the fields based on their names. Sometimes this mapping fails, for example, because the names are not identical or because you have not included a column that is mandatory for the mapping. In this case, you must select the checkbox again if you want to see the fields that are missing from the mapping.
In the example, you have the three columns:
ExternalID,
Name, and
Kind, and People Planner is able to map the fields correctly.
In this example, the imported data is displayed in the Resources view. In addition to the default columns, the
Origin and
External ID columns have also been added. The Origin shows that the resources were imported by the Import Mapping with the name EmployeeImport1. The External ID column contains the values from the ExternalID column in the original Excel spreadsheet.
In this example, the imported data is displayed in the Resources view. In addition to the default columns, the Origin and External ID columns have also been added. The Origin shows that the resources were imported by the Import Mapping with the name EmployeeImport1. The External ID column contains the values from the ExternalID column in the original Excel spreadsheet.
