Import of Skills and Skill Assignments
In this example, you import skills from an Excel file into People Planner, including assigning the skills to existing resources.
Assuming that the skills are stored in an external system-for example, an HR-system-and that you can export them from there to an Excel file, this is the simplest format that you can use.
First, create an Excel file and name it Skills.xlsx or something similar.
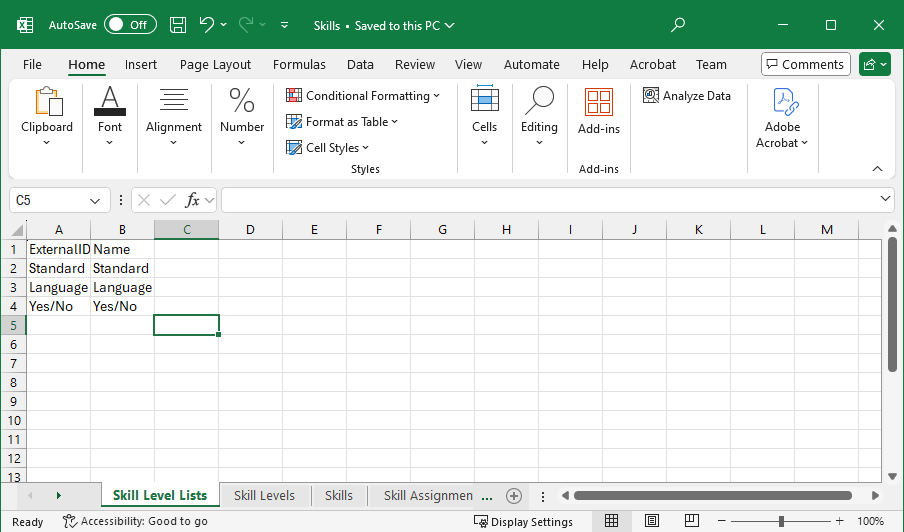
Add the first sheet and name it Skill Level Lists, with the format shown in the following figure.
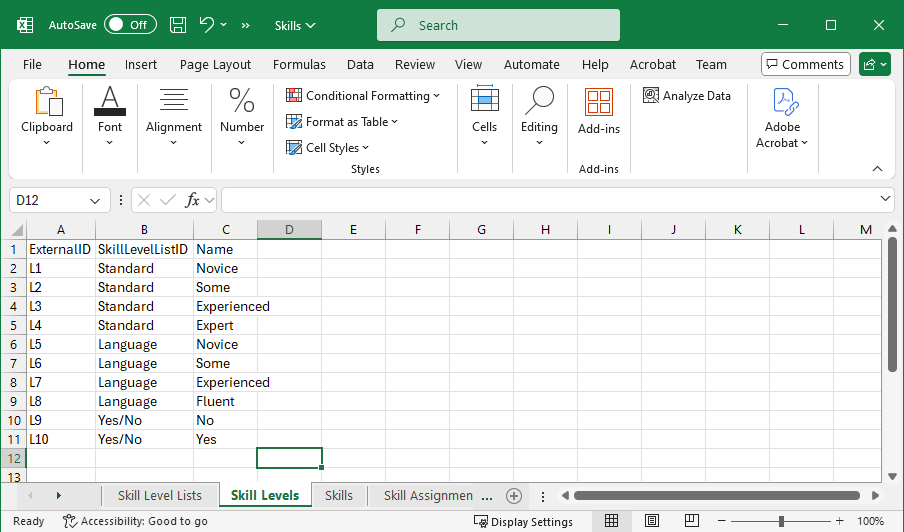
Add a second sheet and name it Skill Levels, with the following format.
The example-data shows that the Skill Level List with the name Language has four levels: Novice (L5), Some (L6), Experienced (L7), and Fluent (L8).
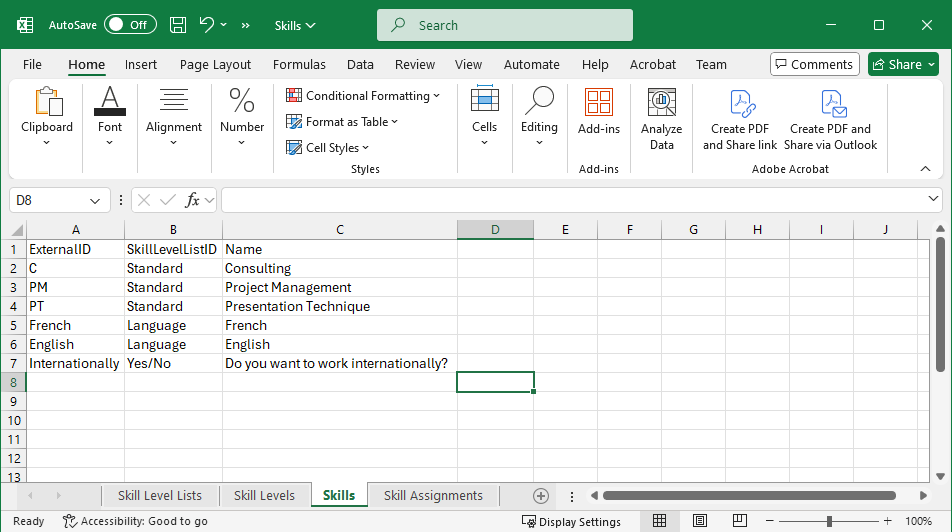
Add a third sheet and name it Skills, with the following format.
The example-data shows that the three different skills-Consulting, Project Management, and Presentation Technique-share the same Skill Level List named Standard, with the following levels: Novice, Some, Experienced, and Expert.
Add a fourth sheet and name it Skills Assignments, with the following format.
The example data shows that the Resource with the External ID DanishPerson12 has two skills, Project Management and French, at the levels Experienced and Novice, respectively.

Now that the file format is ready, the next step is to create a custom import mapping in People Planner.
- Go to .
- Create a custom import mapping.
- In the Import Type field, select Excel from the drop-down list.
- In the Server file path field, enter the folder path of the file on the server to use when running the custom import mapping.
- Click Next.
- In the Local sample file path field, click Select File to choose your Excel file from your device.
- Click Add to add the first mapping.
- In the Source Tab Name - Excel field, select Skill Level Lists from the drop-down list.
- In the Destination Entity Name field, select from the drop-down list.
- Verify that the fields have been mapped correctly.
- Click Save.
- Click Add to add a second mapping.
- In the Source Tab Name - Excel field, select Skill Levels from the drop-down list.
- In the Destination Entity Name field, select from the drop-down list.
- Verify that the fields have been mapped correctly.
Note: You must map the external SkillLevelListID field to the internal PropertyLevelListID field manually. The difference in name is because Skills are actually called "Properties" internally in the People Planner database.
- Click Save.
- Click Add to add a third mapping.
- In the Source Tab Name - Excel field, select Skills from the drop-down list.
- In the Destination Entity Name field, select from the drop-down list.
- Verify that the fields have been mapped correctly.
Note: You must map the external SkillLevelListID field to the internal LevelListID field manually.
- Click Save.
- Click Add to add a fourth mapping.
- In the Source Tab Name - Excel field, select Skill Assignments from the drop-down list.
- In the Destination Entity Name field, select from the drop-down list.
- Verify that the fields have been mapped correctly.
- Click Save.
- Views » Resources » Skill Level Lists
- Views » Resources » Parameters » Skill Levels
- Views » Resources » Skills
- Views » Resources » Resources