Detail Form: Trigger Setting
The Trigger tab on the Message Policy form is used to configure trigger messages. These messages are sent to employees and supervisors based on specific actions. For example, a supervisor adjusting an employee’s time card will activate the TIMECARD_ADJUSTMENT trigger. If this trigger is included in the employee’s Message Policy, the employee whose time card was adjusted will receive the appropriate message.
When you create a Message Policy, you can include or exclude the available triggers using the Trigger tab. Use the Trigger Setting tab to define when the trigger message will be sent, how it will be displayed, who will receive the message, and other options.
You can also change the text of the message generated by the trigger using the Change Trigger Label button.
The DEFAULT_EVENT_TRIGGER will generate messages based on the start or stop of an event. If your Message Policy includes this trigger, you will also need to configure the events that are affected by this trigger. To do so, use the Message Trigger tab on the Events form.
See Also:
Trigger Tab Field Descriptions
Find the Triggers in a Message Policy
Add Triggers to a Message Policy
Modify a Trigger in a Message Policy
Delete Triggers from a Message Policy
Change a Trigger’s Message Label
Notifying Supervisors of Point Level Changes
Message Policy Name
Click the ![]() button
next to the Message Policy Name field to find, add, modify, copy, or delete
a Message Policy Name. To add or modify a Message Policy, you must first
create a Message Policy Name.
button
next to the Message Policy Name field to find, add, modify, copy, or delete
a Message Policy Name. To add or modify a Message Policy, you must first
create a Message Policy Name.
Message Trigger Name
Trigger Description
These triggers define an action that causes a message to be created. See “List of Message Triggers” below for more information on the Message Triggers you can add to your Message Policy:
Message Label
Label used to identify the message in the Dictionary.
Message
Text of the message that is sent to a user based on this trigger.
When editing these messages, do not modify the text that appears in percentage signs or brackets (e.g., [%EVENT_NAME%]). The application will change this text automatically based on the reason for the message.
This setting is used to determine whether a message on the terminal will continue to appear after the user reads or acknowledges it.
The Dispose on Read setting does not affect messages that appear on the message pop-up form in the Shop Floor Time Web application. Once a message is viewed or acknowledged in the Shop Floor Time Web, the message will no longer appear in the message pop-up the next time you log in.
If Dispose on Read is checked, the message will not appear again after the user reads, acknowledges, or agrees/disagrees with it on the terminal.
If Dispose on Read is not checked, the message may appear again in the client terminal, depending on the user's response. If you click Done, the message will appear the next time you log in (the message's status remains Unread). If you click OK, Acknowledge, Agree, or Disagree, the message will not appear the next time you log in.
See Also: Message Response Buttons
Indicates whether users will have to acknowledge that they read the message.
When Acknowledgement is checked, an Acknowledge button
(or a green checkmark  in the
Shop Floor Time Web) will appear along with the message. When a message
has an Acknowledge button, you must click this button or you will continue
to see the message each time you log in. You will not be able to clock
in/out, start/stop labor, etc. until you acknowledge the message. When
you click this button, the message's status changes to Acknowledged.
in the
Shop Floor Time Web) will appear along with the message. When a message
has an Acknowledge button, you must click this button or you will continue
to see the message each time you log in. You will not be able to clock
in/out, start/stop labor, etc. until you acknowledge the message. When
you click this button, the message's status changes to Acknowledged.
Note: If Acknowledgement is checked for the Message Trigger and AGREEMENT_DISAGREEMENT is True in the Trigger Settings, the Agree and Disagree buttons will appear instead of the Acknowledge button.
If you check this box, a message will be deleted after the user has read, acknowledged, agreed, or disagreed with it. The message's status will change to Read or Acknowledged depending on how the user responded. The system will permanently remove the message from the database and it will not be visible the next time the user logs in. The message will also not be visible on the My Messages form, the Message Log form, or the Message View (terminal) form.
If you do not check this box, you must run the PURGE service to delete the message.
Update Date, Updated By
These fields display when the record was created or updated, and the person who created or updated the record.
You can add the following Message Triggers to your Message Policy:
AUTOMATIC_CLOCKOUT_WARNING
Creates a message when the ATTENDANCE service posts an automatic clock out for an employee.
BROADCAST_MESSAGE
Creates a message for one or more employees as defined on the Broadcast Message form.
This trigger has only one setting type, CONSOLIDATE_EMAIL_MESSAGES.
DEFAULT_EVENT_TRIGGER
Creates a message when a particular event is posted. This trigger can be assigned to a stage of an event on the Message Trigger tab on the Events form.
DISCIPLINARY_LEVEL_CHANGE
Creates a message when the DISCIPLINARY_LEVELS task of the ATTENDANCE service runs and a person’s point level has changed since the last time this service ran.
EARLY_CLOCK_IN
Creates a message when an employee clocks in early and the employee's Schedule Policy has Clock In Early set to Confirm, Ignore, or Warn.
EARLY_CLOCK_OUT
Creates a message when an employee clocks out early and the employee's Schedule Policy has Clock Out Early set to Confirm, Ignore, or Warn.
EMPLOYEE_LOAN_ACTION_BEHALF
Sends a message when:
There is an add, modify, or delete of an employee loan on the Manage Employee Loan form.
-or-
There is an add, modify, or delete by a backup supervisor using the Employee Loan form. A backup supervisor is a supervisor who is acting as a supervisor who delegated authority to them.
The SEND_EMAIL_TO_USER and SEND_MESSAGE_TO_USER Trigger Settings will send the message to the employee who is being loaned.
The SEND_EMAIL_TO_MANAGER and SEND_MESSAGE_TO_MANAGER Trigger Settings will send a message to the loaned employee's permanent supervisors and the borrowing supervisor. The borrowing supervisor is the supervisor that the employee was loaned to.
EMPLOYEE_LOAN_BY_BORROWER
Sends a message when a borrowing supervisor modifies or deletes an employee loan record on the Employee Loan form. The borrowing supervisor is the supervisor that the employee was loaned to. For example, SupervisorA loans Employee01 to SupervisorB. SupervisorB then deletes this loan record.
The SEND_EMAIL_TO_USER and SEND_MESSAGE_TO_USER Trigger Settings will send the message to the employee who is being loaned.
The SEND_EMAIL_TO_MANAGER and SEND_MESSAGE_TO_MANAGER Trigger Settings will send a message to the loaned employee's permanent supervisors and the borrowing supervisor.
EMPLOYEE_LOAN_BY_PERMANENT
Sends a message when a permanent supervisor adds, modifies, or deletes an employee loan record on the Employee Loan form.
The SEND_EMAIL_TO_USER and SEND_MESSAGE_TO_USER Trigger Settings will send the message to the employee who is being loaned.
The SEND_EMAIL_TO_MANAGER and SEND_MESSAGE_TO_MANAGER Trigger Settings will send a message to the loaned employee's permanent supervisors and the borrowing supervisor.
LATE_CLOCK_IN
Creates a message when an employee clocks in late and the employee's Schedule Policy has Clock In Late set to Confirm, Ignore, or Warn.
LATE_CLOCK_OUT
Creates a message when an employee clocks out late and the employee's Schedule Policy has Clock Out Late set to Confirm, Ignore, or Warn.
Creates an email message when the Audit Count of any license component is greater than or equal to a defined Warning Threshold. The Warning Threshold is configured on the License Components form. This email message can help you avoid the red warning screen that appears after log in when the number of licenses in use exceeds the number of available licenses. The message will allow an administrator to correct the licensing issue before the red warning screen appears. See License Warning Messages for more information.
The LICENSE_WARNING trigger needs to be included in the Message Policy that is assigned to the ADMIN user on the Employee form (Employee/Person Number "ADMIN" and Person ID "1"). You must configure the trigger's SEND_EMAIL_TO_GROUP setting to define which users will receive the email message.
The LICENSE_WARNING trigger is activated when a license check is done. The application performs a license check once a day, 24 hours from the time the first user logged in for the day. The Recount button on the License Components form will also perform a license check.
If the license check finds that the Audit Count of any license component is greater than or equal to its Warning Threshold, and the LICENSE_WARNING trigger is configured in the ADMIN user's Message Policy, an email message will be created for the Message Group specified in the SEND_EMAIL_TO_GROUP setting.
The LICENSE_WARNING trigger needs to be included in the Message Policy assigned to the ADMIN user on the Employee form (Person Number "ADMIN" and Person ID "1"). The license warning message will be created for the Message Group specified in the SEND_EMAIL_TO_GROUP setting for this trigger. To send the message you need to run the MESSAGE_DELIVERY service.
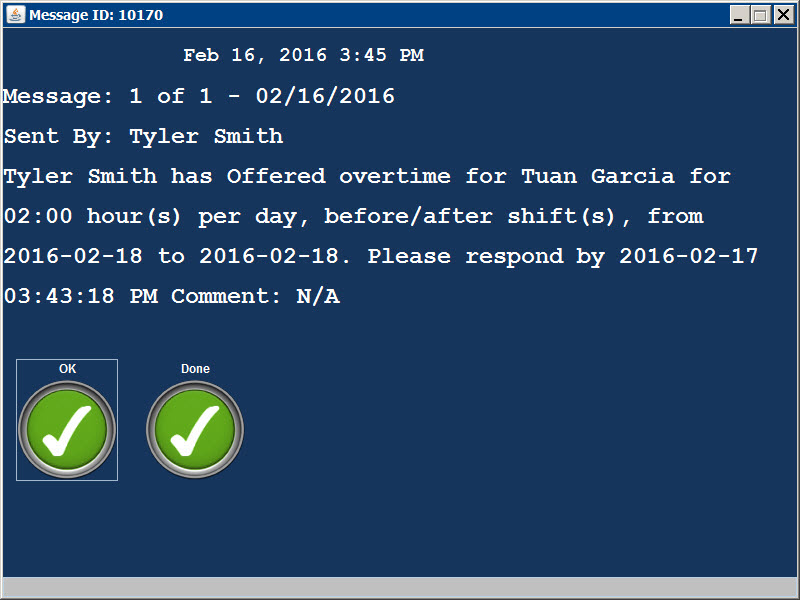
OT_OFFER_ACTION
Creates a message when a supervisor offers overtime to an employee.
OT_OFFER_ACTION_AUTH_BEF_AFT
Creates a message when a supervisor authorizes a Before/After overtime offer.
OT_OFFER_ACTION_AUTH_HOL
Creates a message when a supervisor authorizes a Gap or Holiday overtime offer.
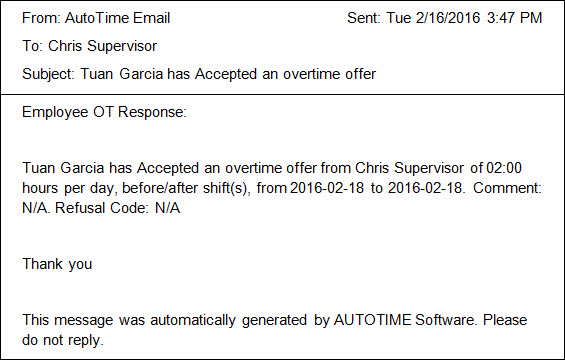
OT_RESPONSE
Creates a message when an employee acknowledges, accepts, or refuses an overtime offer.
PTO_REQUEST
Creates a message when an employee creates a Time Off Request.
PTO_REQUEST_SUPERVISOR
Creates a message when a supervisor has approved or denied a Time Off Request.
TERMINAL_STATUS_CHANGE
Creates a message when the TERMINAL_MONITOR service runs and the status of a terminal has changed since the last time the service ran. Note that the terminals you want to monitor must have the Monitor box checked on the Terminal form.
Creates a message when an employee’s timecard is adjusted by a supervisor or by a service instance (ATTENDANCE, RECALCULATION, etc.).
This trigger will not create a message when hours are deleted from the timecard.
This trigger will also not create a message for events that post automatically (such as an automatic scheduled lunch or a LATE_ARRIVAL event).
You can use the IGNORE_SERVICES Trigger Setting to stop this trigger from creating a message when the timecard is adjusted by a service instance.
TIMECARD_WARNING
Creates a message when a warning message is on the employee’s timecard.
UN_SCH_CLOCK_IN
Creates a message when an employee has clocked in outside of his/her schedule.
UN_SCH_CLOCK_OUT
Creates a message when an employee has clocked out outside of his/her schedule.
Click Main Menu > Configuration > Policies > Message Policy.
Select a Message Policy Name from the drop-down list.
You can also click the ![]() button
next to the Message Policy Name field and select Lookup
from the pop-up menu. Select the Message Policy Name and click OK.
button
next to the Message Policy Name field and select Lookup
from the pop-up menu. Select the Message Policy Name and click OK.
The Trigger tab will display the triggers that are currently in your Message Policy.
To narrow your search, select a Message Trigger Name from the drop-down list.
Click Find. The triggers in the Message Policy Name you selected will appear in the grid.
Click Main Menu > Configuration > Policies > Message Policy.
Select a Message Policy Name from the drop-down list.
You can also click the ![]() button
next to the Message Policy Name field and select Lookup
from the pop-up menu. Select the Message Policy Name and click OK.
button
next to the Message Policy Name field and select Lookup
from the pop-up menu. Select the Message Policy Name and click OK.
The triggers in the Message Policy Name you selected will appear on the Trigger tab.
Click Add.
Select the Message Trigger Names you want to include in the policy. Move these triggers from the Available column to the Selected column.
Check the Dispose on Read, Acknowledgement, and Delete Immediately boxes as necessary. Refer to the Trigger Tab Field Descriptions for more information.
If you want to add more than one record, click Save and Add to save your settings and keep the Add Message Policy window open. Or click Save to save your record and return to the main form.
Click Main Menu > Configuration > Policies > Message Policy.
Select a Message Policy Name from the drop-down list.
You can also click the ![]() button
next to the Message Policy Name field and select Lookup
from the pop-up menu. Select the Message Policy Name and click OK.
button
next to the Message Policy Name field and select Lookup
from the pop-up menu. Select the Message Policy Name and click OK.
The triggers in the Message Policy Name you selected will appear on the Trigger tab.
Select the Message Trigger Name and click Modify.
Check the Dispose on Read, Acknowledgement, and Delete Immediately boxes as necessary. Refer to the Trigger Tab Field Descriptions for more information.
Click Save when you are done.
Click Main Menu > Configuration > Policies > Message Policy.
Select a Message Policy Name from the drop-down list.
You can also click the ![]() button
next to the Message Policy Name field and select Lookup
from the pop-up menu. Select the Message Policy Name and click OK.
button
next to the Message Policy Name field and select Lookup
from the pop-up menu. Select the Message Policy Name and click OK.
The triggers in the Message Policy Name you selected will appear on the Trigger tab.
Select the Message Trigger Name you want to remove and click Delete.
Click OK to confirm the action.
Each message trigger comes with a default message that is stored in a dictionary. To change the text of the message generated by the trigger, use the Change Trigger Label button. This button will display the Dictionary Label form, so you can modify the message in a dictionary. Your change will be visible to all users who are assigned to the dictionary, not just those assigned to the Message Policy.
On the Message Policy form, select the Message Policy Name from the drop-down list.
The triggers in the Message Policy you selected will appear on the Trigger tab.
Select the Message Trigger Name and click Change Trigger Label.
The Dictionary Label form opens.
Terminal/Web Text is the message that appears on the web pop-up form or the client terminal.
Email Text is the body of the email message.
Email Subject is the subject line of the email message.
Email Header is the header of the email message.
Email Trailer is the message trailer.
You can change a message label by typing the new text directly into the grid. Or you can select the message label and click Modify on the Dictionary Label pop-up form.
A message may include semantics - text that appears inside percentage signs or brackets (e.g., [%EVENT_NAME%]). When the message is created, the system will replace the semantic with the correct value (e.g., the name of the event or the person number).
When you are done click Save on the Dictionary Label pop-up
form and then click the ![]() in the upper right
corner of the form to close it.
in the upper right
corner of the form to close it.
When you use the DISCIPLINARY_LEVEL_CHANGE message trigger to alert supervisors of changes in their employees’ point levels, the supervisors will be notified any time the point level changes.
If you want to send messages to different supervisors based on the point level and whether the level has increased or decreased, use the Attendance Rules operands (Set Level, Send Level Change Message, and Supervisor Role). These operands can be used to create an Attendance Ruleset that will override the settings in the DISCIPLINARY_LEVEL_CHANGE message trigger.
For example, you may create a ruleset that alerts the employee’s immediate supervisor when the employee’s point level increases to level 1, and alerts a higher level supervisor when the employee’s point level increases to level 2. Although the employee’s Message Policy has the DISCIPLINARY_LEVEL_CHANGE message trigger configured to send messages to all Supervisor Roles, the Attendance Ruleset will cause the messages to be sent only to specific supervisors based on the employee’s point level.