Search Navigation Controls
The Search Navigation Controls feature is available throughout most hubs and other applications. Use these controls to quickly locate a saved search, create ad hoc or new searches, page through records, find and select multiple records, and view selected hub or application records in either detail view or list view.
Search Navigation Controls

The Search Navigation Controls (highlighted in red) appear at the top of most hub and application forms. These controls are comprised of the following components:
| Field | Description |
|---|---|
| Find <record> |
Use this field to enter a partial or complete name or number in the Find <record> lookup to find and select records that you want to view or edit. Returned records appear in the drop-down list and can include active, inactive, and dormant records. Your current record selection will be preserved even if you switch from one hub to another. For example, if you are working in the Projects hub and then switch from that hub to another, when you return to the Projects hub, your current project record selection is still available. |
| Saved Search Control |
The
Saved Search control provides several components to find and select saved searches available for the active module, filter and locate hub records returned for a search, and add new records to a saved search. Click
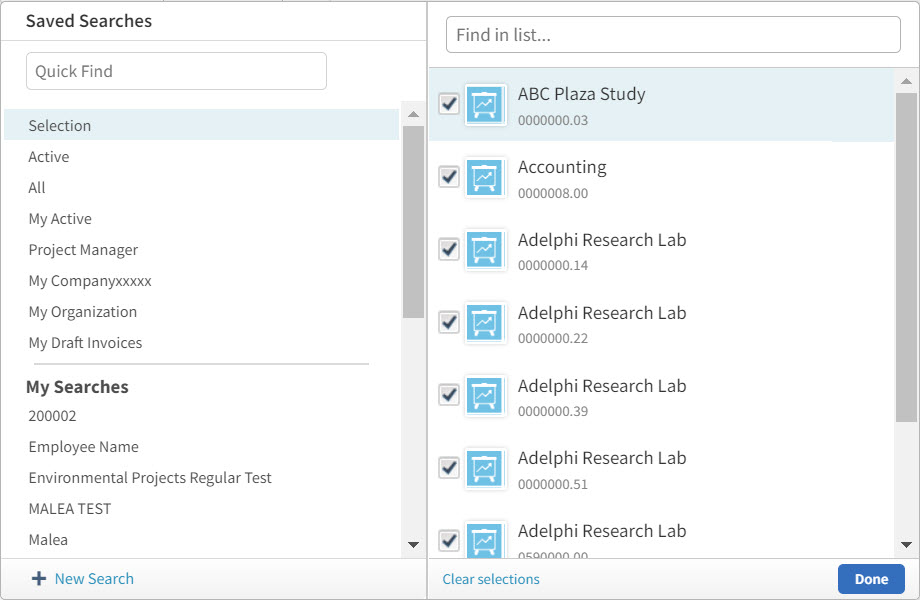
The Saved Searches pane (left) provides a list of all saved searches that are available for the active module, as well as a Quick Find field and a + New Search link. The saved searches can include standard (for example, All, Active, and Mine), as well as personal, shared, and complex searches (such as SQL Where Clause and legacy searches). If available, a Selection search appears in the Saved Search control at the top of most hub and application forms and in the Saved Searches list. The word Selection denotes what is sometimes known as an ad hoc search. Only one ad hoc Selection is available at any given time; it remains unchanged until you either update it or create an ad hoc search. |
| Record Selection |
This pane (right) enables you to find hub records and select multiple records for use in ad hoc searches. At the top of the Record Selection pane, use the Find in list field to filter and locate either a specific record or multiple records. Use the Select All button to preserve all the records included in the saved search without creating an ad hoc selection search. Vantagepoint closes the Saved Searches and Record Selection panes. You can also create an ad hoc search based on a selection of records included in a saved search. From the Record Selection pane, select a single or a subset of the records that you want to include in the ad hoc search. As you begin to select a subset of records, the Select All button at the bottom of the pane is replaced by the Done button. Click Done to save the ad hoc search. To clear your record selections and choose other ones, click the Clear selections link at the bottom of the Record Selection pane.The word
Selection denotes an ad hoc search and appears in both the Saved Search control ( To update the ad hoc search
Selection, click
For more information, see Select Hub Records for an Ad Hoc Search and Edit a Selection in a Saved Search. |
| New Records |
You can also add and track new records on most hub or application forms. When you save one or more new records, a saved confirmation message is displayed for each new record and the
New Records ( Use the New Records paging control to view, track, and edit information for each new record on the active form. If you move the focus from New Records and navigate to another field, search, or form, you lose the ability to use New Records to view, track, and page through new records. The New Records label reverts to the Saved Search control. For more information, see Use Search Navigation Controls to Track New Records. |
| Quick Find |
Use this field to enter part of a search's information, such as a name or number. If the information that you enter matches only one search, an Edit icon appears to the right of the search. Click
To include only active records in the selected quick search, click the
Active Only toggle ( For more information, see Use a Quick Find to Locate a Search. |
| + New Search |
Click this option to create a search for hub records, report fields, and other application records. You use the New Search dialog box to refine your search criteria using either basic or advanced search features. For more information, see New Search Dialog Box, Personal and Shared Searches, Build a Basic Search, and Build an Advanced Search. |
|
Use these arrow icons to scroll through the records in the search results and display a different record on the form. The numbers indicate which record you are viewing out of the total number of records in the search results. |
|

|
Click the
List View icon to see the list view of the form. Fields are displayed in columns in a grid, rather than on separate tabs of the form. In each grid, you can display and edit data for multiple records at one time, with data for each record displayed in a row. This makes it easy to compare, update, and save multiple records at one time because you do not have to open individual records.
To add or remove columns, or to change the order of the columns in the grid, click
For information about selecting columns, see Select Columns for a Grid. Each grid toolbar also provides access to options for printing grid data, exporting data, and grouping by column. To maximize a grid to a full-screen display, click
For more information about working in list view, see Use List View. You can also enable the Explicit Save in List View (Opt-In Available) feature (). This feature disables the auto-save feature and enables you, while working in list view, to quickly update grid column information for multiple records. To save your changes, click the Save button. You can choose to opt in to this feature for the Vantagepoint 7.0 release. The ability to opt in is temporary and will be removed when the feature becomes automatically enabled for all Vantagepoint users in a future release. For more information, see Opt-In Feature Overview. After all validated record changes are saved, a success message appears in the title bar. For deleted records, a confirmation message appears prompting you to either select Delete or Cancel. When one or more records fail, Vantagepoint displays a dialog box that contains a list of all the invalidated records that may provide error descriptions and suggestions on how to correct errors. For more information, see Saving Your Work and Enable the Explicit Save in List View Opt-In Feature. With the appropriate security role access, you can use also the Bulk Update feature when you are working in list view. This enables you to edit multiple hub records that require the same update with one action. For example, if the supervisor for a group of employees is changing, use the Bulk Update option in the Employees hub to change all of the employee records at one time. For more information, see Use Bulk Update to Update Multiple Records. Important: When you select the Bulk Update option, all saved records are permanently updated in your database. To reverse these updates, you must manually roll back each record. In My Preferences, you can set your preferred application view to detail view, list view, or the last view that you used. For more information, see Set the Preferred Application View. |

|
Click the Detail View icon to view and edit the contents of a single record. All fields for the selected record are displayed on the form, typically on one or more tabs. Initially, detail view is used by default when you open hub forms and some other application forms. This is the view described in most help topics. In My Preferences, you can set your preferred application view to detail view, list view, or the last view that you used. For more information, see Set the Preferred Application View. |
 to the right of the filter icon to display the
 to open the Edit Search dialog box. You can then modify the search records and also use the standard and advanced features of
Vantagepoint Search to create an ad hoc search with a new set of conditions, fields, and records.
to open the Edit Search dialog box. You can then modify the search records and also use the standard and advanced features of
Vantagepoint Search to create an ad hoc search with a new set of conditions, fields, and records.

 ) on the
 to the right of the grid and use the Select Columns dialog box.
 . This expanded view reduces the need to scroll through long lists of records. Click this option again to return to the standard grid display. For more information, see
For more information about Search features, see Search Quick Reference, Components of a Search, Search Hub Records, and Select Hub Records for an Ad Hoc Search.
You can access a specific hub record or set of records when you enter a partial or complete name or number in the Find <hub records> field to the left of Search Navigation Controls. If two or more hub records are returned, click the record you want displayed in the active hub or application form.