Detail forms:
The Source Fields tab on the Import Definition form is used to associate source data with specific field names that belong to the tables that are associated with the record names you select. Each context has a set of destination field names with which you can associate the source data. In this form you can also configure a source field not to be mapped to a context, which means it will be ignored during the import (see Add an Empty Source Field).
Note: You must define the record names on the Destination Records tab before you can map the source data on the Source Fields tab.
See Also:
Source Fields tab - Field Descriptions
Find/View a Source Field Record
Import Name
Identifies the Import Name the record applies to. Import names are configured on the Import Source form.
Import Type
Identifies the type of file that will be imported. Available options are CSV (comma-separated values), FIXED (each field has a fixed length), XML, or WS. The Import Type is defined on the Import Source form when you are creating an Import Name.
Fixed Length
This setting applies only if the Import Type is Fixed. It specifies the number of characters in the field. The Fixed Start and Fixed End fields will update automatically based on the field’s Fixed Length and its position in the import file.
Fixed Start, Fixed End
These settings only apply if the Import Type is Fixed. These settings indicate the start and end position of the field. They are calculated automatically based on the field’s Fixed Length and its position in the import file.
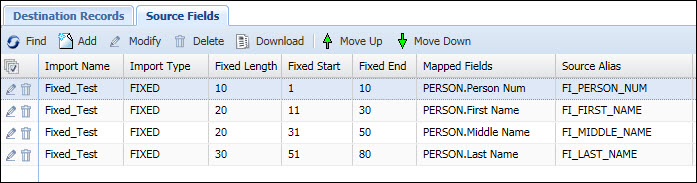
For the first field in the import file, the Fixed Start and Fixed End will be calculated from the beginning of the file (position 1) and continue based on the Fixed Length. As you add more fields, the Fixed Start and Fixed End will continue with the next available position. For example, if the first field in the import file has a Fixed Length of 10, the Fixed Start will be 1 and the Fixed End will be 10. For the next field in the import file, the Fixed Start will be 11 and the Fixed End will be based on the field’s Fixed Length (e.g., if the Fixed Length is 20, the Fixed End will be 30).
Mapped Fields
When you add a Source Field record, the Record Name and Field Name you enter will appear in the Mapped Fields column.
The Mapped Field identifies the Context Name and destination fields with which the source data will be associated. Each context has a set of destination fields with which you can associate the source data. When source data is mapped with fields from multiple contexts, multiple XML documents are created (one for each context). Each context will result in a separate record on the In XML Queue form. Each record will contain an In XML Queue Dtl record for each destination record.
Formats
Identifies the Import Field Format, as specified on the Field Format tab. The format listed first will apply to the first mapped field value. The format listed as second will apply to the second mapped field value, and so on.
Source Alias
This is an optional name for the source field.
Source Rule
If your Import Type is XML, the Source Rule is required. You can use FreeMarker expressions to create the rule.
Update Date, Updated By
These fields display when the record was created or updated, and the person who created or updated the record.
Click Main Menu > Configuration > Interfaces > Import Definition.
Select an Import Type and an Import Name and click Find.
Click the Source Fields tab to view the configured records.
Note: You must have an existing Import Name record. Import Names are created on the Import Source form.
Click Main Menu > Configuration > Interfaces > Import Definition.
Select an Import Type and an Import Name and click Find.
Click the Source Fields tab.
Click Add.
Select a Record Name. This is the context name you created in Destination Records earlier.
Select the Field Name. The source data will be used as a value for the selected field name.
Note: Each Context Name requires certain Field Names. For example, the Context PERSON must include the Field Names "First Name - F1_FIRST_NAME" and "Person Num - F1_PERSON_NUM" when adding a new record.
If the Import Type is FIXED enter the amount of characters that this field will use in the Fixed Length field. The Fixed Start and Fixed End fields will update automatically.
If the import type is CSV the service will import the data that is listed before the first character separator for the first Import Definition record. If a second Import Definition records exist, the service will import the data located between the first and second separator. The service will continue with this sequence for all the Import Definition records with a common Import name.
Enter a Source Alias if you want to use a common name for this record.
If your Import Type is XML, the Source Rule is required.
If you want to add more than one Source Field record, click Save and Add to save your settings and keep the Add Source Fields window open. Or click Save to save your Source Field record and return to the main form.
If you want to associate the source data with more than one field, you can define the additional field names via the Field Map tab. To define the output format for the source values see Field Format.
Repeat steps 4-10 until you have mapped all the source data you want to import.
Click Validate on the toolbar to validate the mapped fields. The system will check that the Import record contains the mandatory mapped fields. If a field name is missing, an error message will display.
Adding an Empty Source Field means that you can configure a source field not to be mapped to a context, which means it will be ignored and not imported during the import process.
Click Main Menu > Configuration > Interfaces > Import Definition.
Select an Import Type and an Import Name and click Find.
Click the Source Fields tab.
Click Add.
Enter a Source Alias if you want to use a common name for this (empty) record.
Click Save.
Note: You cannot modify the Import Name or Type.
Click Main Menu > Configuration > Interfaces > Import Definition.
Select an Import Type and an Import Name and click Find.
Click the Source Fields tab.
Select the record you want to modify and click Modify.
Modify the Source Alias, Source Rule, or Fixed Length field.
Click Save.
Click Main Menu > Configuration > Interfaces > Import Definition.
Select an Import Type and an Import Name and click Find.
Click the Source Fields tab.
Select the record you want to delete and click Delete.
Click OK to confirm the action.
The Move Up and Move Down buttons allow you to move the Source Fields on the Import Definition form. The sequence of the record is important if you want the service to import the data in the order it is listed. The service imports data starting at the beginning of the file and use the values identified there for the field names located in the first record on the Import Definition form. It continues with the next set of data for the second record, and so on.
To move a record up, select the record on the Source Fields form and click the Move Up button until it is positioned where you want to keep it.
To move a record down, select the record on the Source Fields form and click the Move Down button until it is located where you want to keep it.