Dialog messages are two-way messages between the Shop Floor Time application and the user. When a user receives a dialog message, the user must respond to the message. Based on the user’s response, the message will stop displaying, continue displaying, or show a related message that also requires a response. A dialog message can be configured to display in relation to an event posting and can be restricted to display only under certain conditions (for example, the 15th day of the month).
Dialog messages can also be used as attestations. Attestations are confirmations that the user provides in response to a question. For example, a user may be asked during clock out if his or her timecard is correct for the current pay period. If the user responds Yes, the clock out will proceed normally. If the user responds No, the clock out will not continue and the user will be expected to correct the timecard. The message will continue to display during clock out until the user answers Yes.
Dialog messages and attestations can be shown on the Web Time Clock and client terminals. These messages are only available when the terminal is online. See Dialog Message Example. You can also export the dialog messages to an external system such as your ERP system.
Dialog messages are generated by Messaging Rules, a Message Definition/Message Policy, and the MESSAGE_CREATION service. You will also need to define the dialog elements and responses that comprise the dialog message.
To use this feature, you must perform the configuration steps outlined below.
1. Create the Dialog Elements and Responses
2. Define the Rulesets for the Dialog Messages and Responses
3. Assign the Response Rulesets to the Dialog Messages
4. Create the Message Definition for the Dialog Message
5. Generate or Import the Dialog Message
This feature requires the following:
You must have the Messaging module included in your license file.
The Messaging module must be enabled.
To check if the module is included in your license and enabled:
Click Main Menu > Configuration > System > Licensing.
On the License Modules tab, select Messaging under the Module Name column.
Ensure that the following check boxes are selected: Licensed and Module Enabled.
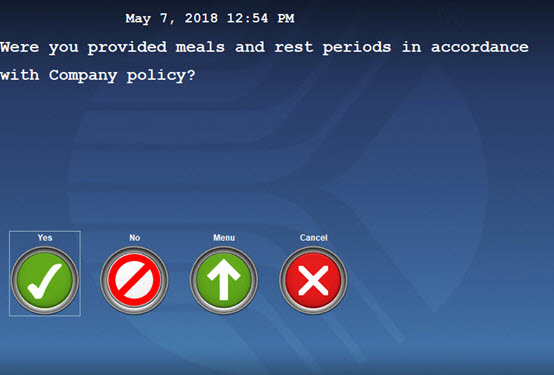
In this example, a dialog message displays when an employee clocks out. The message asks if the employee received his meals and breaks.
If the employee clicks Yes, the employee is clocked out.
If the employee clicks No, another message displays.
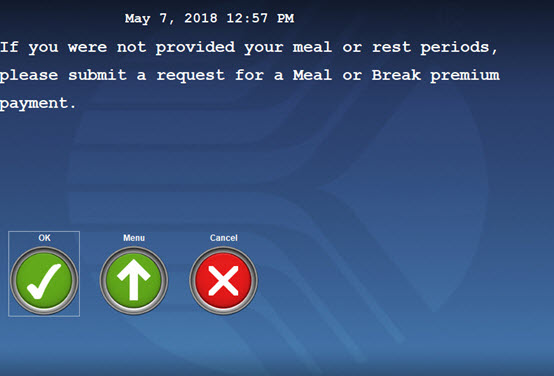
When the employee clicks OK in the second message, the employee is clocked out and his supervisor receives an email that the employee may be entitled to a premium payment.
Use the Dialog Element and Dialog Message forms to define the messages and responses and organize them into the dialog message.
The message or response is created on the Dialog Element form. These elements are then used to create a dialog on the Dialog Message form.
To configure the Dialog Message Example shown above, the Dialog Element form is used to define two messages and three responses. The Dialog Element Label tab shows the text of each message or response.
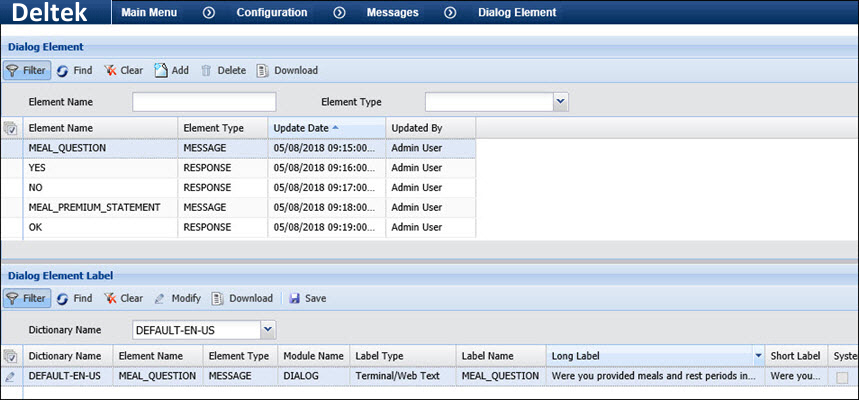
The message called Meal_Question asks the employee if he received his meals and break periods.
The message called Meal_Premium_Statement tells the employee to submit a request for a meal premium.
The responses the employee can make to these questions are also defined on the Dialog Element form (Yes, No, and OK).
Make sure the Element Name for each response matches the Event Name on the Terminal Event Image form. Otherwise, the button for the response may not display correctly. For example, a Yes button will display as a plain blue button instead of a green checkmark if the Element Name is not Yes.
Once the messages and responses are defined on the Dialog Element form, use the Dialog Message form to organize them into a Dialog Message. The Dialog Message you define here will be assigned to a Message Definition so the MESSAGE_CREATION service can use it to generate dialog messages for employees.
On the Dialog Message form,
use the Dialog Name quick
link ![]() to define the dialog name.
to define the dialog name.
Select the dialog name in middle of form and click Add Child.
On the pop-up form, select the Element Name for the first message in the dialog. In this case, the first message is called Meal_Question. You defined it earlier on the Dialog Element form.
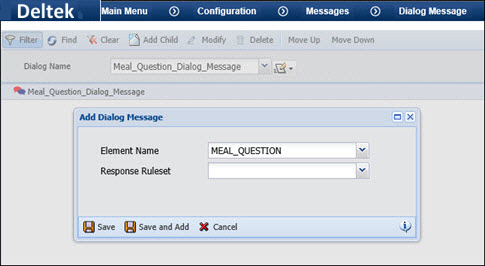
Leave the Response Ruleset blank. It will be added later after the rulesets are created.
Select the message you just added (Meal_Question) and click Add Child to add responses to the message. In this example, we are adding the responses Yes and No.
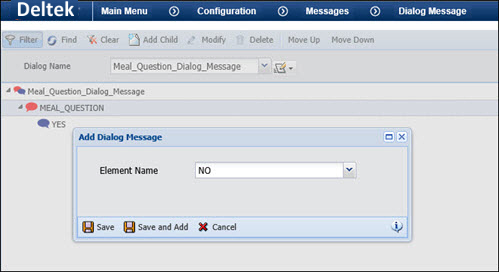
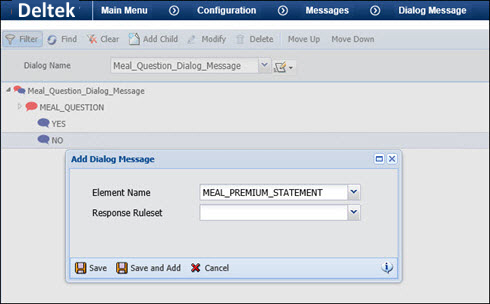
In this example, a second message will display when the employee's response is No. To add this element to the dialog message, select the No response and click Add Child. The Element Name for the No response will be the Meal_Premium_Statement message. Leave the Response Ruleset blank. It will be added later after the rulesets are created.
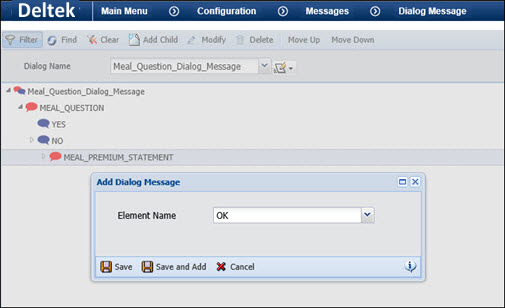
Add a response to the Meal_Premium_Statement by selecting it and clicking Add Child. Add the OK response.
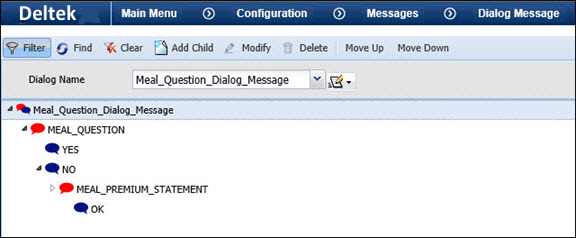
When you are done, the Dialog Message form will show the complete dialog with its messages and responses.
You can now define the rulesets for the dialog message.
You need to define a ruleset for the messages and responses in your dialog message.
The rulesets can be used to update the message's status and send messages to the employee and supervisor. You can also use these rules to define criteria for creating the message, such as the number of hours the employee has posted and whether the employee has signed the day.
Note: If you will be importing your dialog messages, you should define an empty ruleset (one with no rules).
You need to define a ruleset for the dialog message you defined in the Dialog Message form. This ruleset will be used to display the dialog to the employee.
Use the Calc Rule form to create a rule with the MessagingRuleset context. Then, add this rule to a ruleset you define in the Rulesets form.
In the example below, a rule called Meal_Question_Rule is created for the Meal_Question_Dialog_Message that was created earlier.
IF Get Boolean( True )
THEN Create Dialog Message ( Application )
And Display Messages( )
The Meal_Question_Rule is then added to a new ruleset (the Meal_Question_Ruleset) using the Rulesets form.
This ruleset will be assigned to the Message Definition that will be used by the MESSAGE_CREATION service to generate the dialog message.
You also need to create a response ruleset for each of the messages in your dialog. The response ruleset determines what happens when an employee responds to the dialog message.
In this example, a response ruleset is needed for both message elements in the dialog message – the Meal_Question and the Meal_Premium_Statement.
Use the Calc Rule form to create the rules with the MessagingRuleset context. Then, add the rules to the correct ruleset using the Rulesets form.
For the Meal_Question message, the response ruleset includes the following rules.
Meal_Question_Yes: This rule is used when the employee responds Yes to the Meal Question.
IF Is Current Response(
Meal_Question_Dialog_Message, MEAL_QUESTION, YES )
THEN Update Status( Meal_Question_Dialog_Message, Read )
Meal_Question_No: This rule is used when the employee responds No to the Meal Question. If the employee responds No, has posted 6 or more hours, and has signed the day, the employee and supervisor will receive messages.
IF Is Current Response(
Meal_Question_Dialog_Message, MEAL_QUESTION, NO )
AND Get Posted Hours (Day, Current, Paid) >= 6
AND Is Person Type (Employee)
AND Is Signed (Day, Current, Employee)
THEN Create Supervisor Message( Application, Group, 0, False, MEAL
PREMIUM SUP, Get Empty Override Message( ) )
AND Create Person Message( Application, MEAL PREMIUM EMP, Get Empty
Override Message( ) )
AND Update Status( Meal_Question_Dialog_Message, Unread )
For the Meal_Premium_Statement message, the response ruleset includes the following rule:
Meal_Premium_Statement_OK: This rule is used when the employee responds OK to the Meal Premium Statement.
IF Is Current Response(
Meal_Question_Dialog_Message, MEAL_PREMIUM_STATEMENT, OK )
THEN Update Status( Meal_Question_Dialog_Message, Read )
If you use a Set Message Attribute operand in one of these rules, the rule's attributes will override the Message Settings for the dialog's Message Definition.
The response rulesets can now be assigned to the dialog message elements.
Once the response rulesets are defined, you need to add them to the messages in your dialog message.
On the Dialog Message form, select the Dialog Name you defined earlier. In this example, the Meal_Question_Dialog_Message is selected.
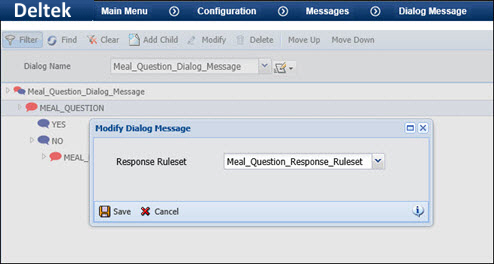
Select the first message in the dialog (Meal_Question in this example) and click Modify. Select the Response Ruleset you defined for the message. Then, click Save.
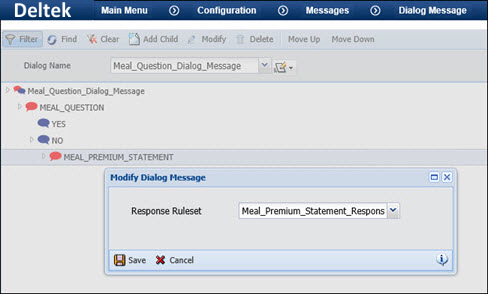
Select the next message in the dialog (Meal_Premium_Statement in this example) and click Modify. Select the Response Ruleset for this message and click Save.
Now that the Dialog Message is complete, you can create the Message Definition that will be used to generate it.
You need to create a Message Definition for your dialog message. This Message Definition will be assigned to the Message Policy of persons who will receive the dialog message.
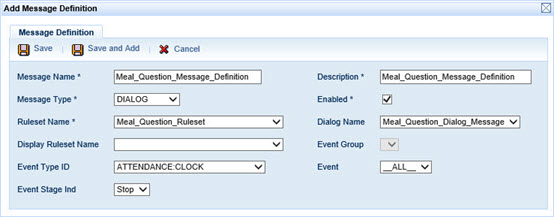
Click Main Menu > Configuration > Messages > Message Definition and click Add.
Enter the Message Name and Description.
For the Message Type, select DIALOG.
Select the Dialog Name you defined earlier and for which you just added the response rulesets.
Select the Ruleset Name that you defined earlier for the dialog message. The MESSAGE_CREATION service will use this ruleset to generate the dialog message. If you are importing your dialog messages, you can select an empty ruleset (one with no rules).
If you defined a Display Ruleset for the dialog message, select it from this field.
If you want the dialog message to display during specific event postings, use the Event Group, Event Type ID, Event, and Event Stage Ind fields to define these events. If you do not enter any values in these fields, the dialog message will display on the terminal after the person logs in.
Make sure the Enabled check box is selected, and click Save.
When the Message Definition is complete, you need to add it to the Message Policy of the persons who will receive the dialog message.
You need to add the Message Definition you just created to the Message Policy of the persons who will receive the dialog message.
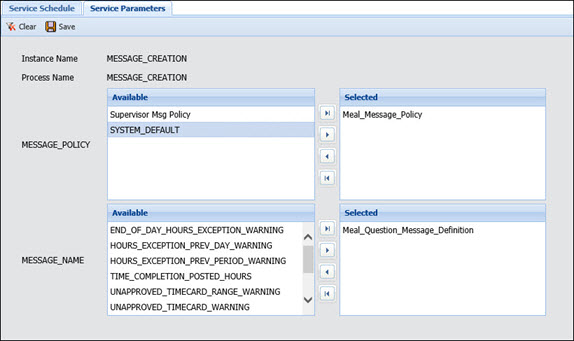
On the Message Policy form (Main Menu > Configuration > Policies > Message Policy), use the Message Policy Name field to select the Message Policy of the persons who will receive the dialog message.
On the Definition tab, click Add.
In the Message Name field, select the Message Definition you just created.
Click Save.
With the Message Definition for the dialog message still selected, use the Message Settings tab to change the attributes of the dialog message. See Message Setting Types for more information.
If any of the rules used by the dialog message include a Set Message Attribute operand, the operand's attributes will override the Message Settings for the Message Definition.
Make sure you assign this Message Policy to the appropriate persons.
Once you have configured your dialog elements, rulesets, Message Definition, and Message Policy, you need to generate the messages. You can do so by running the MESSAGE_CREATION service or importing the messages.
The MESSAGE_NAME parameter of the MESSAGE_CREATION service defines the Message Definitions for which the service will generate messages. You must include the Message Definition for the dialog message you created earlier.
The MESSAGE_CREATION service will process records for persons with the Message Policy/Message Definition specified in the service’s parameters. The MESSAGE_CREATION service will generate the messages based on these settings. These pending (unread) messages can be viewed on the Message Log form.

When the service generates the dialog message, the message will have the status Unread. As long as the message is unread (and has not expired), it will display on the terminal. When a message expires or is cancelled, the service will generate the dialog message again.
You can also import your dialog messages by creating an Import Definition with the Message context. If you import the dialog messages, you do not need to run the MESSAGE_CREATION service. The message import will place the unread messages into the Message Log table.
In the Message Definition for the dialog message, you will need to select an empty ruleset (one with no rules) in the Ruleset Name field. The ruleset is not needed because the dialog message is being generated by the import.
Make sure your import file includes the same dialog elements, message names, and message definition names that you defined earlier. For information on what fields you need to include in the import file, see doc-INTERFACE-events-AUTOTIME.
When the messages import successfully, they will be visible in the Message Log form.