The Mobile Client is a version of the Shop Floor Time application that can be run as a native app on mobile devices such as the iPhone, iPad, and Samsung Galaxy. You can sign and unsign the timecards, add elapsed and punch transactions, modify and delete transactions, and view transaction details. The Mobile Client will not work in offline mode.
Your location will be recorded (provided GPS is enabled on your mobile device) when you add, modify, or delete an event, or sign the timecard. The Mobile Client can also restrict signing and event posting based on a location’s accuracy level.
For a version of the Shop Floor Time application you can run on a mobile device's web browser, use the Mobile Web Application.
To use the Mobile Client, the appropriate modules must be licensed and enabled. You must also configure menus and terminal records for the Mobile Client.
See Also:
System Requirements for the Mobile Client
Configuration for the Mobile Client
The appropriate modules must be included in your license file and they must be enabled.
Module Name |
Description |
Mobile Forms |
Required for all Mobile Client forms. This module enables the Mobile Client. |
Mobile Self Service |
Enables the My Time Card form. Also allows you to display the Map button on the daily and punch time tabs of the timecard as well as the Sign Audit form. The Map button will display the location of an event or timecard signature on a map. When the My Time Card form is enabled, the Favorites and Recently Used options can also be available in the Menu. |
Mobile Time Clock |
Enables the Time Clock form. Also allows you to display the Map button on the daily and punch time tabs of the timecard as well as the Sign Audit form. The Map button will display the location of an event or timecard signature on a map. |
Mobile Timecard Review |
Enables the Time Card Review form. Also allows you to display the Map button on the daily and punch time tabs of the timecard as well as the Sign Audit form. The Map button will display the location of an event or timecard signature on a map. |
To check if a module is included in your license and enabled:
In the Shop Floor Time web application, click Main Menu > Configuration > System > Licensing.
On the License Modules tab, select a Module Name for the Mobile Client (refer to the table above).
The following boxes must be checked: Licensed and Module Enabled.
Supported Device |
Operating System |
Samsung Galaxy |
Android version 5.1 |
iPhone, iPad, or iPod touch |
iOS version 9.2 |
If you want to record the locations of event postings and timecard signatures, make sure the mobile device has GPS enabled in Location Services.
You will need to configure the Application Settings listed below for the Mobile Client. To modify these settings, navigate to Main Menu > Configuration > System > Application in the Shop Floor Time web application.
Setting Type |
Description |
map_url |
You only need to modify this setting if you are using a Google Maps API Key. Otherwise you can use the default setting. This setting is used by the Mobile Client to
display the Terminal Location
Map pop-up form when you click the |
mobile_time_clock_default_did mobile_time_clock_default_gid |
These settings are the Global Identifier and Device Identifier for the Time Clock form of the Mobile Client. These values will need to match the GID and DID of the Terminal records you define for the Mobile Client. |
run_services_synchronously |
This setting indicates whether the LABOR_ALL service will be executed for each transaction that posts from the Time Clock form of the Mobile Client. Set this value to TRUE if you want the LABOR_ALL service to be executed for each transaction that posts from the Time Clock form of the Mobile Client. The transactions may take slightly longer to post with this setting. Set this value to FALSE if you do not want the LABOR_ALL service to be executed for each transaction that posts from the Time Clock form of the Mobile Client. This method is the way transactions normally post from a shop floor terminal. Transactions may post more quickly with this setting. |
The modules you have licensed and enabled for the Mobile Client will determine which forms are available in the Mobile Client. See “License Requirements” above for information.
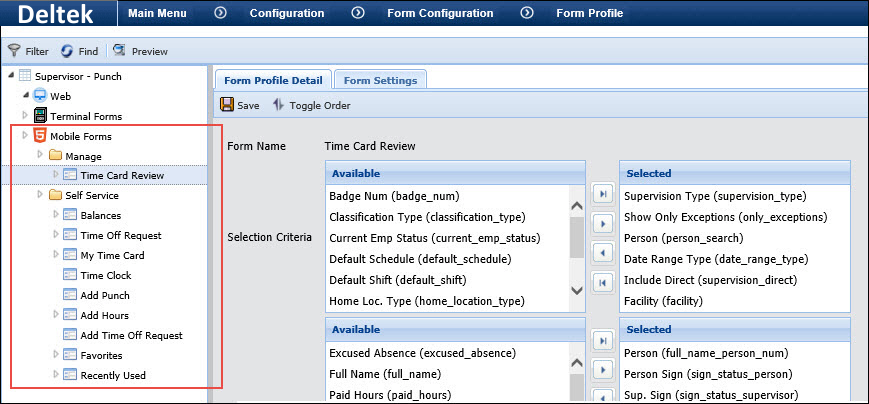
To determine which forms and fields a user can access in the Mobile Client, you need to configure your Security Role and Form Profile.
A user’s Security Role will determine which of the available forms in the Mobile Client the user can access. For example, you may enable the Time Card Review form for your supervisor's Security Role, but disable this form for your employee's Security Role.
To modify the Mobile Client forms in a Security Role, go to Main Menu > Configuration > Security > Security Roles in the Shop Floor Time web application. Select the Security Role Name you want to modify.
Click the ![]() button next to the Mobile
Forms option. Check the forms you want to enable and uncheck the
forms you want to disable.
button next to the Mobile
Forms option. Check the forms you want to enable and uncheck the
forms you want to disable.
Make sure the Map button is also enabled in your Security Role for the timecard or Sign Audit form. The Map button is used to show the location where an event was recorded on a map. See Viewing the Location on a Map.
A user’s Form Profile will determine which fields appear on the Mobile Client forms. To modify a Form Profile, click Main Menu > Configuration > Form Configuration > Form Profile in the Shop Floor Time web application.
You will need to configure the Default
Mobile Form in the Form Profile. The Default Mobile Form is the
form that displays when the user clicks the ![]() Home
button. If Save View State is disabled, the Default Mobile Form will appear
each time the user logs into the Mobile Web application
Home
button. If Save View State is disabled, the Default Mobile Form will appear
each time the user logs into the Mobile Web application
To change the Default Mobile Form, select
Maintain from the Form Profile Name quick link ![]() . On
the pop-up form, select the Form Profile and click Modify. Select an option
from the Default Mobile Form field.
. On
the pop-up form, select the Form Profile and click Modify. Select an option
from the Default Mobile Form field.

On the main Form Profile form, select the
Form Profile Name you want to modify. Then click the ![]() button next to the Mobile Forms
option. Select the form you want to configure. On the right side of the
screen, you can add, remove, or reorder the fields as necessary.
button next to the Mobile Forms
option. Select the form you want to configure. On the right side of the
screen, you can add, remove, or reorder the fields as necessary.
The Form Profile Details for the Mobile Forms also include several combined fields. A combined field allows you to display the same information in one row instead of two.

In the following illustration, combined fields are used to display the same information in fewer rows in the Daily timecard.
|
|
You can create a custom menu for the Mobile Client using the Menu Tree form. The Menu Tree will determine which events can be posted from the Mobile Client.
Note: Do not include events that display information (also called "kiosk events") - such as Daily Timecard, Accruals View, Time Record View, and Schedule View - in your Menu Tree for the Mobile Client. The Mobile Client will not display kiosk events. If you select a kiosk event from the Time Clock form, an error message will appear.
In the Shop Floor Time web application, click Main Menu > Configuration > Form Configuration > Menu Tree.
Click the ![]() button next to the Menu Group Name field
and select Maintain from the pop-up menu.
button next to the Menu Group Name field
and select Maintain from the pop-up menu.
To copy an existing Menu Group, select it and click Copy.
To create a new Menu Group, click Add.
Enter the Menu Group Name and click Save.
Select the new Menu Group Name on the pop-up form and click OK.
The Menu Group’s folder will appear. If you copied an existing Menu Group, you will see the events from that group. If you are adding a new Menu Group, there will be no events in the folder.
Click Add Event.
On the Add Menu Tree pop-up form, select the events you want to add. To select multiple events, press the CTRL key as you select them.
Click Save when you are done.
Make sure you assign this Menu Group to the appropriate Terminal Profile (see below).
You need to create a Terminal Profile for the Mobile Client. The Terminal Profile will include the menu you created for the Time Clock form (see above). You can also add the ACCURACY_TOLERANCE_LEVEL setting to the Terminal Profile.
In the Shop Floor Time web application, click Main Menu > Configuration > Terminal > Terminal Profile.
Select the Terminal Profile that will be assigned to the Mobile Client and click Modify. If there is no Terminal Profile for the Mobile Client, click Add and create a new Terminal Profile for it.
Select the Menu Group Name for the Mobile Client. The menu group determines which events can be posted from the Mobile Client.
Select the Timezone that will be used to display the date and time fields on the Mobile Client.
From the Login Event Name field, select the event that will define the login credentials required in the Username and Password fields in the login screen. The available options are AUTHENTICATION:LOGIN events defined on the Events form. For example, if you select the LOGIN_XML_BADGE_PASSWORD as your Login Event Name, Mobile Client users will log in using a Badge Number in the Username field. Note that Mobile Client users must always enter a Password when logging into the application.
Select the Default Dictionary that will be used to display the field labels on the Mobile Client.
Click Save.
If you want to restrict signing and event posting based on a location’s accuracy level, add the ACCURACY_TOLERANCE_LEVEL setting to this Terminal Profile using the Terminal Profile Setting tab.
Click Update Server.
You will need to assign this Terminal Profile to the appropriate Terminal records (see below).
You need to create a Terminal record for each device that will use the Mobile Client. When a user logs into the Mobile Client, the application looks for an active Terminal record for the Terminal Type Mobile Client that has the same Device ID as the mobile device being used. If there is no Terminal record with this Device ID, the application will select a Mobile Client Terminal record that does not yet have a Device ID. Once the application finds the appropriate Terminal record, it updates the Description with the person’s login name and, if necessary, updates the Device ID field. If the application cannot find a Terminal record to authenticate, the user will not be able to log in.
In the Shop Floor Time web application, click Main Menu > Configuration > Terminal > Terminal.
Click Add.
Enter a GID and a DID for the mobile device.
Enter a name for the device in the Terminal Name field.
Make sure the Terminal Profile you configured above is assigned to this Terminal record.
Select the Terminal Type Mobile Client.
Make sure the Status is set to Active.
If you change the Status of a Terminal record to Inactive, users will not be able to connect to this Terminal record using the Mobile Client app.
Click Save.
Repeat these steps to create a Terminal record for each mobile device that will be running the Mobile Client.
Download the Mobile Client app from an online app store.
Start the Mobile Client app on your mobile device.
The Login form appears.
Enter the Server URL for the Mobile Client.
The URL will depend on which application server you are using. For example, http://<IP address of app server>:8080/autotime/
In the Username and Password fields, enter your login credentials (Badge Number, Username and Password, etc.).
The information you need to enter in these fields will depend on the Login Event Name in the Mobile Client’s Terminal Profile. For example, if you select the LOGIN_XML_BADGE_GROUP as your Login Event Name, Mobile Client users will log in using a Badge Number in the Username field and leave the Password field blank.
Select Login.
If Save View State is enabled in your Form Profile, the last form you viewed will appear. Otherwise, the Default Mobile Form in your Form Profile will appear.
|
The The The The
|
Note: The first time you log into the Mobile Client on a particular device, the application will look for an active Terminal record for the Terminal Type Mobile Client. This Terminal record will be updated with the Device ID of the Mobile Client; the Description will be updated with your login name. The Mobile Client will authenticate this Terminal record each time you log in from that device. If the Mobile Client cannot find an available Terminal record for the Terminal Type Mobile Client or a Terminal record with the correct Device ID, you will not be able to log in.
The Time Card Review form in the Mobile Client displays timecard data for the logged-in supervisor’s employees. You can sign and unsign the timecards; add elapsed and punch transactions; modify and delete transactions; and view transaction details.
The main Time Card Review form displays each of the logged-in supervisor’s employees along with their total hours for the period (Classified Duration) and the employee and supervisor sign status.
In Time Card Review you can:
Sign/Unsign Employee Timecards
Add, Modify, and Delete Events for an Employee
Use the Filter button on the Time Card Review form to change the type of employees you want to view. Select Find when you are done. The Time Card Review form will update the list of employee timecards accordingly.

Select a row on the main Time Card Review form to display the employee’s timecard in Summary View.
When you are in Summary View, each day displays as a separate row. If a day is a split day in a 9-80 schedule, each half will display separately. To show the split day in one row, disable the summary_show_mid_period_split_day Form Setting.
You can show or hide the filter area by clicking
the ![]() or
or ![]() button.
button.
Status indicates
whether the period has been signed by the employee ![]() or supervisor
or supervisor ![]() , if the period
has been payroll locked
, if the period
has been payroll locked ![]() , and if there are any warnings
for the period.
, and if there are any warnings
for the period.
To change the date range for the timecard you are viewing, select a new Effective Date.
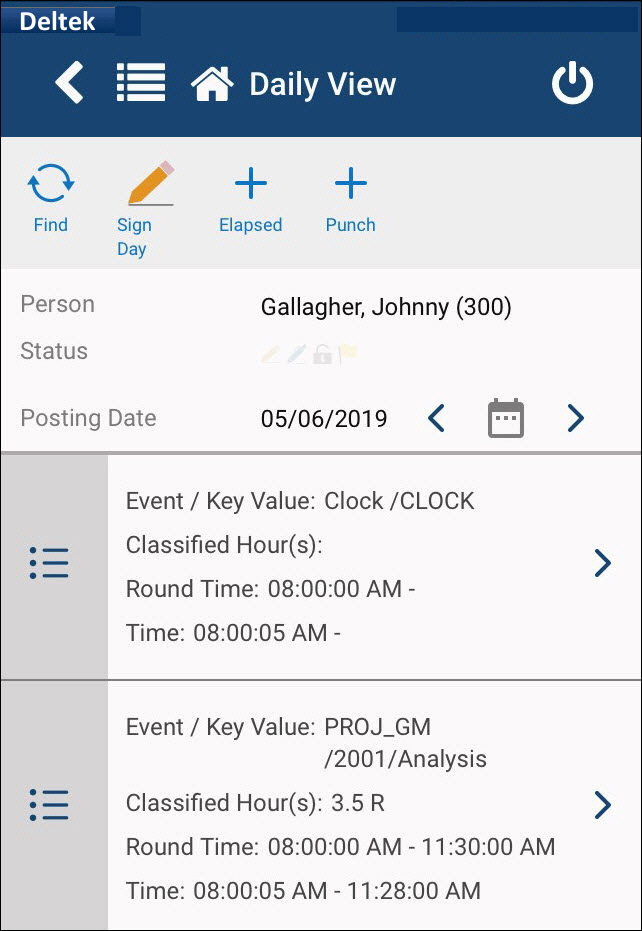
Select a day in the timecard to view the events posted on that day (Daily View form). You can add, modify, and delete events in Daily View.
To display Transaction Details for the event, select the > button on the right. This form shows detailed information about a transaction, including the event name, start and end times, order numbers, activity numbers, and account numbers.
Select the ![]() Back button
at the top of the screen to return to Daily View.
Back button
at the top of the screen to return to Daily View.
Use the Sign Period and Unsign Period buttons in the Time Card Review form to sign or unsign selected employee timecards.
To select the employees, check the ![]() box next to each employee. Check the
box next to each employee. Check the ![]() box to select all the employees.
box to select all the employees.
The Sup. Sign field for each employee will show the supervisor
sign icon (![]() ) if the entire period
is supervisor signed. A red X
will appear if the period is not signed.
) if the entire period
is supervisor signed. A red X
will appear if the period is not signed.
In the Summary
View of Time Card Review, select Sign Period or Unsign Period. The
Status section will show the supervisor sign icon (![]() )
if the entire period is supervisor signed.
)
if the entire period is supervisor signed.
In the Daily View
of Time Card Review, select Sign Day or Unsign Day. The Status section
will show the supervisor sign icon (![]() )
when the day is supervisor signed.
)
when the day is supervisor signed.
In Daily View of the Time Card Review form, select Add Elapsed or Add Punch to add an event to the day.
Select the event you want to post and fill in any remaining prompts that appear.
You can configure the timeout settings for the info messages and success messages that appear when you add and delete events. See info_message_timeout and success_message_timeout in the Form Settings topic for more information.
Select Save to save only this event. Select Save and Add to post this event and keep the form open to post additional events.
To Modify
or Delete an event, select the
![]() button next to the event
in the Daily View form. If you select Modify, the Event Prompts form will
appear with options to modify the elapsed or punch event. Change the prompt
values as necessary and select Save.
button next to the event
in the Daily View form. If you select Modify, the Event Prompts form will
appear with options to modify the elapsed or punch event. Change the prompt
values as necessary and select Save.

Balances is a view-only form that displays your balances for time off, such as vacation, sick, and personal days. This form shows all the employee’s balance records and the corresponding number of units in each balance.
Click the Filter button at the top of the Balances form to display the Balance Code and Year fields. Use these fields to specify which balance records you want to view. Click Find to update the records in the Balances form. Click Clear to remove the values from the Balance Code and Year fields. Click Cancel to return to the Balances form without changing your filter settings.
To display the transactions that caused a withdrawal from a balance, select the > button on the right of the balance record. The Balance Transactions form will open.
Balance transactions are updated when an action is posted by the ATTENDANCE service or an elapsed event, or when the balance is manually updated in the Balance tab of the Employee form.
To view a balance's transactions for a specific date, click the Filter button in the Balance Transactions form. Select the Start Date and End Date and click Find. The Start and End Date fields will filter the records based on their Update Date.
The Time Off Request form allows the logged in user to request time off. A supervisor can then approve or disapprove the request using the Time Off Review form. The status of the time off request will then be updated for the employee to see in the Time Off Request form.
Click the Add Request button in the Time Off Requst form to add a time off request. This button is the same as the Add Time Off Request option in the Main Menu.
Select the time off Event for the request and set the Start Date and End Date to the dates of the request. Select the Hours Type (Full Day, Half Day, or Hours Amount), and a Duration and Start Timestamp if necessary. Enter any optional comments in the Request Comment box.
Click Save when you are done. The Time Off Request form will open so you can view the new request.
An employee can modify a Pending and/or Approved time off request with type Schedule. Employees cannot modify Disapproved requests or requests with type Cancel.
When an already approved request is modified, the originally approved request will stay on the form; a new record with type Cancel will be added to the form; and a pending request with type Schedule will be created.
To modify a time off request, select the round button next to the request and click the Modify button. Change the settings as necessary and click Save.
An employee can cancel a Pending and/or Approved time off request with type Schedule.
When an already approved request is cancelled, the originally approved request record will remain unchanged, and a new record with type Cancel will be added to the form.
To cancel a time off request, select the round button next to the request and click the Cancel Request button. A success message will appear when the request is cancelled.
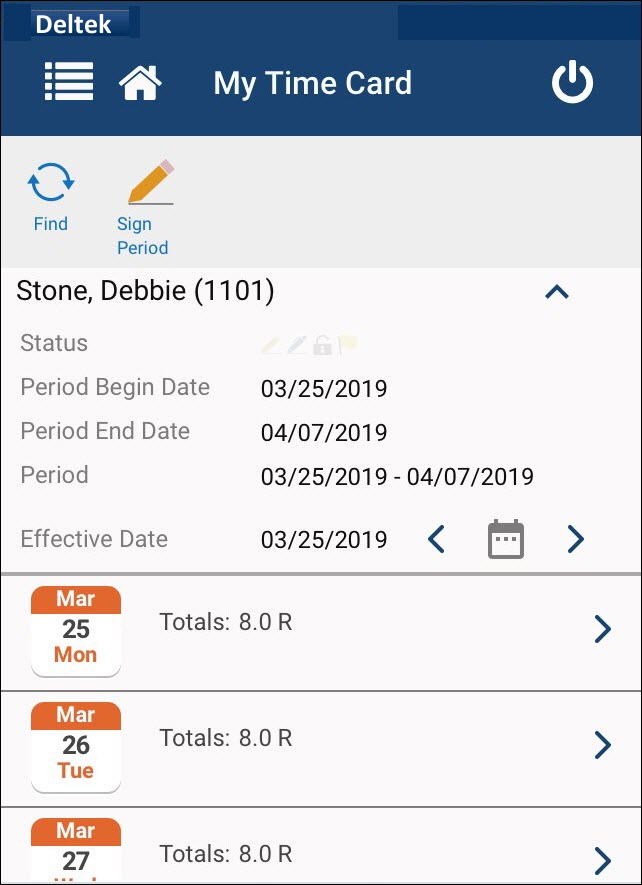
The My Time Card form in the Mobile Client displays the logged-in employee’s timecard. Use this form to sign and unsign your timecard; add elapsed and punch transactions; modify and delete transactions; and view transaction details.
The main form displays each day in the pay period and the total hours for each day. Each day displays as a separate row. If a day is a split day in a 9-80 schedule, each half will display separately. To show the split day in one row, disable the summary_show_mid_period_split_day Form Setting.
To change the dates you are viewing, select an Effective Date.
Status indicates
whether the period has been signed by the employee ![]() or supervisor
or supervisor ![]() , if the period
has been payroll locked
, if the period
has been payroll locked ![]() , and if there are any warnings
for the period.
, and if there are any warnings
for the period.
Select a row in the My Time Card form to display the Daily View form.
Select Find in the Daily View form to refresh the screen and display the latest changes.
Select the event in the Daily View form to display the Transaction Details form.
To sign or unsign the entire pay period, select the Sign Period or Unsign Period button in the My Time Card form.
To sign or unsign a single day, select the Sign Day or Unsign Day button in the Daily View form.
The Status field
will display the employee signature icon (![]() ) when the
day or period is signed.
) when the
day or period is signed.
In Daily View, select Add Elapsed or Add Punch to add an event to the day. These buttons are the same as the Add Hours and Add Punch options in the Main Menu.
Select the event you want to post and fill in any remaining prompts that appear.
You can configure the timeout settings for the info messages and success messages that appear when you add and delete events. See info_message_timeout and success_message_timeout in the Form Settings topic for more information.
If you selected Add Elapsed, you can use the Favorite Name field to select a Favorite or a Recently Used event.
Select Save or Save and Add to post the event.
If you are posting an elapsed event, you can select Save Favorite to save the event as a Favorite.
To Modify
or Delete an event, select the
![]() button next to the event
in the Daily View form. If you select Modify, the Event Prompts form will
appear with options to modify the elapsed or punch event. Change the prompt
values as necessary and select Save.
button next to the event
in the Daily View form. If you select Modify, the Event Prompts form will
appear with options to modify the elapsed or punch event. Change the prompt
values as necessary and select Save.

The Time Clock form in the Mobile Client allows employees to enter real-time punch transactions.
When you select the Time Clock option, the available events will appear.
Select the event you want to post. If the event has prompts, the prompts will appear.
Enter the prompt values as necessary and click Save. A message will appear when the event posts successfully and you will return to the list of available events.
Use the Add Punch option in the Main Menu to post an event in a manner that is similar to a real-time collection terminal. This menu option is the same as selecting Add Punch from the Daily View of the My Time Card form.
The Timestamp defaults to the Effective Date or Post Date in the timecard. Change this value as necessary.
Select the event you want to post and fill in any remaining prompts that appear. Click Save when you are done.
You can configure the timeout settings for the info messages and success messages that appear when you add and delete events. See info_message_timeout and success_message_timeout in the Form Settings topic for more information.
Use the Add Hours option in the Main Menu to record the number of hours spent on a particular event (such as Break, Meal, Project, Sick, Day Worked, Vacation, or Work Order) after the event was completed.
This menu option is the same as selecting Add Elapsed from the Daily View of the My Time Card form.
Select the Posting Date and the Event. Fill in any remaining prompts that appear. Click Save when you are done.
You can configure the timeout settings for the info messages and success messages that appear when you add and delete events. See info_message_timeout and success_message_timeout in the Form Settings topic for more information.
Use the Add Time Off Request option in the Main Menu to create a time off request.
This menu option is the same as selecting Add Request from the Time Off Request form.
Select the time off Event for the request and set the Start Date and End Date to the dates of the request. Select the Hours Type (Full Day, Half Day, or Hours Amount), and a Duration and Start Timestamp if necessary. Enter any optional comments in the Request Comment box.
Click Save when you are done. The Time Off Request form will open so you can view the new request.
The Favorites form displays any event favorites you have saved and allows you to save a new event favorite. An event favorite is a saved event that you post frequently. You can save event prompt values, such as order and operation numbers, with the event. When you are ready to post the event, you can select it from the Favorites menu.
Event favorites can only be saved and posted by the logged-in employee in their own timecard. If you save an event favorite in the mobile timecard, it will also be available in the web timecard and vice versa. Supervisors cannot save or post event favorites for their employees.
Note that you can only save elapsed events as favorites. You cannot save punch events as favorites.
Select the + Favorite option in the Favorites form to save a new favorite. When you select this option, the Event Prompts – Elapsed form will open. You can use this form to save the favorite and post the event.
Event favorites can also be saved when you select Add Elapsed in Daily View of the My Time Card form.
Select Favorites from the menu and then select + Favorite.
-or-
In the My Time Card form, select a day in your timecard and then select Add Elapsed.
If you are going to post the event you are saving as a favorite, select the Posting Date when you want to post the event.
Select the Event you want to save as a favorite. Note that you will not enter a Favorite Name until you click Save Favorite.
Enter the other prompt values you want to save. Note that the Posting Date and Hours will not be saved with the favorite.
Select Save Favorite.
Enter a name for the favorite and select OK.
When you select an event favorite from the Favorites form, the Event Prompts – Elapsed form will open with the configuration of the event favorite you saved.
You can also select a favorite when you use Add Elapsed to post an event.
Select the Posting Date and enter the Hours. You can change the other prompts as well. Select Save to post the event.
You can use the return_to_favorite_menu Form Setting to control how the Back button works after you select an event favorite to post. If return_to_favorite_menu is set to 1 (enabled), you will return to the Favorites menu. If return_to_favorite_menu is set to 0 (disabled), you will return to the Daily View of My Time Card.
To modify this setting, go to the Form Profile form and select the Form Profile Name you want to modify. Expand the Mobile Forms option and select the Favorites form. In the Form Settings tab, select the return_to_favorite_menu option and click Modify.
To delete a favorite:
In the Favorites menu, select the ![]() button next to a favorite and select Delete from the pop-up menu.
button next to a favorite and select Delete from the pop-up menu.
To modify a favorite:
Select the favorite from the Favorites form.
The Event Prompts - Elapsed form will appear.
Change the prompt values as necessary. Note that you cannot save an Hours value in your favorite.
Select Save Favorite.
The Event Favorite form appears.
If you change the Favorite Name, a new favorite will be created with the new name. If you do not change the Favorite Name, your changes will be made to the existing favorite.
Select OK when you are done.
The Recently Used form displays a list of the last events you posted from the My Time Card form. The number of events in this list is configurable. Note that the Recently Used list will only include elapsed events; it will not include punch events.
When you select a Recently Used event, the Event Prompts – Elapsed form opens so you can post the event.
Modify the event prompts (Posting Date, Hours, etc.) as necessary. Select Save to post the event.
You will return to the Recently Used form or the Daily View of My Time Card, depending on the return_to_recently_used_menu setting in your Form Profile.
To delete an item from the Recently Used form, select the
![]() button next to the event
and select Delete from the pop-up menu.
button next to the event
and select Delete from the pop-up menu.
You can also post a Recently Used event from the Daily View of My Time Card when you click Add Elapsed. The Favorite Name field will display event favorites and recently used events.
The Form Settings form includes two settings for the Recently Used menu.
number_of_recently_used_events
This setting determines the maximum number of events that will appear in the Recently Used menu.
To modify this setting, go to the Form Profile form and select the Form Profile Name you want to modify. Expand the Mobile Forms option and expand the Recently Used form. Select the Event Prompts form under Recently Used. On the Form Settings tab, select the number_of_recently_used_events option and click Modify. Change the Setting Value and click Save.
return_to_recently_used_menu
This setting determines whether you will return to the Recently Used menu or the Daily View of the My Time Card form when you select Back, Cancel, or Save after selecting a Recently Used event.
When the Setting Value is 1 (enabled), you will return to the Recently Used menu when you select Back, Cancel, or Save after selecting a Recently Used event.
When the Setting Value is 0 (disabled), you will return to the Daily View of the My Time Card form when you select Back, Cancel, or Save after selecting a Recently Used event.
To modify this setting, go to the Form Profile form and select the Form Profile Name you want to modify. Expand the Mobile Forms option and select the Recently Used form. On the Form Settings tab, select the return_to_recently_used_menu option and click Modify.
If your mobile device has GPS enabled in Location Services, your location will be recorded when you post an event or sign the timecard. See Enabling and Disabling GPS on the Mobile Device for more information.
You can view this location on the Sign Audit form, Action form, and the Punch Time tab of the timecard. In all these forms, the coordinates where the action occurred will appear in the Latitude and Longitude fields. The Accuracy field displays the radius in meters for which the Latitude and Longitude coordinates are accurate. In some of these forms, you can also view the location on a Map.
Note: You can also use the ACCURACY_TOLERANCE_LEVEL setting in a Terminal Profile to restrict signing and event posting based on a location’s accuracy level.
The Latitude, Longitude, and Accuracy fields display the coordinates where a sign action or event posting occurred. If the fields are not visible, you may have to enable them in your Form Profile.
These fields are on the following forms:
Sign Audit form
Action form
Punch Time tab of the supervisor timecard (Supervisor Review/Current Situation and Time Card Review)
Punch Time tab of the Self Service timecard
Punch Time form (Self Service menu)
Transaction Details (Start and End Accuracy, Latitude, and Longitude)
When you view the event in the daily or punch
time tab of the timecard (or view the sign action on the Sign Audit form),
you can show the location where the action was recorded on a map. To do
so, click the  Map button next to the event or sign
record. The Terminal Location
Map pop-up form will appear.
Map button next to the event or sign
record. The Terminal Location
Map pop-up form will appear.
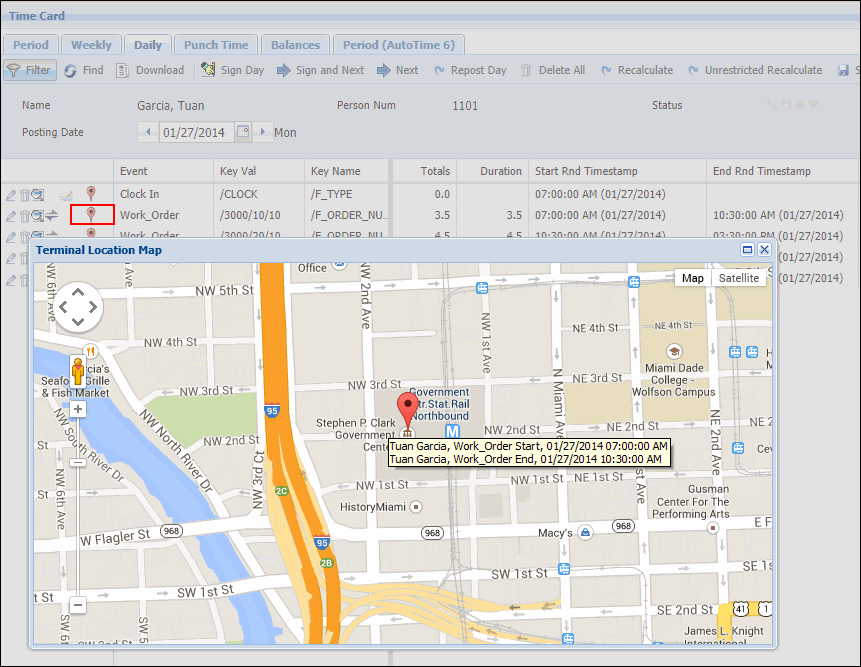
When you hover over the location, details about the action will appear. You can use the map controls to zoom in or out.
The Map button will only appear on the
timecard or Sign Audit form if:
At least one of the following modules is included in your license and enabled: Mobile Self Service, Mobile Time Clock, or Mobile Timecard Review.
The Map button is enabled in your Security Role for the appropriate form.
The map_url Application Setting is configured.
Refer to the Terminal Location Map topic for more information.
The method for enabling GPS will depend on which mobile device you are using. Refer to your mobile device's documentation for information.
If you want to record the locations of event postings, make sure the mobile device has GPS enabled in Location Services.
You must log in with GPS already enabled in order to record event locations and use the ACCURACY_TOLERANCE_LEVEL setting to restrict event postings.
If you disable GPS after you have already logged into the Mobile Client, the application will only continue to record event locations for five minutes. After five minutes, the application will no longer be able to record locations. If you are using the ACCURACY_TOLERANCE_LEVEL setting to restrict event postings, an error message will appear when you try to post an event.
If you enable GPS after you have already logged into the Mobile Client, the application will not be able to record locations until you log out and log in again.