The Authorized Hours form is used to authorize hours for EWT and Comp Time. EWT and Comp Time are ways of allowing employees to receive compensation when they work more than their regular scheduled hours. It is typically used for salaried employees.
EWT and Comp Time are calculated by the Pay Rules Ruleset in the employee’s Pay Policy. The authorized hours will be included in the pay rule that is used to calculate EWT and/or Comp Time.
A supervisor can authorize EWT or Comp Time hours for an employee by entering the number of hours directly in the grid of the Authorized Hours form. You can also import authorized EWT or Comp Time hours for an employee using the Person Authorized Hours context.
An employee must be assigned a Pay Policy that has Extra Work Time and/or Comp Time set to Pay Period or Weekly in order to appear on the Authorized Hours form.
The Authorized Hours form shows an employee’s scheduled hours, total hours worked, and the number of hours that are eligible or ineligible for EWT and Comp Time. It also shows the Period and Weekly timecard tabs for the employee.
Detail Forms:
See Also:
Authorized Hours Field Descriptions
Click the ![]() Filter button at the top of the
Authorized Hours form to display the filter fields. Use these fields to
change the employees that display on the form. Click Find
after you define your filter settings. Click Clear
to remove all the filter settings.
Filter button at the top of the
Authorized Hours form to display the filter fields. Use these fields to
change the employees that display on the form. Click Find
after you define your filter settings. Click Clear
to remove all the filter settings.
Note: An employee must be assigned a Pay Policy that has Extra Work Time and/or Comp Time set to Pay Period or Weekly in order to appear on this form.
Posting Date
Select a Posting Date that is in the pay period or pay week for which you want to authorize EWT and Comp Time hours.
The Pay Policy that is in effect on the Posting Date will determine the number of records that display for an employee on the Authorized Hours form. For example, if Extra Work Time and Comp Time in the Pay Policy are set to Weekly, then two records will display on the Authorized Hours form (one for each week in the biweekly pay period).
The Period and Weekly timecard tabs in the bottom half of the Authorized Hours form will also update to display the pay period or pay week that includes the Posting Date you select.
Click the  and
and  buttons to scroll to the previous or next day.
Click the ![]() button to display a calendar
from which you can select another date.
button to display a calendar
from which you can select another date.
Current Emp Status
You will have to create a custom Form Profile to enable this field.
Use this field to find employees with a particular Employment Status on the current date. The Employment Status is defined in the person’s Employment Profile.
If a person does not have an Employment Profile record for the current date, the person can display on the form if you leave the Current Emp Status filter field blank. However, if you select any Current Emp Status filter option (Active, Inactive, or Terminated), this person cannot display on the form.
The following Current Emp Status options are explained. Refer to the Employee form for information on how each status affects a person’s use of the application.
Active employees have full use of the program. Active employees can log into the program and post labor. Active supervisors can also review and adjust employee timecards.
Inactive status is typically used for employees that take extended leave time but will eventually return to work. Inactive employees cannot post labor.
Terminated employees cannot use the application because the system does not grant access to terminated employees. A supervisor with the SUPERVISOR_ADMIN item in their Security Data Role can still view timecards for terminated employees.
Facility
To view only those persons assigned to a specific Facility, select the Facility from this drop-down list.
Employee
Use the Employee field to search for persons by their first name, last name, or person number.
You can use the * or % wildcard symbol in this field to search using partial values. The wildcard symbol can be placed anywhere in your search value to represent unknown characters. For example, to find persons whose first name, last name, or person number starts with the letter b, enter b*. To find person numbers (or first and last names) that include 007, enter *007*.
Use this field to filter the person records by the type of supervisor the person has.
Include Direct
When this box is selected, persons that report directly to the logged in supervisor (are members of a Employee Group of type DIRECT_MANAGER) will be displayed on the form. This box is automatically checked when you select Direct in the Supervision Type field.
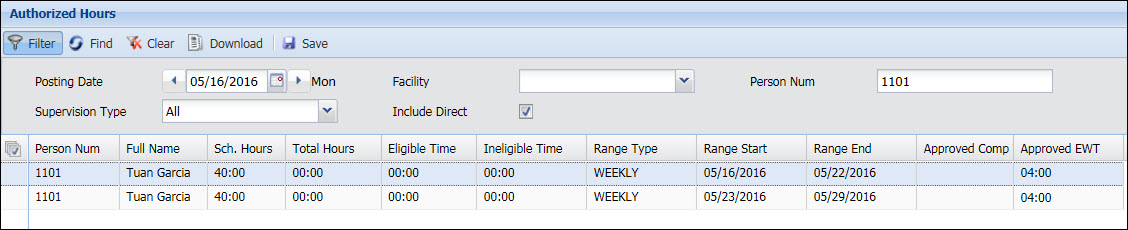
For each employee who meets the filter criteria, the Authorized Hours form will display one record or two records, depending on how the employee’s Pay Policy is configured to authorize EWT and Comp Time. If the employee’s Pay Policy has Extra Work Time and Comp Time set to Weekly, then two records will display for the employee (one for each week in the biweekly pay period). Otherwise, one record will display for the employee (for the entire pay period).
Employee
Person Number of the employee whose eligible hours, ineligible hours, and approved EWT/Comp Time hours are shown on the form.
Full Name
First Name and Last Name of the employee whose eligible hours, ineligible hours, and approved EWT/Comp Time hours are shown on the form.
Note that the Full Name field on the Authorized Hours form displays the First Name and Last Name from the Employee form; it does not display the Full Name from the Employee form.
Sch. Hours
The employee’s scheduled hours for the pay period or pay week, based on his or her normal schedule.
Total Hours
Total number of hours the employee has worked in the pay period or pay week.
On the Authorized Hours form, the Eligible Time is calculated by taking the number of hours over schedule that the employee worked and subtracting any Ineligible Time. For example, an employee is normally scheduled for 40 hours in a pay week. The employee works 52 hours in one week, and 8 of those hours are a sick day (ineligible). The employee’s Eligible Time will be 12 (hours over schedule) – 8 (ineligible hours) = 4 hours.
The Eligible Time that displays in the timecard is different from the Eligible Time in the top section of the Authorized Hours form. In the timecard, Eligible Hours is total number of hours worked minus any ineligible time. Using the above example, the employee’s Eligible Time will be 52 (total hours) – 8 (ineligible hours) = 44 hours.
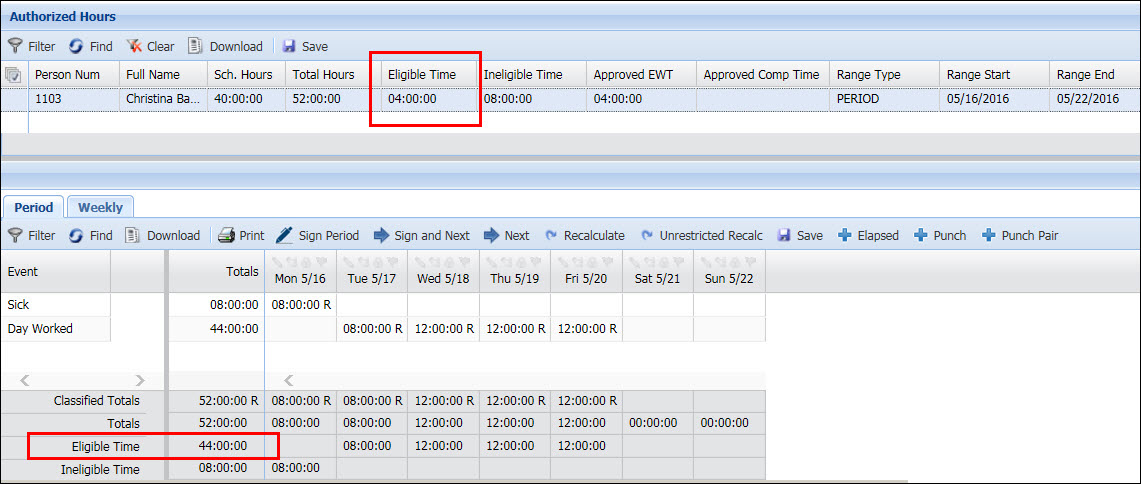
Number of hours the employee worked that are not eligible for EWT and/or Comp Time. The eligible and ineligible events are determined by the Event and Hours Class configurations in the employee’s Pay Policy.
Approved EWT, Approved Comp Time
Use these fields to enter the amount of EWT or Comp Time you are approving (authorizing) for the employee. These hours will be used in the Get Authorized Hours operand for the pay rule that is used to calculate EWT and/or Comp Time. If you enter an amount that is less than one hour (.25, .5, .75, etc.), you do not have to include a zero before the decimal.
Range Type
This field displays WEEKLY if Extra Work Time and Comp Time in the Pay Policy are set to Weekly. Displays PERIOD if Extra Work Time and Comp Time in the Pay Policy are set to Pay Period.
The Range Type is based on the Pay Policy that is in effect on the Posting Date you selected.
If the Range Type is WEEKLY, then two records will display on the Authorized Hours form (one for each week in the biweekly pay period). The Range Start and Range End will display the start and end date for each week in the pay period. The pay period is based on the Posting Date you selected.
If the Range Type is PERIOD, then one record will display on the Authorized Hours form. The Range Start and Range End will display the start and end date for the pay period. The pay period is based on the Posting Date you selected.

Range Start, Range End
This field displays the dates for the Range Type (WEEKLY or PERIOD) based on the Pay Policy that is in effect on the Posting Date you selected.
Click Main Menu > Manage > Authorized Hours.
If necessary, click the ![]() Filter icon to display the
filter fields.
Filter icon to display the
filter fields.
Select a Posting Date that is in the pay period or pay week for which you want to authorize EWT and Comp Time hours.
Use the other filter fields to select the employees for whom you want to authorize EWT and Comp Time hours. Then click Find.
The employee records will appear in the grid.
For each employee, the Authorized Hours form will display one record or two records, depending on how the employee’s Pay Policy is configured to authorize EWT and Comp Time. If the employee’s Pay Policy has Extra Work Time and Comp Time set to Weekly, then two records will display for the employee (one for each week in the biweekly pay period). Otherwise, one record will display for the employee (for the entire pay period).
Employees who have Extra
Work Time and Comp Time
set to Disabled in the Pay
Policy will not display any records on the Authorized Hours form.
The employee’s Scheduled Hours,
Total Hours, Eligible
Hours, and Ineligible Hours
will appear for the pay week or pay period.
The Range Type, Range
Start, and Range End
fields indicate the pay week or pay period for which these hours are
being displayed.
In the Approved EWT and Approved Comp Time fields in the grid, enter the amount of EWT and Comp Time hours you want to authorize for each employee.
Click Save.
When you click Save, the changes you made to the Approved EWT and Approved Comp Time fields will be saved as authorized hours for the employees.
These hours will display in the EWT Hours and Comp Time Hours fields on the Period and Weekly tabs at the bottom of the Authorized Hours form.

Note that if the Range Type is Weekly, then you must use the Weekly tab to view the EWT and Comp Time Hours in the timecard. On the Period tab, these fields will display N/A if the Range Type is Weekly.
In addition, the pay period for each of these employees will be marked as needing recalculation, so the RECALCULATION service can update the timecard to display the correct hours classifications for EWT and Comp Time.
If you have enabled the Comp Time Cap feature in your Pay Policy, you will receive a message if the amount of hours you are approving for Comp Time will cause the person’s Comp Time Balance to exceed the Comp Time Cap Amount.
Note: If you navigate away from the Authorized Hours grid without clicking Save, a warning message will display that un-saved data will be lost. Make sure you click Save to keep the changes you entered in the grid.