 button
to close the form.
button
to close the form.The OT Offer Detail tab on the OT Offer form displays employee responses to a selected overtime offer. These employees are selected for the overtime offer using the Add Person(s) button and the Add Pool(s) on the OT Offer form.
Supervisors can use the OT Offer Detail tab to offer overtime to specific employees and check whether the employees have accepted, refused, or acknowledged the offer. A supervisor can also make a verbal overtime offer and then accept or refuse the offer on the employee’s behalf. Supervisors can also authorize, revoke, and delete overtime offers for specific employees using this form.
If you have been assigned a Supervisor Role, the actions that you can carry out on the OT Offer Detail form will depend on the Functional Areas that have been assigned to your role. See Supervisor Role for more information.
See Also:
OT Offer Detail Field Descriptions
Offer the Overtime to the Employee
Person Num, Person Name
These fields identify the employee who has been selected for the overtime offer.
Acknowledge Date
If the employee acknowledged the overtime offer, this field displays the date of the acknowledgment.
Status
This field identifies the current status of the overtime offer for the specified person.
Accepted: The employee accepted the offer.
Acknowledged: The employee has acknowledged the offer before deciding to refuse or accept.
Cancelled: The offer was cancelled by the supervisor who created it.
Offered: The employee was offered the overtime.
Pending: The employee was selected for this overtime but has not yet been offered it.
Revoked: The overtime offer was revoked. The employee will not be able to acknowledge, accept, or refuse it. The supervisor will not be able to authorize it.
Accepted After Cutoff: The employee accepted the offer after the Cutoff Date.
Refused: The employee refused the offer.
Refused After Cutoff: The employee refused the offer after the Cutoff Date.
Comment
If a comment was entered when the offer was accepted or refused, it displays in this field.
Authorized
The supervisor has authorized the overtime for the employee. When an offer is authorized, an overtime schedule is created for it. You can view these schedules on the Employee Schedule form.
If the overtime offer is mandatory (the Required field on the OT Offer form was set to Mandatory), when the offer is authorized, an overtime schedule will be created with the Schedule Type Normal. A Normal schedule is one that the employee must follow; there will be a violation if time is not posted.
If the overtime offer is optional (the Required field on the OT Offer form was set to Optional), when the offer is authorized, an overtime schedule will be created with the Schedule Type Optional. An Optional schedule is one for which the employee will not receive a violation if time is not posted.
Authorize Date
If the Authorized box is selected, this field displays the date when the offer was authorized.
Authorized By
If the Authorized box is selected, this field identifies the person who authorized the offer.
Update Date, Updated By
These fields display when the record was created or updated, and the person who created or updated the record.
The Offer button is used to send an offer to the employee currently selected on the OT Offer Detail form.
Click Main Menu > Manage > OT Offer.
Select the overtime offer record and go to the OT Offer Detail tab.
On the OT Offer Detail tab, select the employee who will be offered the overtime. To select multiple employees, press the CTRL key as you select them.
Click Offer.
Click OK to confirm the action.
The offer's Status changes to Offered. The offer will be sent to the employee.
Employees can view the overtime offer and accept, acknowledge, or refuse it using the OT Response form. You can also present a verbal offer to the employees and use the Accept and Refuse buttons (see below) to record their responses.
The Revoke button is used to revoke/remove offers for specific person records. Any OT Offer records that do not have a status of Pending, Revoked, or Cancelled can be revoked. If the offer had already been authorized, revoking it will delete the associated overtime schedule for the employee.
Click Main Menu > Manage > OT Offer.
Select the overtime offer record and go to the OT Offer Detail tab.
On the OT Offer Detail tab, select the employees who will have the offer revoked. To select multiple employees, press the CTRL key as you select them.
Click Revoke.
Click OK to confirm the action.
The offer's Status changes to Revoked.
The Delete button is used to delete pending overtime offers.
Click Main Menu > Manage > OT Offer.
Select the overtime offer record and go to the OT Offer Detail tab.
On the OT Offer Detail tab, select the employees who will have the offer deleted. To select multiple employees, press the CTRL key as you select them.
Click Delete.
Click OK to confirm the action.
The offer will no longer appear on the OT Offer Detail tab form.
Use the Authorize Bef./Aft. button to authorize overtime offers of type Before After (before or after schedule). Any overtime offer that is not Authorized, Pending, Revoked, or Cancelled can be authorized. When an offer is authorized, an overtime schedule will be created for it.
Click Main Menu > Manage > OT Offer.
Select the overtime offer record and go to the OT Offer Detail tab.
On the OT Offer Detail tab, select the employee for whom you want to authorize the offer.
Click Authorize Bef./Aft.
Click OK to confirm the action.
The Authorized box will be selected. The Authorized Date and Authorized By values will reflect this change.
Use the Authorize Gap/Hol. button to authorize overtime offers of type Gap or Holiday. Any overtime offer that is not Authorized, Pending, Revoked, or Cancelled can be authorized.
When you click Authorize Gap/Hol., the OT Offer Schedule pop-up form appears. Use this form to configure the overtime schedule, its margins, properties, and events.
The Unauthorize button is used to remove the authorization from overtime offers. Any overtime schedules for the person that came from the authorization of this offer will be deleted.
Click Main Menu > Manage > OT Offer.
Select the overtime offer record and go to the OT Offer Detail tab.
On the OT Offer Detail tab, select the employee for whom you want to unauthorize the offer. The Authorized box will be selected.
Click Unauthorize.
Click OK to confirm the action.
The Authorized box will be cleared. The Authorized Date and Authorized By values will be removed.
The Accept button is used to accept an offer on behalf of an employee.
Click Main Menu > Manage > OT Offer.
Select the overtime offer record and go to the OT Offer Detail tab.
On the OT Offer Detail tab, select the employee for whom you want to accept the offer.
Click Accept.
The OT Offer Accept pop-up form displays.
Enter a comment in the Comment box (optional).
Click Accept.
The offer's Status changes to Accepted.
The Refuse button is used to refuse an offer on behalf of an employee.
Click Main Menu > Manage > OT Offer.
Select the overtime offer record and go to the OT Offer Detail tab.
On the OT Offer Detail tab, select the employee for whom you want to refuse the offer.
Click Refuse.
The OT Refuse Offer pop-up form displays.
If applicable, select a Refusal Code.
Enter a reason for the refusal in the Comments box (optional).
Click Refuse.
The offer's Status changes to Refused.
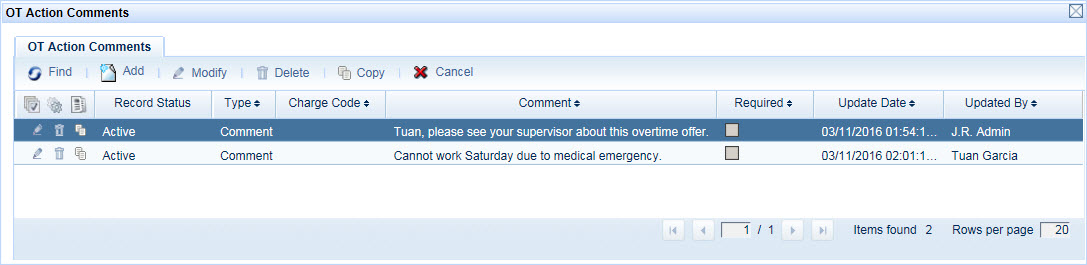
The Comments button is used to manage comments in an overtime offer. When you click Comments, the OT Action Comments pop-up form appears.
In addition to your comments, this form shows comments made by the employee on the OT Response form.
You may need to resize the Comment column to view the entire comment.
You can Modify and Delete comments that you entered. You can also Add a new comment and Copy (duplicate) an existing comment.
When you are done, click the button
to close the form.
The Audit button is used to track the status changes of an overtime offer. For example, you can view when the offer was created (pending), offered, accepted, etc.
When you click Audit, the OT Action Audit pop-up form appears. The OT Action Audit pop-up form has the following fields:
Person Num, Person Name: Identifies the person to whom the overtime was offered.
Action: Identifies the status of the offer (e.g., Pending, Offered, Authorized, etc.)
Action Date, Action By: Identifies when the Action occurred and who performed the Action.
Cancel: Click to close this form when you are done viewing the records.