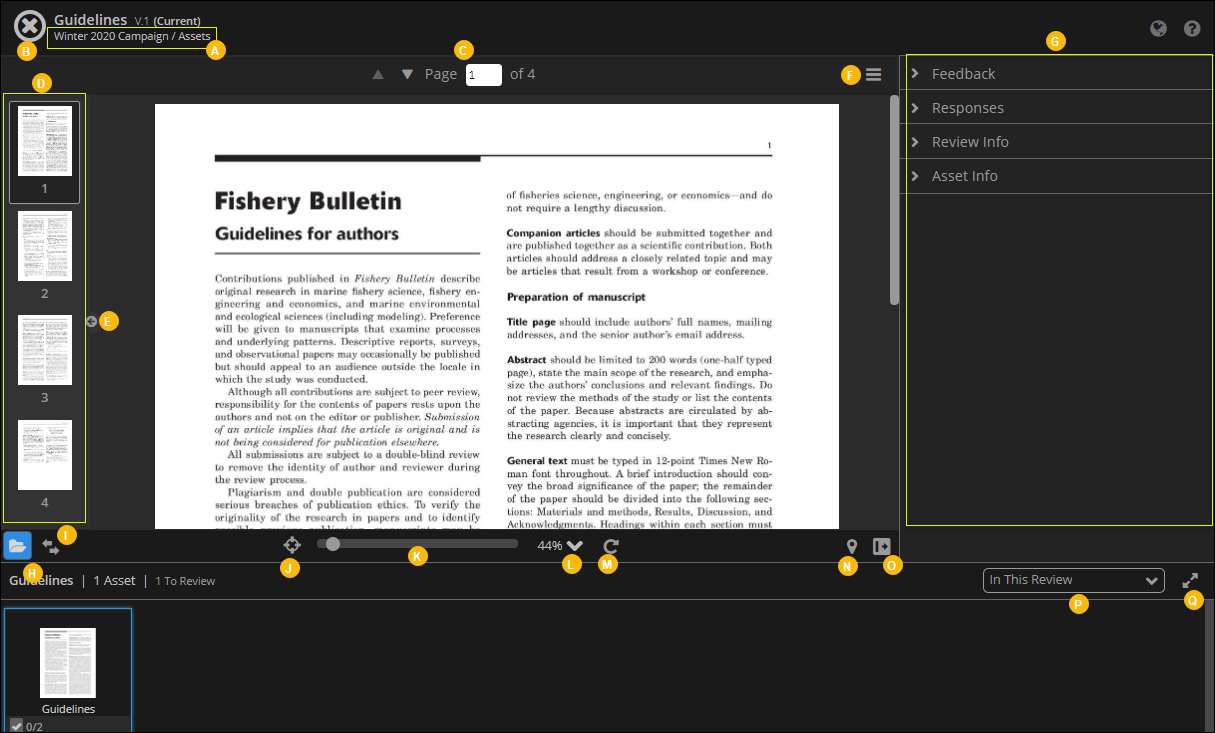
Navigating the Proofing Workspace
The Proofing Workspace is a tool for annotating and marking up your Assets. This tool enables collaborative communication among users on an Asset. The Proofing Workspace is the core component of a Review.
You can access the Proofing Workspace by clicking an Asset anywhere in the application, or by launching a Review.
The navigation options help you go to other areas of ConceptShare or within the Proofing Workspace.
| Legend | Description |
|---|---|
| A |
Breadcrumbs. Use breadcrumbs to access other levels of the Project structure. Clicking a link in the breadcrumb takes you to the following places:
|
| B |
Exit. Click
Exit
|
| C |
Page Selector. For multiple-page Assets, a
Page Selector is available at the top center.
Note: This option is available only for Word and PDF Assets.
|
| D |
Page Thumbnails. Displayed on the left side panel, the page thumbnails let you jump to specific pages in the document.
Note: This option is available only for Word and PDF Assets.
|
| E |
Show / Hide Thumbnails. Use the button to show or hide the page thumbnails panel.
Note: This option is available only for Word and PDF Assets.
|
| F |
Display Options. For multiple-page Assets,
Display Options are available at the top right.
Note: This option is available only for Word and PDF Assets.
|
| G |
Properties Panel. The Proofing Workspace contains a
Properties Panel on the right side of the screen. The Properties panel contains two sections. It contains four sections if you access it from a Review.
|
| H |
Asset Explorer. It opens the view at the bottom of the screen that displays thumbnails of related Assets. It also displays the versions of the asset.
Note: If you view this section from a Review, the asset explorer displays only the Assets in the specific Review.
|
| I |
Compare Lab. It enables you compare the asset that is currently open with another version of itself, or a related asset in the same Project. |
| J |
Reset. Use the tool for applying the default asset size (Fit to Screen). |
| K |
Zoom Slider. It enables you to smoothly zoom in and out to adjust your view of an asset. |
| L |
Default Zoom. Access the zoom options via the chevron.
|
| M |
Rotate. The tool rotates the asset clockwise by 90 degrees. |
| N |
Markers. This tool enables you to display pointers on the image where annotations have been made. |
| O |
Collapse. The tool enables you to collapse or expand the properties panel. |
| P |
Asset Selector. The selector lets you choose the category of the asset/s that will display in the asset explorer. You can select from:
|
| Q |
Expand / Collapse. Use the tool to expand or collapse the asset explorer. |
