About entering timesheets in the browser
You can enter timesheets and approve timesheets from a browser-based task making it easier and more intuitive to capture time for all users.
With the timesheets in the browser feature you get:
- A browser-based interface where you see the timesheet and timesheet detail all on one screen. This screen also breaks out regular and overtime hours by row and totals them at the top.
- A welcome screen that orients you to the new interface.
- The ability for users to enter timesheets from browsers like Chrome or Firefox in addition to Internet Explorer.
- The same functionality with the new timesheets features as Manage > Time & Expense with some exceptions. Click here to view what functionality is currently unavailable.
- Control over when employees can access the new timesheet feature by giving them access to the menu option in Roles.
-
Deltek Predict: With Deltek Predict, employees get predictive timesheet creation based on recent and current scheduled projects. When an employee creates a new timesheet, they'll have two new options: Include recent projects and Include scheduled projects. When these options are selected, the new timesheets will be filled with the projects and/or phases where the employee has scheduled hours for the timesheet week or projects they used in the last two weeks.
-
The ability to track start, end, and break times.
Ajera uses the browser spell check so you can verify the spelling before submitting timesheets.
The following is a typical sequence of events for processing time:
- An employee enters time.
- When finished entering all the time for a week, an employee submits the timesheet.
- The supervisor, accounting manager, or project manager reviews the timesheet and does the following:
- Approves the timesheet.
- Rejects time on the timesheet, entering comments about the rejected time. The employee then corrects the rejected time and resubmits the timesheet.
Depending on the options chosen when setting up company time and expense entry preferences, the supervisor/manager may have access to change an employee's timesheet.
Working with timesheets
The following events occur as you process time at your company:
|
When this occurs |
This happens |
|---|---|
|
Submit |
An employee has finished entering time on a timesheet and is ready for the supervisor/manager to review it. Now, to make any changes to the timesheet, the employee must first unsubmit it. A timesheet can be unsubmitted as long as accounting or supervisor's have not approved the time. Time approved by project managers cannot be changed. |
|
Approve |
A supervisor/manager approves the time that the employee entered. The timesheet appears as Approved in timesheet lists. The timesheet can no longer be changed unless it is unapproved first. |
|
Reject specific hours |
When approving a timesheet, the supervisor, accounting, or project manager can reject specific hours and optionally add any comments. If a timesheet has any rejected hours, the timesheet appears as Time Rejected in timesheet lists. The employee must correct the time and submit the timesheet again. The rejected hours appear in bold type on the timesheet for the employee to review or change them. Rejecting time will unsubmit and unapprove accounting or supervisor approvals. Project Manager approvals remain. |
|
Reject |
The supervisor/manager rejects the entire timesheet. The timesheet appears as Time Rejected in the timesheets list. The employee must correct and submit the timesheet again. Rejected time cannot be billed or paid. Rejecting a timesheet reverses all supervisor or accounting approvals and unsubmits the timesheet. Project manager approvals remain. |
|
Unsubmit |
An employee decides a timesheet is not ready for approval after all. An employee can change a timesheet if it has not yet been approved. However, an employee cannot change any time on the timesheet that has already been billed, approved, or paid. Time approved by project managers cannot be changed. |
|
Unapprove |
A supervisor/manager decides that they do not want to approve the timesheet after all. However, any time that has already been billed or paid can no longer be changed. |
|
Delete |
You cannot delete a timesheet if it has been submitted or approved or if it contains time that has been billed or paid. |
Get to know the Timesheet user interface
The timesheet user interface is split into 3 main sections and a timesheet totals section.
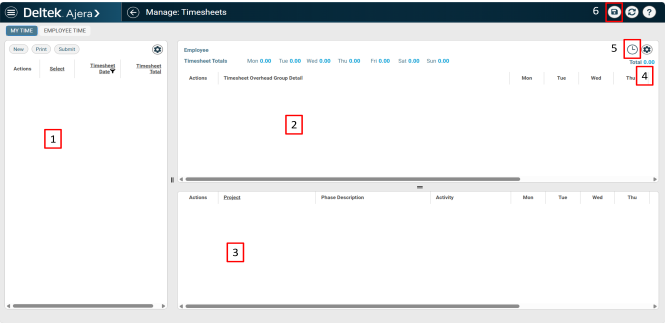
1: Left Pane
- In the left pane, you can view current timesheets, create new timesheets, or print timesheets.
- You can click the column heading to include or exclude more timesheets in the timesheet list using the widget filter, sort, and group functionality.
- In the Actions column, you can Edit, Submit, Unsubmit, or Delete a timesheet. If you're track start, end, and/or break times, you can also view a summary of the entered break time information.
- You can resize the pane by clicking and dragging the
 icon.
icon. - Click the
 to add optional columns.
2: Overhead or non-project time
- In the overhead or non-project time window you can enter any time that is not associated with a particular project.
- The time is split up by type of overhead time defined in your overhead group and day of the week.
- Regular and overtime are broken out into two separate columns. The Total column displays the sum of the regular (Reg) and overtime (OT) columns.
- Click on a day cell and select the
 icon to view Hours Detail.
3: Project Time
- In the project time window you can enter time associated with a project.
- The time is split up by regular and overtime.
- Click on the Search icon in the Project, Phase Description, or Activity columns to select from a list or begin typing and select from the filtered list.
- Enter hour time directly into the cell or click the icon to open the Hours Detail window to enter more information about the time.
4: Employee Timesheet Totals
- This section displays the total hours by day and the grand total of all hours entered on the timesheet.
5: Enter Start, End, and Break Times
-
Click the
 to open the Start, End, and Break Time dialog box.
6: Save button
- This is where the save button is located.