Integrating with Autodesk® Revit®
Use this part of the online help to learn how to integrate your Specpoint projects with your Autodesk® Revit® projects.
Specpoint leverages two complementary classification systems, UniFormat® and MasterFormat® to organize construction information within a project. However, BIM integration requires the use of UniFormat, which similar to BIM software, relies on functional elements (i.e. assemblies and systems).
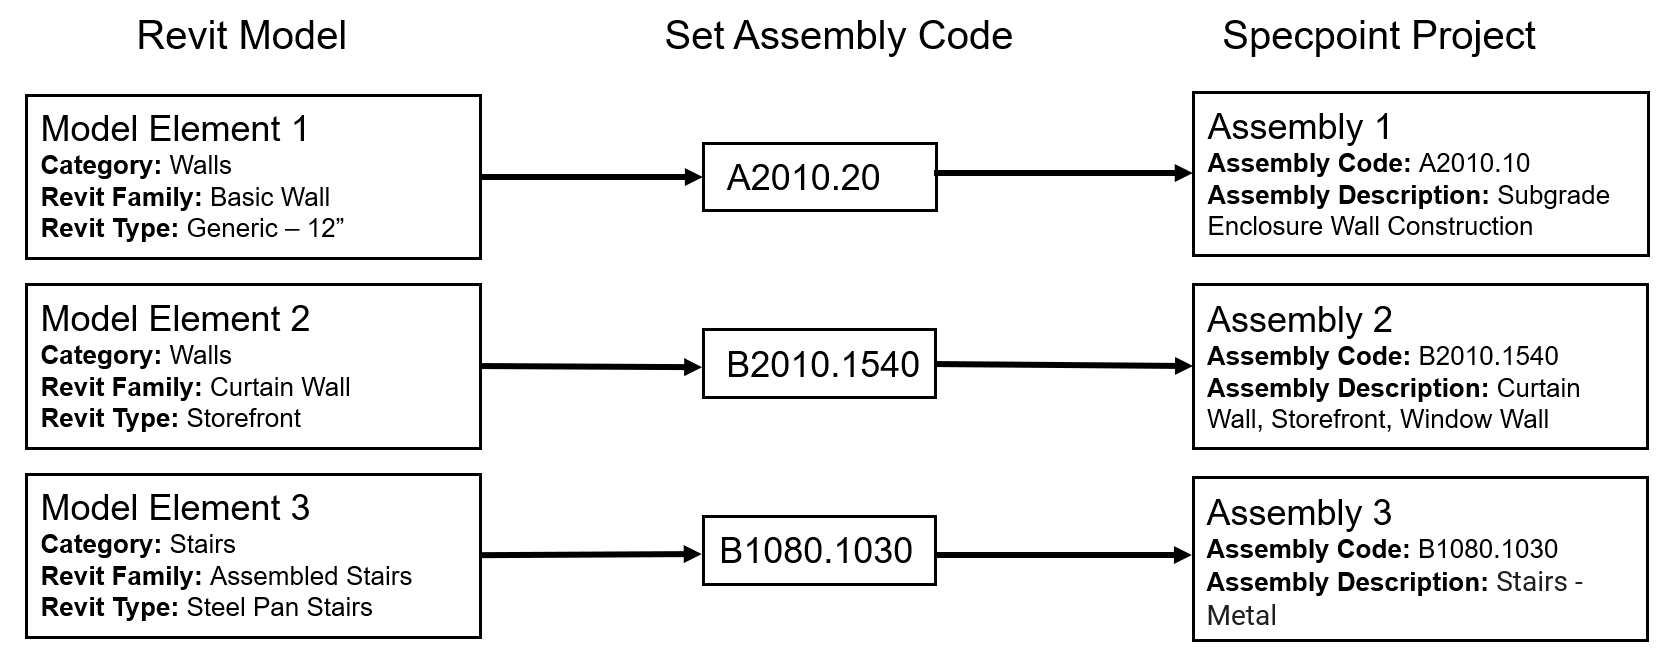
Each UniFormat functional element has a unique code/description which is used to associate to a Revit model element. This alignment ultimately provides you with the opportunity to automate coordination and manage graphic and non-graphic project information bi-directionally.

For example, for Model Element 1 with the Generic 12" Revit type, you set its assembly code as A2010.20. Specpoint will associate Model Element 1 to the A2010.20 - Subgrade Enclosure Wall Construction assembly. You can associate only one Specpoint assembly for each Revit model element. Set the assembly code for as many model elements as needed.
When you set an assembly code, Specpoint automatically creates associations between the Revit model element and the added families under the associated assembly.

- 051200 - Structural Steel Framing
- 055113 - Metal Pan Stairs
- 055116 - Metal Floor Plate Stairs
If the assembly does not have any families, the platform does not create any family associations.
To integrate your project specifications with your models in Autodesk Revit, use Specpoint plug-in for Revit. This plug-in contains the features for your BIM integration workflow, such options for linking a project and setting assembly codes.
- Related Topics:
- Plug-in Installation and Setup
Use this part of the documentation as reference for installing and setting up Specpoint plug-in for Revit. - Specpoint Plug-in for Revit
Use this plug-in to integrate your project specifications with your Revit models. - Integrating a Specpoint Project with a Revit Model
Use this part of the documentation as reference for integrating your Specpoint project with your Revit model. - Troubleshooting Specpoint Plug-in for Revit
Use this reference to learn about and resolve the possible issues that you might encounter with Specpoint Plug-in for Revit.