The Operation tab on the Order form displays detailed information about the operations for the selected Order. You can view information such as Operation Status, Work Center, and Labor Standards. Some of this information is defined for the operation on the Charge Element form; most of this information is imported to the application from an external system or ERP.
By default, you can modify the Operation Status. You can modify additional properties (e.g. Labor Standard Hours, Labor Standard Basis) if you enable these fields in your Form Profile.
Note: You cannot modify, delete, or replace a work order transaction that has an operation that is COMPLETE. To display an error message when the user attempts to delete such a transaction, make sure the user is assigned an Order Policy that has Update on Cancel checked.
See Also:
Operation tab Field Descriptions
Operation Num
Identifies a specific operation in the Order.
Description
Description of the operation as defined on the Charge Element form.
Operation Status
Indicates the status of the operation. The options are Open, Complete, Cancelled, Hold.
Record Status
Indicates whether the order is Active or Inactive.
Element Node
Displays the Order number /Operation number representing the path of the current node. For example: You have Order 3000. Order 3000 has Operation 10. The Element Node would be listed as 3000/10.
Work Center
Work Center associated with the operation.
Location Element Node
If the operation is associated with an Organizational Hierarchy, this field will list the operation’s path inside the hierarchy.
Indicates whether the operation is a milestone or pay point operation.
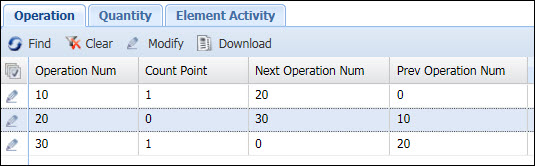
If you have Allow Quantity Skip checked in your Order Policy, then only count point operations will receive quantity when quantity is completed on the Previous Operation Number.
If you do not have Allow Quantity Skip checked in your Order Policy, then quantity will move based on the Next Operation Number and Previous Operation Number for the order.
In the illustration below, Operation 20 is not a count point. When quantity is completed on Operation 10 and Allow Quantity Skip is checked in the Order Policy, the completed quantity will move to the next Count Point (Operation 30). If Allow Quantity Skip is not checked, the completed quantity will move to the Next Operation Num (Operation 20).
See Skip Quantity on Non Count Point Operations for more information.
Labor Std Hours
Labor Standard Hours. Standard number of hours it takes to make a certain number of pieces (the Labor Standard Basis).
Labor Std Basis
Labor Standard Basis. Standard number of pieces made in the Labor Standard Hours. For example, if the Labor Standard Basis is 1 and the Labor Standard Hours is 4, it takes 4 hours to make 1piece.
Labor Std Per Piece
Labor Standard Per Piece. Standard Number of hours it takes to produce one piece. Calculated by dividing the Labor Standard Hours by the Labor Standard Basis.
This setting may be used to determine duration for each of the individual labors in a Batch or Multi labor.
When a Batch or Multi labor event is posted, the duration for each of the individual labors is calculated based on the DIV_METHOD setting for the event. The Divide by Standard and Divide by Quantity times Standard methods use the Labor Std Per Piece or Setup Std Hours to determine the duration of each labor. Labor Std Per Piece is used if the Labor Type is Run and Setup Standard Hours is used if the Labor Type is Setup. See Time Division for Batch and Multi Labor for more information.
Setup Std Hours
Setup Standard Hours. Standard number of hours it takes to perform a complete setup of the operation.
This setting may be used to determine duration for each of the individual labors in a Batch or Multi labor.
When a Batch or Multi labor event is posted, the duration for each of the individual labors is calculated based on the DIV_METHOD setting for the event. The Divide by Standard and Divide by Quantity times Standard methods use the Labor Std Per Piece or Setup Std Hours to determine the duration of each labor. Labor Std Per Piece is used if the Labor Type is Run and Setup Standard Hours is used if the Labor Type is Setup. See Time Division for Batch and Multi Labor for more information.
Machine Std Hours
Machine Standard Hours for the operation.
Planned Work Center
Planned Work Center for the operation.
Current Plant
Current plant for the operation.
Planned Plant
Planned plant for the operation.
Operation Step
Operation step for this operation.
Alternate Oper Num
Alternative step or operation number.
Allow Labor
Indicates whether labor can be posted for this operation.
Allow QC
Indicates whether this operation can be inspected for quality control.
Operation Stage
Stage of the operation.
Operation Labor Type
Labor type for this operation.
Work Center Group
Department or work center group for the operation.
Operation that follows this operation. If you have Material Move enabled in your Order Policy, this setting indicates where completed quantity will be moved.
Note that if your Order Policy also has Allow Quantity Skip enabled, the quantity will move to the next Count Point operation.
Operation that precedes this operation. If you have Material Move enabled in your Order Policy, this setting indicates which operation had its completed quantity moved to this operation.
Note that if your Order Policy also has Allow Quantity Skip enabled, quantity will only be moved to operations that have Count Point enabled.
Flex Field Name/Value
Flex Fields are used to import data that does not have a corresponding field in this form.
Update Date, Updated By
These fields display when the record was created or updated, and the person who created or updated the record.
To modify an operation, select it on the Operation tab and click the Modify button. Change the field values as necessary and then click Save.
The fields you can modify on the Operation tab will depend on which Modify Criteria are enabled in your Form Profile.
The DEFAULT Form Profile only has the Operation Status field enabled for modification. You can enable other fields for modification in a custom Form Profile. To do so:
Click Main Menu > Configuration > Form Configuration > Form Profile.
If necessary, click the ![]() Filter button to display the Form Profile Name field.
Filter button to display the Form Profile Name field.
Select a custom Form Profile from the Form Profile Name field.
On the left side of the form, navigate to Web: Administration: Charge Element: Order: Operation.
On the Form Profile Detail tab on the right side of the form, go to the Modify Criteria section.
Move the fields you want to enable from the Available box to the Selected box. The fields in the Selected box can be modified on the Operation tab.
Click Save.
The next time you click Modify on the Operation tab, you will be able to modify the fields you enabled.
When you modify an operation, the changes you make will only apply to new transactions posted for that operation. If you modify an event and its operation has also been modified, the new (modified) event will be based on the newest operation settings.