Setting up a project or template

Carefully plan the way you want security for your projects to work with a project template. When setting up project security, you can prevent employees from changing specific fields on their projects. However, you may also want to set up a template with much of the information already entered.
Set up security for a field so employees that need to change it can do so. For example, you allow project managers to change the Status field. You set up the template with a project status of Preliminary. In this way, project managers can update the status for a project and its phases as the project progresses.
- Perform one of the following:
| To set up | Do this | ||
|---|---|---|---|
|
A project template |
The Project Templates window appears. It works like the Project Command Center, except that it contains only templates, not projects.
|
||
|
A project |
|
The top area of the window contains your list of projects. The bottom area of the window consists of two areas:
- Project tree on the left side of the window, where you build the work breakdown structure for your project
- Detail tabs on the right side of the window, where you enter information about each of the components you build on the left side of the window
- On the General subtab, under the Project Info tab, enter the following information for the project:
| For | Do this | ||
|---|---|---|---|
|
Description |
Required. Type a name for the project. This name appears on invoices. Be sure not to use any slashes / \ in the name. |
||
|
Select the company that is responsible for the project. If more than one company is associated with the project, you can do one of the following:
Contact your Ajera consultant to determine the best approach for your organization. |
|||
|
ID |
Does not apply when setting up project templates. If you want to identify projects using an ID, type an identifier for the project. The ID must be 30 characters or less. You can view a project ID in reports and selection lists.
|
||
|
Department |
unavailable in ajeraCore unless you have the Departments add-on If your company is defining departments in Ajera, enter the department that owns the project. |
||
|
Project type |
Indicate a project type, which is used to sort and group information on reports. For example, your company may want to group governmental and private sector projects separately for company-wide reporting. |
||
|
Project manager |
Enter the manager of the project. |
||
|
Principal in charge |
Enter the principal responsible for this project. |
||
|
Marketing contact |
Enter your company's marketing representative for the project. |
||
|
Location |
Type the location of the project. You may include any detailed information about the location, such as directions. |
||
|
Payroll wage rate table |
Appears only if you selected to use wage rate tables when setting up payroll preferences. Enter the wage rate table to use for employees whose rate of pay is based on the work they are performing (their employee type). Ajera uses the wage rate table to retrieve pay rates when you enter time or add resources to budgets. |
||
|
For the status, select a status for the project. Select the billing type that is most often used for this type of project. It can be changed once the contract is won. For example, to begin setting up a budget to produce an estimate for a proposal, you select a status of Preliminary (and then on the Billing subtab, you select a billing type of Marketing). When you win the contract, you then change the status to Active (and on the Billing subtab, you change Marketing to a billable billing type). Status options are: Marketing (unavailable in ajeraCore)You want to track BD efforts and win rates, and project your pipeline. Time and expenses can be entered to the project. The client cannot be invoiced. PreliminaryThe project is not ready for billing. Time and expenses can be entered to the project but the client cannot be invoiced. ActiveThe project is active. Time and expenses can be entered to the project. The client can be invoiced. Ajera keeps the status as Active until you change it. Work holdTime and expenses cannot be entered to the project. The client can be invoiced. HoldTime and expenses cannot be entered to the project. The client cannot be invoiced. Billing holdTime and expenses can be entered to the project. The client cannot be invoiced. ClosedThe project is complete, but you still want to include it in reports.
|
|||
|
Payroll Taxes |
The next two fields appear only if you selected the Company > Preferences > Payroll tab> Allow state taxes from multiple states on one paycheck check box. To learn about the entire process of setting up state and local withholding when processing for multiple states, see About state withholding for multiple states. |
||
|
State |
Enter a state if you want Ajera to withhold state tax when employees enter time to this project (or phase). If you do not enter a state for a phase, Ajera uses the state you entered for the project if you entered one. If you do not enter a state for the project, when you process payroll, Ajera uses the state you entered for the employee in the Setup > Employees > Payroll Taxes tab > Default Work State field. |
||
|
Local tax |
Enter a local payroll tax applicable for work on the project. A tax is available only if you set it up as location-based ( Company > Payroll Taxes >Type field with the Local option selected > Calculation Method field with the Percent of Taxable option selected, and the Taxable Type field with Location Based selected). |
||
| Restrict time and expense entry to Resource only |
If selected, employee will see this Project and all of its phases if they are a labor resource anywhere on the project. If My Department filters are turned on and the employee's department matches a phase department, but they are not a labor resource on the project, they will not see the project on their list.
|
- Click the Billing subtab, under the Project Info tab, and enter the following information for the project:
| For | Do this | ||||
|---|---|---|---|---|---|
|
Required when setting up a project. Make a selection to indicate the way the client is billed according to the contract. You can change it at any time during the project lifecycle. If you are setting up a template (unavailable in ajeraCore) or a preliminary project for estimating purposes, select the billing type that is most often used for this type of project. You can change it once the contract is won. If you do not want to designate a rate table when estimating your projects, select a billing type of Marketing. When the contract is won, change it to a billable type, and select the appropriate rate table. Billing types are: Time & expenseYou bill the client for actual hours worked and expenses incurred on the project. You can use this type if you bill the client with a billing rate or a markup of cost.
Fixed feeYou charge the client a fixed amount for the project and bill a fixed amount on each invoice. Percent completeYou charge the client a fixed amount for the project. You bill a percent of the total amount based on the amount of the project that is complete. Unit priceYou charge the client a price per each unit completed, such as square feet. Percent of construction costYou charge the client for the actual or estimated cost of construction for the project. NonbillableYou do not charge the client for the project. Use this billing type to track project-related time and expenses that you cannot invoice to the client. You can set up a nonbillable phase so that you can enter charges against the project which contribute to the total cost but cannot be billed. Learn about work-in-progress write-off vs. nonbillable MarketingYou track the marketing cost for the project. Use this billing type to track time and expenses related to winning the project. You can enter and track time and expenses, but the client cannot be invoiced. You can change this billing type to one of the billable types after the project is won, if the contract allows you to recover any of these costs. Overhead You can optionally set up an overhead project to track your internal expenses. You can enter and track time and expenses, but no client is associated with the project and no invoice is produced.
|
|||||
|
Rate table |
Required when setting up a project with a billable billing type. Indicate the pricing structure for the project. You may choose to use your standard rates for estimating and budgeting, or you can create a rate specifically for that purpose.
|
||||
| Require notes on timesheets |
Select if notes are required on timesheets for this project. If selected, this check box is also automatically selected for all phases in the project. You can clear the check box for individual phases, if needed. |
||||
Sales tax: |
|||||
|
Apply sales tax |
Select it if any of the labor or expenses for this project are subject to sales tax.
|
||||
|
Tax code |
If sales tax applies to the project, type the tax code that applies to the project. |
||||
|
Tax rate |
If sales tax applies to the project, enter the sales tax rate as a percent. For example, enter 6 for 6%. |
||||
Bill as Time & Expense: |
|||||
|
Labor, expense, consultant |
These fields only appear for fee-based If the fee on a contract does not include labor, expense, or consultant fees, but you want to bill them as time and expense, select these check boxes. For example, a fixed fee on a contract includes labor and consultant fees. However, in addition to the fixed fee, you are also billing expenses as time and expense, so you select the Expense check box. |
||||
| Bill as Units: | |||||
| Expense, consultant | If you would like the ability to use consultants and bill them as unit based, select these check boxes. | ||||
|
Summarize phases |
Select this check box to summarize (subtotal) the phases of a project on an invoice. |
||||
 Maximum Exceeded
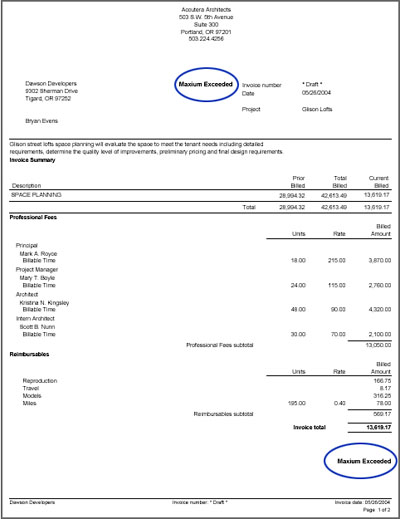
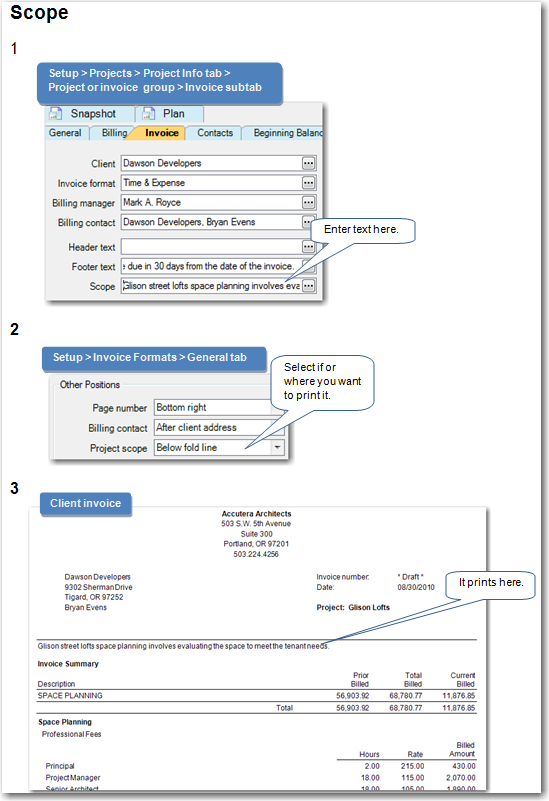
- Click the Invoice subtab, under the Project Info tab, and enter the following information:
| Note: | You define invoice information for the project or each invoice group . If you decide to use invoice groups, complete the Invoice
tab when setting up each invoice group. . If you decide to use invoice groups, complete the Invoice
tab when setting up each invoice group. |
Invoice examples:
| For | Do this | ||
|---|---|---|---|
|
Client |
Required when setting up a project with a billable billing type. Identify the client who is invoiced for services. unavailable in ajeraCore - If you are setting up a template for a specific client, select the client. Otherwise, you may want to leave the client blank on the template and the project manager can select the appropriate client when creating the project. |
||
|
Invoice format |
Required when setting up a project with a billable billing type. Establish the look and content of the client invoice. The options that
appear depend on the invoice
formats you set up. If not already entered, click
If you are setting up a template (unavailable in ajeraCore) or a project for estimating purposes, select the invoice format that is most often used for this type of project. You can change it when the contract is won. |
||
|
Billing manager |
Identify the person responsible at your company for billing on this project. When setting up invoice formats, you can choose to print this name in the signature area of the invoice. |
||
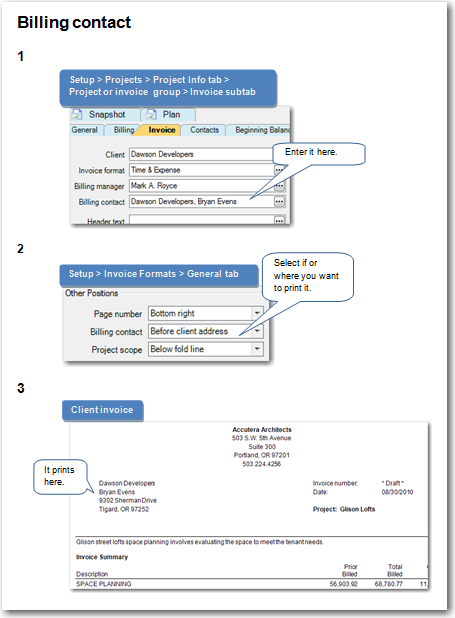
|
Identify the contact for the client that handles billing issues on this project. If the billing contact has an address on record, that address prints on the invoice. Otherwise, the client's address prints on the invoice.
|
|||
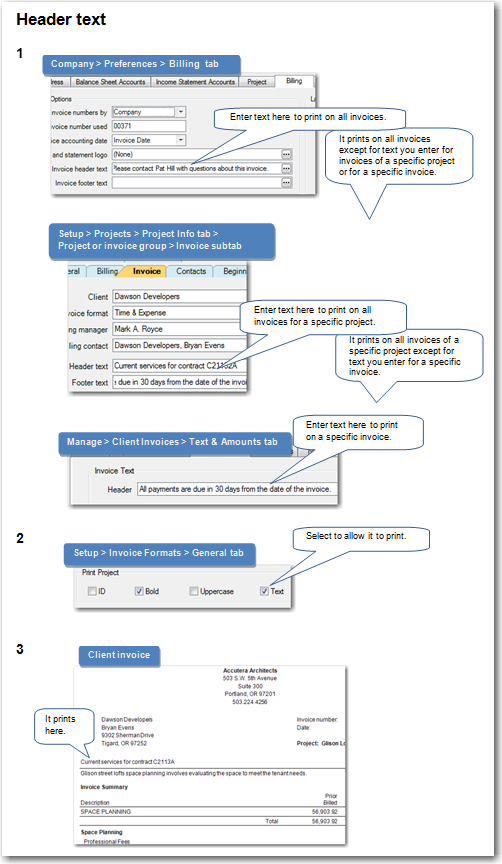
|
Enter text that you want to print on the invoice below the client mailing address. You can reenter header text from the Company > Preferences window by right-clicking and selecting Refresh header text. (If you use multi-company, the header text is from the Company > Companies window.) If you entered header text on the Billing tab of the Company Preferences window, that text appears in this field and prints on client invoices for all projects, unless you change it here for this project. (If you use multi-company, the header text is on the Billing/Payroll tab of the Company > Companies window.) You can also change header text for a specific invoice on the Text & Amounts tab of the Client Invoice window. If you do not want the text to wrap to the second line on the invoice, press the Enter key where you want the first line to end.
|
|||
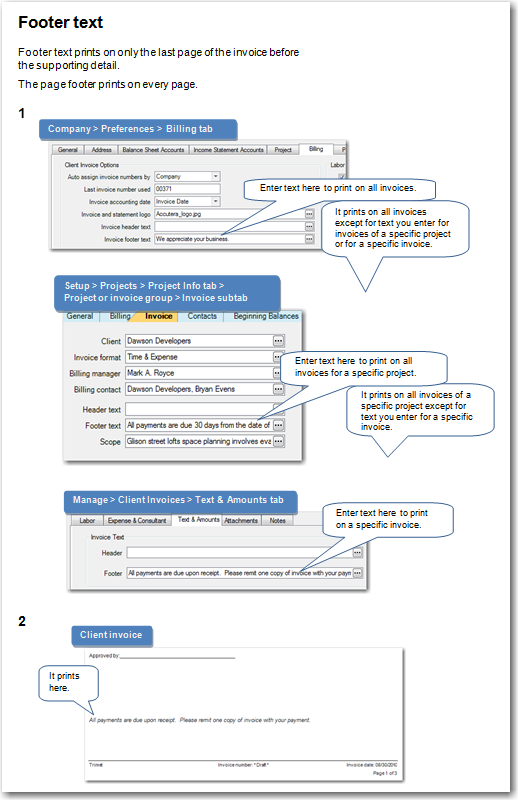
|
Enter text that prints on only the last page of the invoice. There is no length limit. For example, you may choose to use it to print a holiday greeting or contract information. You can reenter footer text from the Company > Preferences window by right-clicking and selecting Refresh footer text. (If you use multi-company, the footer text is from the Company > Companies window.) If you entered footer text on the Billing tab of the Company Preferences window, that text appears in this field and prints on client invoices for all projects, unless you change it here for this project. (If you use multi-company, the footer text is on the Billing/Payroll tab of the Company > Companies window.) You can also change footer text for a specific invoice on the Text & Amounts tab of the Client Invoice window.
|
|||
|
Enter the description of work to be performed for the project.
|
|||
|
Last invoice number |
This field appears when you select to automatically assign invoice numbers by project (Company > Preferences > Billing tab > Auto Assign Invoice Numbers By field). Enter the number to use as the starting point for numbering invoices for the project. For example, enter 999 to start printing invoices with a number of 1000. If you leave the field as zero, the next invoice has a number of 1. |
- Click the Contacts
subtab, under the Project Info
tab, and enter any contacts for the client. For each contact you want
to add, click
 . Type any notes about the contact in the field
below it.
. Type any notes about the contact in the field
below it. - The Beginning Balances subtab, under the Project Info tab, displays any beginning balances entered for the phases of this project. You enter beginning balances for each phase of a project, not for the project itself, and Ajera produces project totals by calculating the phase totals.
- unavailable in ajeraCore - Click the Permissions subtab, under the Project Info tab, and enter the following information.
Your project security settings determine if you can access projects and phases, and which columns you can view and change on the Manage tab.
Use the Permissions subtab to allow changes to this project's work breakdown structure, resources, tasks, and to allow when a budget is final.
| For | Do this |
|---|---|
|
Change work breakdown structure |
Indicate if users of the project can change the work breakdown structure as represented in the project tree on the left of the window. If you plan to select the Never option, first enter all your phases, invoice groups, and billing groups, as explained in the remainder of these instructions. Otherwise, you will also be unable to make changes unless you first change this option, which you can do at any time. |
|
Change resources |
Indicate if users of the project can change the project's resources. If you plan to select the Never option, first enter all your phases, invoice groups, and billing groups, as explained in the remainder of these instructions. You then enter resources on the Manage tab when budgeting the project. |
|
Change tasks |
Indicate if users of the project can change the project's tasks. If you plan to select the Never option, first enter all your phases, invoice groups, and billing groups, as explained in the remainder of these instructions. You then enter tasks on the Manage tab when budgeting the project. |
|
Budget is final |
Does not apply when setting up a template. When the Final budget check box is selected on the Manage tab, you can no longer change amounts in the budget. You can only undo the finalizing of a budget by clearing this field. |
- Click the Attachments subtab and add attachments, by linking to related files. A linked file must be in a shared location for other people to open it (for example, on a shared network or a website).
- Click the Notes subtab, and type any general notes about the project.
- Set up phases.