Setting up general invoice format options
Follow these instructions as part of setting up an invoice format.
- On the General tab, complete information, as follows:
| For | Do this | ||||||||
|---|---|---|---|---|---|---|---|---|---|
|
Description |
Type a name for the invoice format. |
||||||||
|
Billing types to include |
Make a selection:
|
||||||||
|
Use custom design |
Leave blank unless you are working with a consultant using a custom invoice design created with Crystal Reports.
|
||||||||
Print company information: |
|||||||||
|
On letterhead First page only |
Select the On letterhead check box if you want to print the invoice on your company letterhead paper. This option leaves one inch at the top of each page for your company letterhead. Select the First page only check box if you want to print your invoice on company letterhead on only the first page of the invoice. |
||||||||
|
First page only |
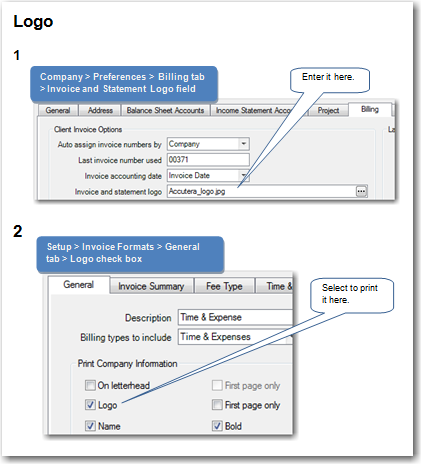
Select the Logo check box to print your company logo, which you identified when setting up company billing preferences. Select the First page only check box if you want to print your logo on only the first page of the invoice.
|
||||||||
|
Name Bold |
Select the Name check box if you want to print your company name on the invoice. Select the Bold check box to print it in boldface. |
||||||||
|
Address Bold |
Select the Address check box if you want to print your company address on the invoice. Select the Bold check box to print it in boldface. |
||||||||
|
Phone # Bold |
Prints a company phone number on the invoice. It uses the number in the first phone number field on the General tab of the Company Preferences window. Select the Bold check box to print it in boldface. |
||||||||
|
Position |
Select the place on the invoice where you want to print the company information. If you select Left - window envelope, the client information prints on the invoice so it fits in the address window of a #10 window envelope. |
||||||||
Print project: |
|||||||||
|
ID |
Select the ID check box to print the project ID on the invoice along with the project name/billing description. |
||||||||
|
Bold |
Select the Bold check box to print the billing description/project name in boldface. |
||||||||
|
Uppercase |
Select the Uppercase check box to print the billing description/project name in all uppercase letters. If the check box is cleared, the billing description/project name prints the way you entered it when setting up the project. |
||||||||
|
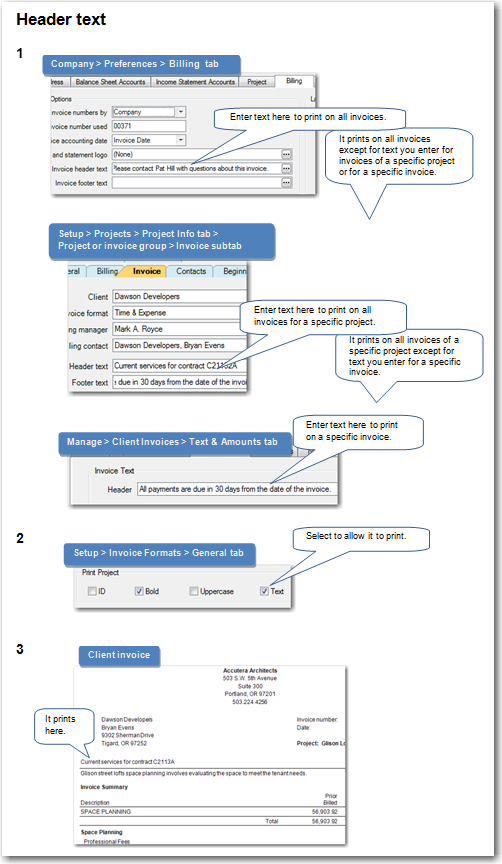
Select the Text check box to print header text on the invoice. It prints the way you entered it on the Company Preferences window, unless you changed it on the Project window or the Client Invoice window.
|
|||||||||
Other positions: |
|||||||||
|
Select if or where you want to print the page number. |
|||||||||
|
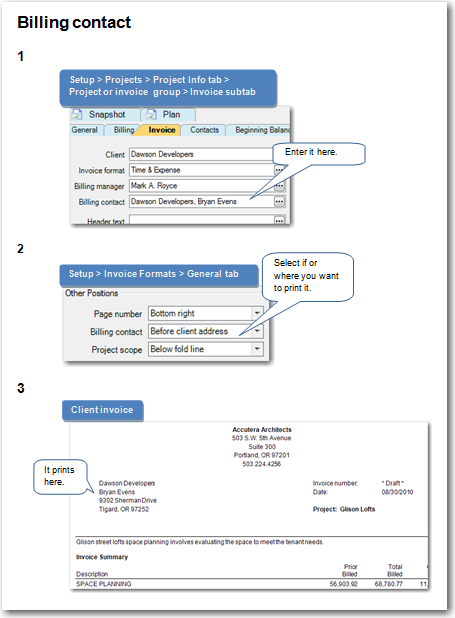
Billing contact |
Select where you want to print the billing contact.
|
||||||||
|
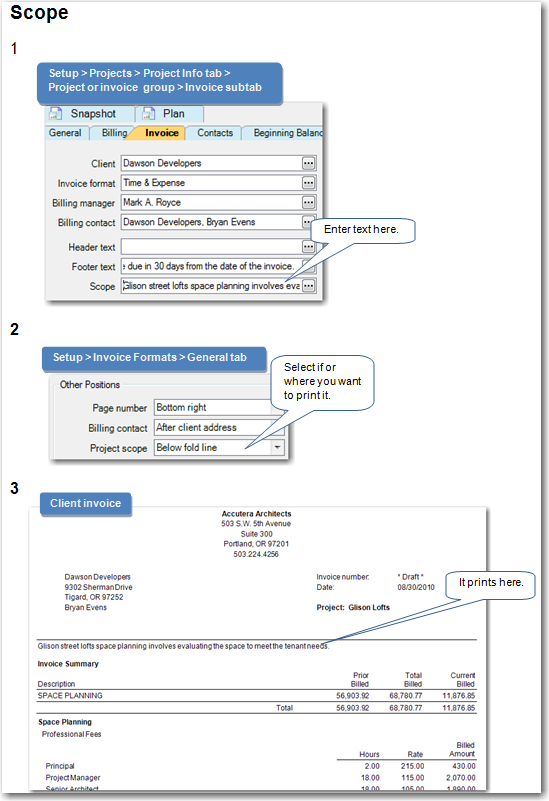
Project scope |
Select where you want to print the project scope. The fold line is the first place the invoice is folded, which falls between the header information and the main content of the invoice. If you choose to print the project scope above the fold line, limit the project scope to two lines so the invoice fits properly in the window envelope.
|
||||||||
Approvals: |
|||||||||
|
Position |
If your clients require a manager or principal to sign the invoice, you can print approval information at the end of the invoice. Select to print it on the right or left of the invoice, or not at all. |
||||||||
|
Style |
Select to print a signature line or a signature block. To the right of the Style field, type any text that you want to appear near the signature. For example, you might type Approved by. Otherwise, leave it blank. |
||||||||
|
Signer |
Applies only if you selected Signature Block in the Style field. Select to print
the name of the billing manager, project manager, or principal in charge, as entered in |
||||||||
|
Title |
Applies only if you selected Signature Block in the Style field, and a signer (not Don't Print) in the Signer field. Make a selection as follows:
|
||||||||
|
Page Footer: |
|||||||||
|
Left, Center, Right |
Select the information that you want to print in the left, center, and right part of the page footer. If you select Text, you can type specific text in the field to the right. |
||||||||
|
Print Overline |
Select it if you want to print a line above the footer. |
||||||||
Invoice Total: |
|||||||||
|
Bold |
Select it to print the total in boldface. |
||||||||
|
Box |
Select it to print a box around the total. |
||||||||
|
Underline |
Select it to underline the total. |
||||||||
|
Select it to print a receivables aging summary at the end of the invoice. |
|||||||||
|
Include finance charges |
If you selected to print the aging summary, select this check box to include amounts for finance charge invoices in the aging summary section of the invoice. |
||||||||
 Signature line example
- Include any notes about the invoice format by clicking the Notes tab and typing your notes.