![]()
The Time Record View feature allows a time reporter to view time record data on a terminal for a single day. To display this data, the time reporter will swipe their badge and press the Time Record View button on the terminal. The Posting Date field will appear. Enter the date for which you want to view your time record data and the Punch Time form will appear
Note: The name of the button (Time Card View) is determined by the event name .
The specific data items shown can be configured in the application based on who is looking at the data. For example, one customer may want to show a time reporter’s full name while another may only want to show the person number. In addition, some devices may have restricted amount of space available on the form real estate, and users may simply want to limit the amount of data that appears. See Modify the Time Record View Fields in a Form Profile below.
Time Record View is a "kiosk" event. You can require users to enter their passwords before accessing this event. See Password Required to Access Kiosk Events for more information. If you are viewing this event from the InTeract Client, you can also print it. See Print Kiosk Events from Client Terminals for more information.
See Also:
Add Time Record View to a Menu Tree
Time Record View Field Descriptions
Modify the Number of Time Record View Fields in a Form Profile
This feature requires the following:
You must have the Time Record View module included in your license file.
The Time Record View module must be enabled.
To check if the module is included in your license and enabled:
Click Main Menu > Configuration > System > Licensing.
On the License Modules tab, select the Module Name called Time Record View.
The following boxes must be checked: Licensed and Module Enabled.
By default, the Time Record View event is included in the Menu Tree of the TERMINAL_DEFAULT Menu Group. This event allows the Time Record View menu button to appear on a terminal.
If the Time Record View event has been removed from the Menu Tree of your Menu Group, you must add it back. To do so, use the following steps:
Click Main Menu > Configuration > Form Configuration > Menu Tree.
Select a Menu Group from the Menu Group Name field.
You cannot add items to the TERMINAL_DEFAULT Menu
Group. If you need to create a new Menu Group, click the ![]() button next to the Menu Group Name field and select Maintain from
the pop-up menu.
button next to the Menu Group Name field and select Maintain from
the pop-up menu.
The Menu Group’s folder will appear.
Click the arrow on the left side of the folder to expand it and view the events and folders in the menu.
Select a folder and click Add Event.
On the Add Menu Tree pop-up form, select Time Record View (TIMECARDVIEW).
Click Save.
Click Update Server to update all active terminals will be updated with the latest Menu Tree configurations.
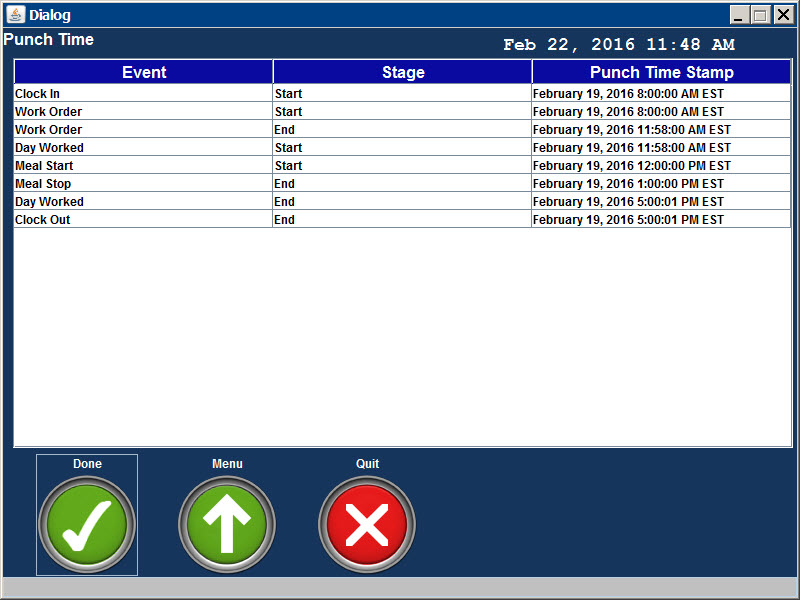
When a time reporter presses the Time Record View menu button on a data collection terminal, the following fields can appear. The Event, Stage, and Punch Time Stamp fields appear in the default form profile. You can add or remove Time Record View fields from a custom form profile (see below).
Event
Name of the event that was posted.
Stage
Start, End, or Elapsed. Indicates whether the transaction was started, stopped, or posted as an elapsed transaction.
Punch Time Stamp
Date and time when the punch transaction was posted. Will be blank for elapsed transactions.
Acct Desc, Acct ID, Acct Num, Acct Type (1-5)
The Acct fields display information about the account numbers to which the transaction was posted (if any).
Accuracy
If the transaction was recorded using the Mobile Client, the Accuracy displays the radius in meters for which the Latitude and Longitude coordinates are accurate.
This field will only display values if the transaction was recorded from the Mobile Client application. For all other devices, including the Mobile Client used from a web browser, the location will not be recorded and this field will be blank.
The Accuracy level depends on how the location was recorded. For example, a location recorded using GPS or a Wi-Fi connection will be more accurate than a location recorded using cell phone tower triangulation. You can use the ACCURACY_TOLERANCE_LEVEL setting in a Terminal Profile to restrict signing and event posting based on a location’s accuracy level.
Action ID
For punch transactions, displays the ID number of the action associated with this record.
Action Key Name
For punch transactions, this field displays the event prompt associated with the transaction.
Action Key Value
For punch transactions, this field displays the response to the event prompt (such as the order and operation number).
Activity Desc, Activity ID, Activity Num
The Activity fields display information about the activity to which the transaction was posted (if any).
Badge Num
Badge Number of the person who posted the transaction.
Leave Type Code
If the transaction draws from a balance (such as vacation or sick time), the leave type (balance) code will be shown here.
Billable
Response to the Billable event prompt (if any).
Charge Type
Charge Type (Account, Order, Project, etc.) for the transaction.
Chg Elem Desc, Chg Elem ID, Chg Elem Value (1-5)
The Chg Elem fields display information about the charge elements to which the transaction was posted (if any).
Event Type ID
Event type and subtype (e.g., ATTENDANCE:CLOCK or LABOR:WORKORDER).
Exp. Type
Expenditure Type, if any, for this transaction.
Flex 1-5
Displays information about the flex fields associated with this transaction.
Hour(s)
Total number of hours for the transaction.
Ind. Charge Code
Charge code associated with a LABOR:INDIRECT event.
Labor Type
Indicates whether the labor is a Run or Setup operation.
Latitude, Longitude
If the action was recorded using the Mobile Client, the Latitude and Longitude fields display the coordinates of the position where the transaction was recorded.
These fields will only display values if the transaction was recorded from the Mobile Client application. For all other devices, including the Mobile Client used from a web browser, the location will not be recorded and these fields will be blank.
Op Complete
Indicates whether the operation was completed or not.
Op Desc, Op ID
Additional information about the work order operation to which the transaction was posted.
Operation Num
Identifies a specific operation number in an Order Number.
Order Desc, Order ID
Additional information about the work order operation to which the transaction was posted.
Order Num
Order number, if any, for this transaction.
Posting Date
Date the transaction was posted on the timecard.
Proj Desc, Proj ID, Proj Num
The Proj fields display information about the project to which the transaction was posted (if any).
Quantity Available
Quantity available for the specified work order, project, etc.
Quantity Complete
Quantity completed for the specified work order, project, etc.
Quantity Moved
Quantity moved for the specified work order, project, etc.
Quantity Planned
Quantity planned for the specified work order, project, etc.
Quantity Rejected
Quantity rejected for the specified work order, project, etc.
Quantity Scrapped
Quantity scrapped for the specified work order, project, etc.
Quantity Started
Quantity started for the specified work order, project, etc.
Reason
Reason code, if any, entered when the transaction was posted.
Request Comment
Comment, if any, entered when the transaction was posted.
Sender Name
Identifies the interface that the work order, project, etc. originates from.
Task Description, Task ID, Task Num
Identifies the task, if any, for which this transaction posted.
Terminal Name
Displays the Terminal Name (as defined on the Terminal form) of the terminal where the transaction was posted.
Timezone
Time zone of the terminal or web application where the transaction was posted.
You can limit the number of fields that appear on the Punch Time form. Any changes you make will reflect on the terminal.
The Default Form Profile includes Event, Stage, and Punch Time Stamp fields. To modify the fields shown on the form, you have to modify a custom Form Profile (see below), or create a new Form Profile with unique Time Record View setting.
Click Main Menu > Configuration > Form Configuration > Form Profile.
Select the Form Profile Name you want to modify.
Click the ![]() button next to the Terminal
Forms item and select Punch Time.
button next to the Terminal
Forms item and select Punch Time.
In the Resultset Fields section, the items in the Selected box will appear on the terminal. The items in the Available box will not appear on the terminal. Move the items from the Available box to the Selected box or vice versa.
Note: If you want to select more than one item, hold down the CTRL key, select the items and click the REMOVE ALL button to the left of the box.
Click Save after you have finished your selection.