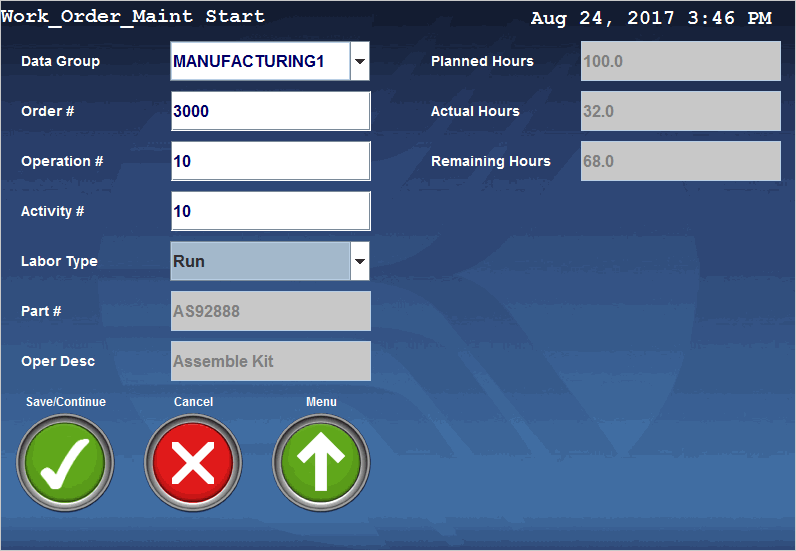
Shop Floor Time can be configured to display the planned, actual (consumed), and remaining hours for a particular job that a person is starting on a client terminal. This information will let the person know how many hours were planned (budgeted) for the job, how many hours have actually been worked, and how many hours remain. In addition, a supervisor can view the Open Labor hours (labor punches that are still open) for a particular job.
Planned Hours are defined for a particular charge element. The Charge Type Element form defines which level of the charge element will contain the Planned Hours.
Actual (Consumed) Hours are calculated as the sum of open and closed transactions for a particular charge element, for all persons and post dates. Remaining Hours are the difference between the Planned and Actual Hours.
This feature requires you to configure charge elements and event prompts.
See Also:
Configure the Planned Hours for the Charge Element
Define the Event Prompts for the Planned, Consumed, and Remaining Hours
View Open Labor Hours in Labor Review
Note: On the Charge Element and Charge Element Detail forms, you can only modify the Planned Hours for an existing charge element. If you add a new charge element using the Charge Element or Charge Element Detail form, the Planned Hours field will not be visible. However, you can include the Planned Hours in a charge element import as explained below.
Create a .csv file with the charge elements and planned hours you want to import. This file must include the Charge Type, Element Name, Element Value, Sender Name, and Planned Hours (FI_PLANNED_HOURS).
Use the Import Definition form to create an import with the Charge Element context.
Configure an instance of the IMPORT_FILES service that includes your import definition.
You can run the IMPORT_FILES service via a schedule. You can also run it immediately using the Service Monitor form or the Schedule Immediately button on the Import Definition form.
The imported Charge Elements and Planned Hours will be visible on the Charge Element form. You can modify the Planned Hours if necessary. If more than one level of a charge element has Planned Hours, use the Charge Type Element form to specify which level will be used to calculate the Planned/Actual/Remaining Hours when labor is posted (see below).
On the Charge Element and Charge Element Detail forms, you can view and modify the Planned Hours for a particular charge element.
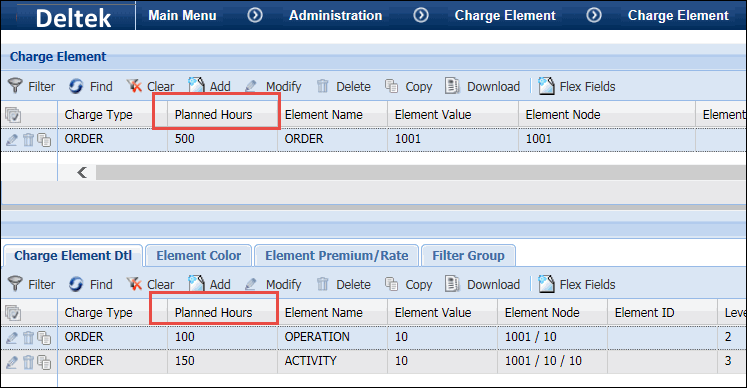
To change the amount of Planned Hours, select the Charge Element or Charge Element Detail record and click Modify. Enter the new Planned Hours amount and click Save. You can also use the Order form to modify the Planned Hours of a work order.
Use the Charge Type Element form to specify which level of the charge element will be used to calculate the Planned Hours.
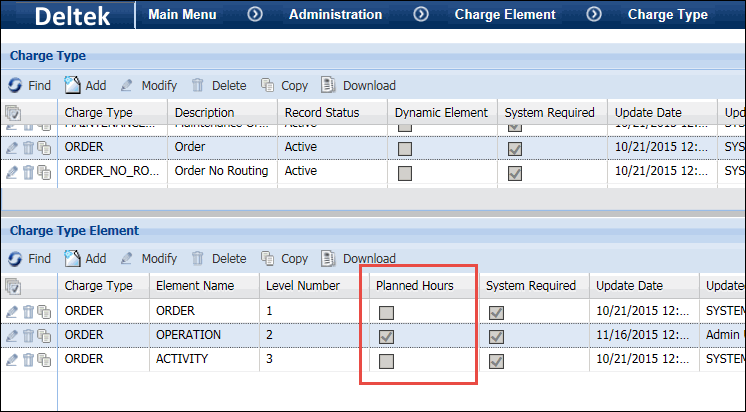
For example, if the Charge Element ORDER has three levels – Order, Operation, and Activity, and Operation has the Planned Hours box checked, then the Planned/Actual/Remaining Hours will be calculated based on the Planned Hours defined for the Operation on the Charge Element form.
Select the charge element on the Charge Type form. Then, select the Charge Type Element record and click Modify. Check or un-check the Planned Hours box and click Save.
You will need to add the following event prompts to the events that will display Planned, Actual, and Remaining Hours: F_ACTUAL_HOURS, F_PLANNED_HOURS, and F_REMAINING_HOURS. You will also need to add Prompt Dependency records for these prompts.
Click Main Menu > Configuration > Event > Events, select the event that will display Planned, Actual, and Remaining Hours.
Go to the Prompt tab and click Add.
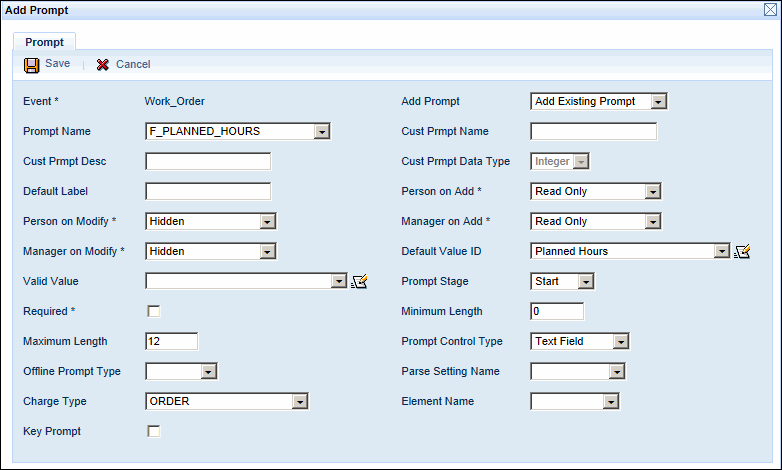
Make sure the Add Prompt field is set to Add Existing Prompt and select the correct Prompt Name (F_ACTUAL_HOURS, F_PLANNED_HOURS, or F_REMAINING_HOURS).
Configure the other settings as follows:
Person on Add, Manager on Add: Set to Read Only
Person on Modify, Manager on Modify: Set to Hidden
Default Value ID: Select Planned Hours, Remaining Hours, or Consumed (Actual) Hours to match the Prompt Name you selected
Charge Type: Select the Charge Type for this prompt (e.g., ORDER)
Maximum Length: Set this value to a whole number from 1 to 12.
Click Save and repeat the steps above for the other event prompts you need to add (F_ACTUAL_HOURS, F_PLANNED_HOURS, or F_REMAINING_HOURS).
Use the Move Up and Move Down buttons on the Prompt tab to order the event prompt so that F_PLANNED_HOURS, F_ACTUAL_HOURS, and F_REMAINING_HOURS appear in that order as the last prompts in the list.
Go the Prompt Dependency tab and click Add.
Select the Prompt Name F_PLANNED_HOURS, F_ACTUAL_HOURS, or F_REMAINING_HOURS.
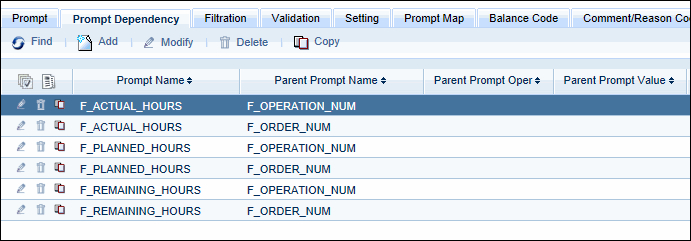
Select the correct Parent Prompt Name. For example, if Planned Hours will be calculated based on an Operation, then you need Prompt Dependency records for both F_OPERATION_NUM and F_ORDER_NUM.
Click Save and Add save your changes and continue adding Prompt Dependency records for the other prompts. Click Save when you are done adding the last record.
Use the Open Labor button on the Labor Review form to display the open labor hours (labor punches that are still open) for a specific charge element. When you click this button, a pop-up window appears.
By default, the fields in the Filter area will display the same values as those on the Labor Review form.
In the Filter area, select the Charge Type and other filter values for the open labor hours you want to view.
Click Find.
The Open Labor hours display on the form.
