The Manage Employee Loan form is designed for administrators who want to loan one or more employees to one supervisor on behalf of another supervisor. This form can also be used to create a new assignment (such as Schedule Cycle or Shift) for selected employees on behalf of their supervisor. The assignment can be created with or without loaning the employee.
The borrowing supervisor can review, edit, and approve the timecards of the loaned employees, based on the settings in the borrowing supervisor's Supervision Date Policy.
The Manage Employee Loan form is similar to the Employee Loan form. However, the Employee Loan form will only display the employees you supervise. The Manage Employee Loan form can display the employees for any supervisor.
You will need to configure the Manage Employee Loan form in your Form Profile, to enable the appropriate fields to view and change employee assignments. The Supervision Date Policy settings will determine the actions that the borrowing supervisor can perform in the timecard for a loaned employee. Refer to Employee Loan Feature for more information
The Manage Employee Loan form has two tabs:
The Create tab is for loaning an employee or creating a new assignment for the employee on behalf of a supervisor.
The Maintain tab is for viewing, modifying, and deleting employee loan records on behalf of a supervisor.
See Also:
Creating Records in Manage Employee Loan
Modifying and Deleting Records in Manage Employee Loan
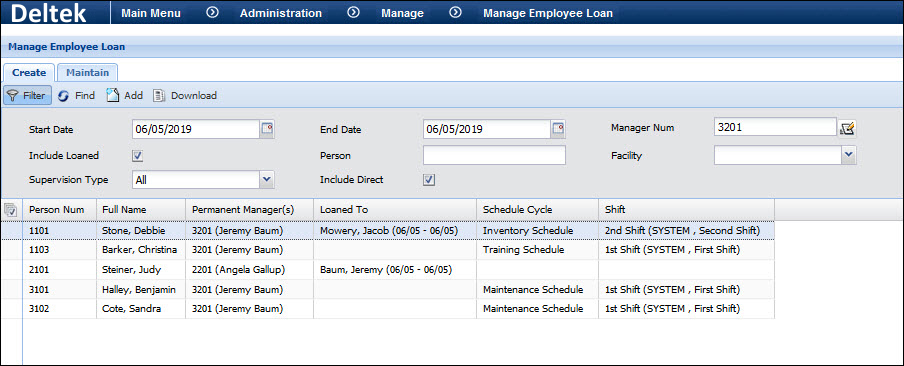
Use the Create tab on the Manage Employee Loan form to loan an employee and/or create an assignment for the employee on behalf of a supervisor.
1. Click Main Menu > Administration > Manage > Manage Employee Loan and click the Create tab.
2. If necessary, click the ![]() Filter
button to display the filter fields.
Filter
button to display the filter fields.
3. Enter the Start Date and End Date for the employee loan record you are creating.
If you are creating an employee loan for dates in the past, and the loan includes an assignment (schedule, shift, pay rate, etc.) the assignment change may affect the transactions that were already posted on those past dates. You may have to Recalculate the person's timecard.
4. In the Manager Num field, select the supervisor on whose behalf you are creating the employee loan records.
5. Check Include Loaned to display employees who already have employee loan records in effect during the Start Date and End Date range.
You can use the other filter fields (Person, Facility, Supervision Type, and Include Direct) to select the employees for which you are creating the employee loan record.
6. Click Find.
The employees that meet the filter criteria will appear in the middle of the form.
Only the employees that the Manager Num supervises during the Start Date/End Date range will appear. For example, if the Manager Num is borrowing Employee_01 from 6/1 to 6/2 and you set the Start Date/End Date to 5/31 and 6/7, this employee will not appear on the form. This employee will only appear on the form if you set the Start Date to 6/1 and the End Date to 6/2.
Loaned To identifies the loaning or borrowing supervisor for the person (if any) and the dates of the loan. In the image above, Manager Num 3201 is supervisor Jeremy Baum. Person 2101 is Loaned To Jeremy Baum, so Jeremy is borrowing Person 2101. Person 1101 is Loaned To Jacob Mowery.
Permanent Managers displays the supervisors of any DIRECT_MANAGER, SUPERVISOR_MANAGER, or Hierarchy groups that the Person belongs to.
If you configured the Create tab of the Manage Employee Loan form to display columns for employee assignments, these columns will also appear. The PERSON_ASSIGNMENT item in your Security Data Role will also determine which assignments you can view.
7. Select the employees for which you want to create a loan and/or assignment and click Add.
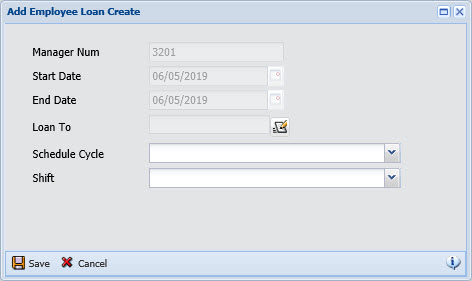
8. On the Add pop-up form, the Manager Num, Start Date, and End Date will be read-only and set to the same values you selected in the filter.
9. In the Loan To field, select the supervisor who will be borrowing the selected employees. If you are only creating an assignment and not a loan, leave this field blank.
If the Create tab has columns for employee assignments (Schedule Cycle, Shift, etc.), these fields will also appear on the Add form. The PERSON_ASSIGNMENT item in your Security Data Role will also determine which assignments you can create on the Add form. Use these fields to select a setting value if you are creating a new assignment for the selected employees.
If you are creating an employee loan for dates in the past, and the loan includes an assignment, the assignment change may affect the transactions that were already posted on those past dates. You may have to Recalculate the person's timecard.
10. Click Save when you are done.
The new employee loan record cannot overlap an existing employee loan record for the same employee. You will have to delete or modify the current employee loan record first.
If you loaned the employees, they will become members of a DIRECT_MANAGER Employee Group for the borrowing supervisor. If the borrowing supervisor is already a direct manager, the selected employees will be added to the borrowing supervisor's DIRECT_MANAGER group. Otherwise a new DIRECT_MANAGER group will be created for the borrowing supervisor. The employees will be members of this DIRECT_MANAGER group for the date range you specified for the loan.
If you created an assignment for the selected employees, an Override assignment will be created on the Employee Assignment form. The employee loan record will always create an override assignment, even if the employee did not have a default assignment of the same type.
If you created a Schedule Cycle assignment for the selected employees, the new schedule will automatically be generated for each employee.
You can view, modify, and delete the employee loan record on the Maintain tab of the Manage Employee Loan form.
Use the Maintain tab on the Manage Employee Loan form to modify or delete the employee loan records on behalf of a supervisor.
Click Main Menu > Administration > Manage > Manage Employee Loan and click the Maintain tab.
If necessary, click
the ![]() Filter button to display the filter fields.
Filter button to display the filter fields.
In the Manager Num field, select the supervisor on whose behalf you are modifying or deleting the employee loan records.
Select the Loan Effective Date of the employee loan records you want to modify or delete. You can use the other filter fields to narrow your search.
Select a Loan To supervisor to view only the employees who were loaned to a particular supervisor.
Select a Loan Type to view only the employees you have Loaned or the employees that were loaned to you (Borrowed).
Use the Person filter field to search for employees by their First Name, Last Name, Person Number, or Login Name. For example, to find Person Number 1101 named Jane Doe who has Login Name JDOE001, you can enter 1101, Jane, Doe, or JDOE001 in the Person field. You can also use the * or % wildcard symbol in this field to search using partial values. The wildcard symbol can be placed anywhere in your search value to represent unknown characters. For example, to find employees whose First Name, Last Name, Login Name, or Person Number starts with the letter b, enter b* in the Person field. To find employees whose First Name, Last Name, Login Name, or Person Number includes 007, enter *007* in the Person field.
Check Include Cancelled to display employee loan records that have been deleted. The Cancelled column on the Maintain tab will have a check mark for these records.
Click Find.
The employees you supervise that meet the filter criteria will appear in the middle of the form.
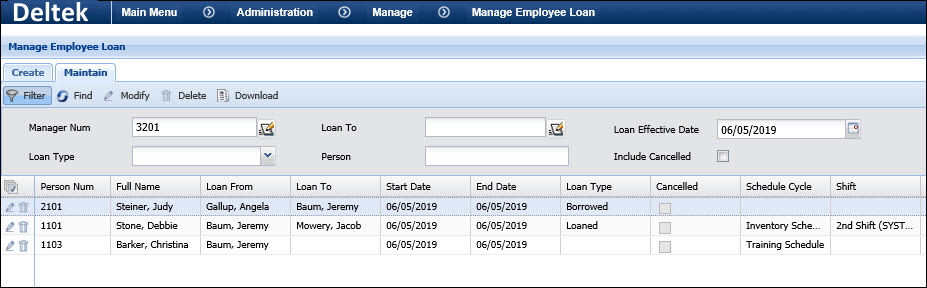
The Loan From and Loan To columns identity the supervisor who loaned the employee (Loan From) and the supervisor who borrowed the employee (Loan To). If the Loan To field is blank, the record is for an assignment only and not a loan.
The Start Date and End Date show the effective dates of the employee loan record.
The Loan Type indicates whether the employee is Loaned or Borrowed. If this field is blank, the record is for an assignment only and not a loan.
The Cancelled box will be checked if the employee loan record has been deleted. You may have to check the Include Cancelled box in the filter to display these records.
If you configured the Maintain tab of the Manage Employee Loan form to display columns for employee assignments, these columns will also appear. The PERSON_ASSIGNMENT item in your Security Data Role will also determine which assignments you can view.
You can select one or more records on the Maintain tab of the Manage Employee Loan form and Modify them.
You can use the Modify button to:
Change the Start Date and End Date of the employee loan record.
If you change the loan dates to dates in the past, and the loan includes an assignment (schedule, shift, pay rate, etc.) the assignment change may affect the transactions that were already posted on those past dates. You may have to Recalculate the person's timecard.
The Start and End Date of an employee loan record cannot overlap an existing employee loan record. If the employee loan record is for an assignment only (the Loan Type is blank), the date can overlap another assignment.
Change the assignment values.
The assignment values you can change will depend on your Form Profile configuration. If your Security Data Role includes the PERSON_ASSIGNMENT item, it will also determine which assignment values you can change.

To modify an assignment value, check the box next to the assignment and select a new value from the drop-down list.
To delete an assignment, check the box next to it and select the blank value from the drop-down list.
Click Save when you are done.
When you return to the Maintain tab, the changes you made will be visible on the form. If you changed the Start or End Date of the record, you may need to change the Loan Effective Date in the filter to view the modified record.
If you modified the Schedule Cycle in the employee loan record, the new schedule will automatically be generated for each employee.
If you modified the employee loan record, the History tab of the Manage Employee Loan form will show the original (now cancelled) loan or assignment record. The modified record will be in the grid of the Maintain tab.
The Assignment tab of the Employee Loan form will show the new assignment values you selected. If you deleted an assignment value from the Modify pop-up form, the assignment record will also be deleted from the Assignment tab of the Manage Employee Loan form.
You can select one or more records on the Maintain tab of the Manage Employee Loan form and Delete them.
When you delete an employee loan record, the Cancelled box will be checked on the Maintain tab.
If you delete an employee loan record that loans an employee to another supervisor, the employee's member record will be deleted from the borrowing supervisor's DIRECT_MANAGER Employee Group.
If you delete an employee loan record that includes an assignment, the assignment will be deleted from the Employee Assignment form. The assignment will still be displayed on the Assignment tab of the Employee Loan form. However, if there is another assignment of the same type in Employee Assignment, then the Override box will be checked on the Employee Loan Assignment tab.
If you delete an employee loan record that has a Schedule Cycle assignment, and the person does not have another Schedule Cycle assignment on those dates, then the Schedule Cycle from the employee loan will remain in effect. The SCHEDULE_GENERATION service will not delete this schedule because the person does not have another assigned schedule to replace it.
The History tab on the Manage Employee Loan form shows the changes that were made to an employee loan record.
Select the Maintain tab on the Manage Employee Loan form.
Use the filter fields to view the appropriate records. When you select a record in the grid, its modification history will appear on the History tab.
The History tab has the same fields as the Maintain tab, with the addition of the Cancel Date and Cancelled By fields. These fields identify the date the record was modified and the person who modified it.
The Assignment tab on the Manage Employee Loan form shows the assignment changes that were made for a specific employee.
This tab will show the assignments that were added with or without an employee being loaned to another supervisor. If you create an employee loan without an assignment, then no records will be included on the Assignment tab.
Assignment Type is the name of the assignment setting (SCHEDULE_CYCLE, SHIFT, etc.).
Assignment Value is the value of the setting (e.g., the name of the schedule or the shift number).
Level Number is assigned automatically when you create a new assignment on the Manage Employee Loan form. It indicates which assignment should be used when assignments have overlapping dates.
Example 1: An employee has a default Shift 1 assignment. On the Manage Employee Loan form, the employee is assigned to Shift 3 for two weeks. The Shift 3 assignment appears on the Assignment tab of the Manage Employee Loan form with Level Number 1. The Shift 3 assignment also appears on the Employee Assignment form with the Override box checked and Level Number 1.
Example 2: The Employee Assignment form shows an employee has a default Shift 1 assignment and a Level 1 Override assignment of Shift 2. On the Manage Employee Loan form, the employee is assigned to Shift 3 for the same time span as the Shift 2 assignment. The Shift 3 assignment appears on the Assignment tab of the Manage Employee Loan form with Level Number 2. The Shift 3 assignment also appears on the Employee Assignment form with the Overriden box checked and Level Number 2.
Overridden indicates that the assignment record has been overridden by another assignment due to a change on the Level Number or assignment value. For example, a person has a default SHIFT assignment of Shift 1. The Manage Employee Loan form assigns the person to Shift 3. The Employee Assignment interface then changes this assignment value to Shift 2. The Assignment tab on the Manage Employee Loan form will still show the Shift 3 assignment but the Overriden box will be checked because there is another shift assignment that takes precedence (Shift 2 in Employee Assignment).