The Lock by Pay Policy tab on the Payroll Lock form is used to lock or unlock timecards for all the employees in a Pay Policy.
When a day is locked, the employee cannot post any additional transactions/punches to the date. If an employee tries to post any transactions to a locked day, the message "This day is payroll locked" will display on the terminal or the web. A supervisor cannot make changes to a locked posting date. However, it may be possible to sign/unsign a payroll locked timecard, depending on the employee's Sign Policy settings.
You can also use the PAYROLL_LOCK service to lock or unlock records for a specific Pay Policy. The PAYROLL_LOCK service can be scheduled to run at different times for different Pay Policies.
Note: The Payroll Lock form will not lock the timecards of Terminated employees.
See Also:
Lock by Pay Policy – Field Descriptions
Using the Lock by Pay Policy Form
Example - Payroll Lock for a Split Day
Pay Policy
Identifies the Pay Policy that will be locked or unlocked.
Use the Pay Policy drop-down field at the top of the form to select a Pay Policy to lock or unlock. The Pay Policy must be in effect for the selected date range; otherwise, it will not appear in the middle of the form.
A person must be assigned a Pay Policy in order to have their timecard locked or unlocked. Note that the Payroll Lock form will not lock the timecards of Terminated employees.
Range Type
Use this field to select the dates in the timecard that will be locked or unlocked. Available options are:
Date Range: Select Date Range to lock or unlock the records from the specified Start Date to the End Date.
Day: Select Day to lock or unlock the records for the specified Posting Date. When you select the Day option, the Split Day field is available. The Split Day field determines which half of a split day in a 9-80 schedule should be locked or unlocked.
Week: Select Week to lock or unlock the records in the pay week that includes the specified Posting Date.
Period: Select Period to lock or unlock the records in the pay period that includes the specified Posting Date.
When you select Week or Period as your Range Type, the pay week or pay period you select may include half of a split day in a 9-80 schedule. The Week and Period options will respect the split day boundaries. For example, a pay week may include a split day from the previous pay week for which the Second Half is part of the pay week you have selected. The form will therefore lock or unlock the Second Half hours on this split day, but not the First Half hours. See Example - Payroll Lock for a Split Day for more information.
Posting Date
If Range Type is set to Day, this field identifies a specific date that will be locked or unlocked.
If Range Type is set to Week, this field is used to determine the pay week that will be locked or unlocked.
If Range Type is set to Period, this field is used to determine the pay period that will be locked or unlocked.
Split Day
This field is only available when you select Day as your Range Type.
Use this field to define which half of a split day should be locked or unlocked.
The Split Day setting will not affect which records you find on the Lock By Pay Policy tab. It will only affect which half of the day is locked or unlocked.
All: Select this option to lock or unlock the entire day. If the day is a split day, both the first and second half will be locked or unlocked. If the day is not a split day, it will be locked or unlocked.
Non Split: Select this option if you only want to lock or unlock a day if it is not a split day. This option may be useful if the Pay Policy has employees with 9-80 schedules and without 9-80 schedules.
First Half: Select this option if you only want to lock or unlock the first half of a split day. If the day is not a split day, then the day will be skipped.
Second Half: Select this option if you only want to lock or unlock the second half of a split day. If the day is not a split day, then the day will be skipped.
First Half and Non Split Day: Select this option if you only want to lock or unlock the first half of a split day or the entire non-split day. If the day is a split day, only the first half will be locked or unlocked. If the day is not a split day, the entire day will be locked or unlocked.
Second Half and Non Split Day: Select this option if you only want to lock or unlock the second half of a split day or the entire non-split day. If the day is a split day, only the second half will be locked or unlocked. If the day is not a split day, the entire day will be locked or unlocked.
Start Date, End Date
When Range Type is set to Date Range, these fields specify the dates that will be locked or unlocked.
Emp Sign Required
Indicates whether the days in the specified range must be signed by the employee in order to be locked.
If you do not check this box, the system will not check the days in the specified range for an employee signature. The system will lock the days regardless of their employee signature.
If you check this box, the system will make sure that all the days in the specified range have an employee signature. If any day does not have an employee signature, then the system will not lock any of the days in the range.
The Emp Sign Required setting will not affect which records you find on the Lock By Pay Policy tab. It will only affect whether the records will be locked or unlocked.
Sup Sign Required
Indicates whether the days in the specified range must be signed by a supervisor in order to be locked.
If you do not check this box, the system will not check the days in the specified range for a supervisor signature. The system will lock the days regardless of their supervisor signature.
If you check this box, the system will make sure that all the days in the specified range have a supervisor signature. If any day does not have a supervisor signature, then the system will not lock any of the days in the range.
The Sup Sign Required setting will not affect which records you find on the Lock By Pay Policy tab. It will only affect whether the records will be locked or unlocked.
Note: The fields below are hidden in the default Form Profile. To view these fields, you will have to enable them in a custom Form Profile and assign this Form Profile to the persons who will be using the Lock by Pay Policy form.
Cancelled By
If the Last Action was Cancelled, this field identifies who cancelled the action.
Cancelled By Timestamp
If the Last Action was Cancelled, this field identifies the date and time when the action was cancelled.
Last Action
Identifies the last action (LOCK or UNLOCK) performed on the Pay Policy from the Lock by Pay Policy form.
Last Action By
Identifies the person who performed the Last Action.
Last Action Status
Indicates the status of the Last Action (Processing, Complete, Error, or Cancelled).
Last Action Time
Date and time when the Last Action occurred.
Payroll Lock
For each Pay Policy, this field displays the number of persons whose records have been locked and the total number of persons in the Pay Policy. For example "90/100" means 90 of the 100 people in the Pay Policy have had their records locked.
Note: Making this field visible may cause the Lock by Pay Policy form to load (display data) more slowly.
Click Main Menu > Payroll > Payroll Lock.
Go to the Lock by Pay Policy tab.
If you want to lock or unlock a specific Pay Policy, select it from the field at the top of the form. Otherwise, leave this field blank.
Select the Range Type for the records you want to lock or unlock.
If you select Week or Period, make sure the Posting Date is a date in the pay period you want to lock or unlock.
If you select Date Range, you also need to enter the Start Date and End Date.
If you select Day, make sure the Posting Date reflects the day you want to lock or unlock.
If you selected Day as your Range Type, you need to select the Split Day option that determines which half of a split day will be locked or unlocked.
If you only want to payroll lock days that have employee and/or supervisor signatures, check the Emp Sign Required and Sup Sign Required boxes.
Click Find.
The records that appear in the middle of the form will be based on the Pay Policy, Range Type, and Posting Date you selected in the filter area. The Pay Policy must be in effect for the specified date range; otherwise, it will not appear in the middle of the form.
Select one or more of the Pay Policies and click Lock or UnLock. An alert message will ask if you are sure you want to perform the action; click OK to continue.
If necessary, click Cancel Action to stop the lock/unlock process.
You can click the Details button to view a list of the employees in a selected Pay Policy.
Select a Pay Policy on the Lock by Pay Policy tab and click Details. A pop-up form will display. For each employee in the Pay Policy, a record will display for each date in the range defined in the Filter area of the form.
Note: If a person assigned to this Pay Policy has an Employment Status of Terminated during the specified date range, that person will not appear on the Details form. You cannot lock the timecard of a Terminated employee.
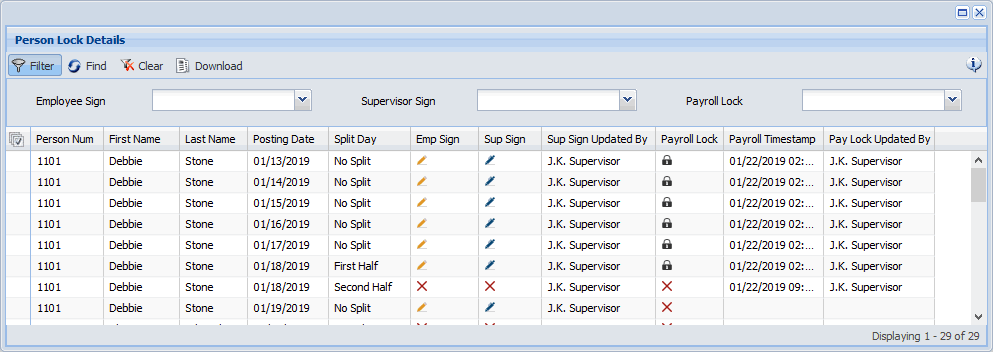
Click the ![]() Filter
button to display the filter fields. You can use the Employee Sign, Supervisor
Sign, and Payroll Lock fields to view specific records in this form.
Filter
button to display the filter fields. You can use the Employee Sign, Supervisor
Sign, and Payroll Lock fields to view specific records in this form.
In the Employee Sign field, select Signed or Unsigned to view only records with or without an employee signature. Leave this field blank to show records that are signed or unsigned by the employee.
In the Supervisor Sign field, select Signed or Unsigned to view only records with or without a supervisor signature. Leave this field blank to show records that are signed or unsigned by the supervisor.
In the Payroll Lock field, select Unlocked to show only unlocked records. Select Locked to show only locked records.
Click Find.
The detail records will display in the middle of the form.
Person Num, First Name, Last Name: Identifies the employee whose record was locked or unlocked.
Posting Date: Date that was locked or unlocked.
Split Day: Indicates whether the payroll locked occurred on the split day of a 9-80 schedule. No Split indicates the day is not a split day. First Half and Second Half indicate whether the lock or unlock action occurred on the first or second half of a split day.
Emp Sign: Displays
a ![]() icon if the day was employee signed,
or an
icon if the day was employee signed,
or an  if the day was not employee signed.
Sup Sign: Displays
a ![]() icon if the day was supervisor
signed, or an if the day was not supervisor signed.
icon if the day was supervisor
signed, or an if the day was not supervisor signed.
Sup Sign Updated By: Identifies the supervisor who signed the day.
Payroll Lock: Displays
a ![]() icon if the day is payroll
locked or an if the day is not locked.
icon if the day is payroll
locked or an if the day is not locked.
Payroll Timestamp: Date and time when the record was locked or unlocked.
Pay Lock Updated By: Identifies the person or service instance that locked or unlocked the record.
Use the Lock button to lock the selected Pay Policies on
the Lock by Pay Policy form. To select a Pay Policy, click it so that
it is highlighted. To select multiple Pay Policies, press the CTRL key
as you click to select them. Click the ![]() icon to select all the Pay Policies on the form. Once the records are
locked, the word LOCK will appear in the Last Action column (if it is
visible on the form).
icon to select all the Pay Policies on the form. Once the records are
locked, the word LOCK will appear in the Last Action column (if it is
visible on the form).
Use the UnLock button to unlock the selected Pay Policies
on the Lock by Pay Policy form. To select a Pay Policy, click it so that
it is highlighted. To select multiple Pay Policies, press the CTRL key
as you click to select them. Click the ![]() icon to select all the Pay Policies on the form. Once the records are
unlocked, the word UNLOCK will appear in the Last Action column (if it
is visible on the form).
icon to select all the Pay Policies on the form. Once the records are
unlocked, the word UNLOCK will appear in the Last Action column (if it
is visible on the form).
Use the Cancel Action button to stop a lock or unlock action that is still processing. Once the action is cancelled, the word Cancelled will appear in the Last Action column (if it is visible on the form).
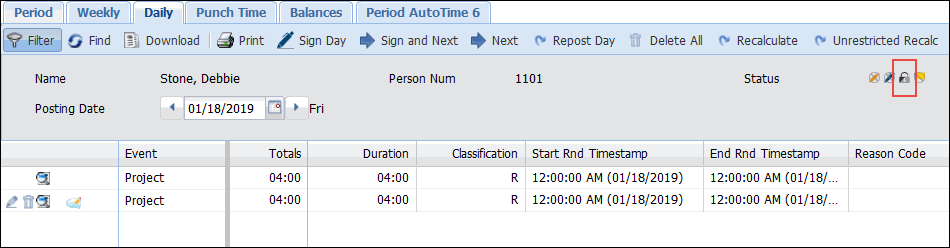
In the following example, the pay period is 1/13 to 1/26. Friday 1/18 is a split day in a 9-80 schedule.

A payroll administrator only wants to lock the first week in this pay period. On the Lock by Pay Policy tab, the administrator selects the appropriate Pay Policy and sets the Range Type to Week. The Posting Date is a day in this pay week.
The administrator clicks Find, selects the Pay Policy in the middle of the form, and clicks Lock.
The timecard now shows that the first pay week in the period is locked. Only the first half of the split day (1/18) is locked.

On the Daily tab for the split day (1/18), the half indicator
icon (![]() ) shows the first half of the split day is payroll
locked.
) shows the first half of the split day is payroll
locked.