The Fiscal Calendar form is used to create calendars that do not have to correspond to a traditional calendar year. For example, your organization may require a report once per twelve months, but does not require that the period reported on constitutes a calendar year (i.e., January through December). A new fiscal year can begin on any date that meets your fiscal reporting requirements.
The Fiscal Calendar name is defined in the Calendar
Name ![]() quick link in the Filter area at the
top of the form. The detail records appear in the middle of the form.
quick link in the Filter area at the
top of the form. The detail records appear in the middle of the form.
Each fiscal calendar may hold multiple fiscal detail records. You can add a week/period or range to a fiscal calendar. When adding a range, the system will automatically break the date range into fiscal weeks/periods. A fiscal week/period does not have to have seven days; it can be of variable length. However, there must be at least four fiscal weeks/periods in a fiscal month. The default length of a fiscal week/period in the application is seven days.
Note that fiscal detail records must follow continuously - you cannot have gaps in a fiscal calendar. For example, you cannot skip dates when adding new records, or delete a fiscal detail record if doing so causes a gap in the calendar.
A Fiscal Calendar can be assigned to a single Employee via the Employee Setting form, to an Employee Group with type POLICY_GROUP or FACILITY via the Employee Group Setting form, or to all users via the System Settings form. An Employee setting overrides an Employee Group setting, which overrides a System Setting. See Settings Precedence for more details.
See Also:
Fiscal Calendar Field Descriptions
Add, Modify, Delete, or Copy a Fiscal Calendar
Add Detail Records to a Fiscal Calendar
Delete a Fiscal Calendar Detail
Calendar Name
Name of the Fiscal Calendar. Defined in the Calendar Name
![]() quick link in the Filter area at the top of the form.
quick link in the Filter area at the top of the form.
Description
Description of the calendar. This field appears when you add or modify a Fiscal Calendar (using the Calendar Name quick link).
Start Date, End Date
Dates when the fiscal record starts and ends.
Fiscal Year
Fiscal year to which this record applies.
Fiscal Month
Fiscal month to which this record applies (may be any number between 1 and 12). By default, the first fiscal detail record you add will be assigned to Fiscal Month 1.
Fiscal Week
Fiscal week to which this record applies (may be any number between 1 and 54). By default, the first fiscal detail record you add will be assigned Fiscal Week 1.
Update Date, Updated By
These fields display when the record was created or updated, and the person who created or updated the record.
Click Main Menu > Administration > Calendar > Fiscal Calendar.
If necessary, click the ![]() Filter button to display the
Calendar Name filter field.
Filter button to display the
Calendar Name filter field.
Select the Fiscal Calendar from the Calendar Name filter field.
You can also click the ![]() quick
link next to the Calendar Name field and select Lookup
from the pop-up menu. Use the pop-up window that appears to select
the Calendar Name and then click OK.
quick
link next to the Calendar Name field and select Lookup
from the pop-up menu. Use the pop-up window that appears to select
the Calendar Name and then click OK.
Use the Start Date, End Date, and Fiscal Year fields in the filter area to narrow your search.
Click Find on the Fiscal Calendar form.
The detail records will appear in the middle of the form.
Use the Calendar Name field to add, modify, copy, or delete a Fiscal Calendar.
Click Main Menu > Administration > Calendar > Fiscal Calendar.
Click the ![]() quick link next to the Calendar Name
field at the top of the form.
quick link next to the Calendar Name
field at the top of the form.
To find a specific Fiscal Calendar, select Lookup from the quick link.
On the pop-up form that appears, select the Fiscal Calendar you want to view and click OK.
To create a new Fiscal Calendar, select Add from the quick link.
On the pop-up form, enter a Calendar Name and Description and then click Save. See Add Detail Records to a Fiscal Calendar to continue.
To modify the Description of a Fiscal Calendar, select Maintain from the quick link.
On the pop-up form, select the Fiscal Calendar and click Modify. Enter a new Description and then click Save.
To duplicate a Fiscal Calendar, select Maintain from the quick link.
On the pop-up form, select the Fiscal Calendar you want to duplicate and click Copy. Enter a new Calendar Name and Description and then click Save.
The duplicate Fiscal Calendar will have the same fiscal details as the original.
To delete a Fiscal Calendar, select Maintain from the quick link.
On the pop-up form, select the Fiscal Calendar and click Delete. Click OK to confirm the action.
Once you have defined your Fiscal Calendar using the Calendar Name quick link, you can add detail records to it using the Add button or the Add Range button.
Click Main Menu > Administration > Calendar > Fiscal Calendar.
Select the Fiscal Calendar from the Calendar Name field and click Find.
Click Add to add a single fiscal detail record.
Select the Start Date, End Date, Fiscal Year, Fiscal Month, and Fiscal Week for this record.
Click Save and Add to save these settings and keep the window open to add more detail records. Click Save to save these settings and close the pop-up window.
Use the Add Range button to add fiscal weeks to the calendar for a specific date range, up to the end of the current Fiscal Year. The weeks will be created automatically based on this range (each week will be seven days long).
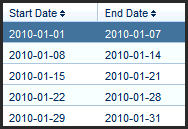
For example, set the Start Date to 2010-01-01 and set the End Date to 2010-01-31. The system will break up the range into five records, where each record is seven days long:
Click Main Menu > Administration > Calendar > Fiscal Calendar.
Select the Calendar Name of the fiscal calendar for which you want to add a range of fiscal weeks.
Click Add Range.
Enter the Start Date and End Date for the range.
Select the Fiscal Year for these weeks.
The Fiscal Month and Fiscal Week you enter will be used to number the months and weeks in the calendar chronologically.
Click Save.
Note: Fiscal detail records must follow continuously - you cannot have gaps in a fiscal calendar. For example, you cannot skip dates when adding new records, or delete a fiscal detail record if doing so causes a gap in the calendar.
Click Main Menu > Administration > Calendar > Fiscal Calendar.
Select the Calendar Name of the Fiscal Calendar with the detail record you want to delete.
Select the record you want to remove and click Delete.
Click OK to confirm the action.