The Broadcast Message form is used to broadcast/send a message to one or more persons. These messages do not require Messaging Rules or Message Definitions. The supervisor composes a message on the Broadcast Message form and selects the persons who will receive the message. The message can be sent to the person’s email address or the person can view the message after logging in to a terminal or the web application.
To receive a broadcast message, the person must be assigned a Message Policy. This Message Policy must include the BROADCAST_MESSAGE trigger. If you want the message to display on a terminal or d web application after login, the Alert on Terminal and/or Alert on Web boxes must be checked in the person's Message Policy.
If you are sending the broadcast message to an email address, you must run the MESSAGE_DELIVERY Service to deliver the message.
All messaging features are outlined in the Messaging topic.
See Also:
Broadcast Message Field Descriptions
In order to receive messages, a person must be assigned a Message Policy.
Click Main
Menu > Manage > Broadcast Message and click the ![]() Filter button to display the
filter fields.
Filter button to display the
filter fields.
To view all the persons you supervise, click Clear to remove any filter values and then click Find.
To view specific persons, use the Employee, Facility, Supervision Type, and Include Direct filter fields to narrow your search. If you have enabled any additional filter fields, you can use these fields as well.
Click Find.
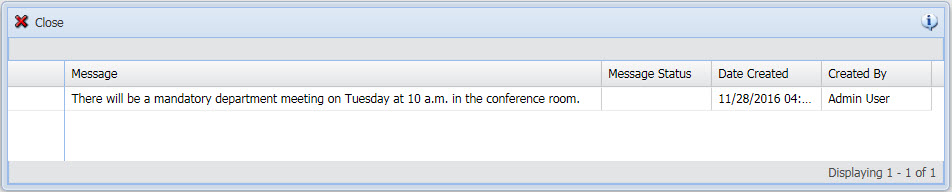
The persons will display in the middle of the Broadcast Message form.
The maximum number of persons that can display is determined by the max_supervisor_records setting in your Application Settings.
Highlight the persons that will
receive the message. Press the CTRL key and click to highlight multiple
persons. Click the  icon to select all the
persons on the form.
icon to select all the
persons on the form.
You can now compose the message by clicking the Create Message button (see below).
Once you have selected the message recipients (see above), click Create Message to compose and send the message. The Create Message pop-up form will display.
Select the Start Date and End Date for the message. Terminal/Web messages will appear on the terminal for each day in this range. Email messages will only be sent once when the MESSAGE_DELIVERY service runs during this date range.
Select the message’s Priority. Priority may be used to determine the order in which messages will appear. The person’s Message Policy must have Use Priority checked.
Check Do Not Purge if you do not want this message to be purged by the PURGE service.
Check Send Terminal/Web if you want the message to display on a client terminal or the web application after login. Note that the Alert on Terminal and/or Alert on Web boxes must also be checked in the person's Message Policy.
Check Send Email to send the message to the person’s Email Address (defined on the Employee form).
The remaining fields comprise the actual message. If the message will be displayed on the terminal/web, only the Message text will display to the person. The other fields pertain to email messages.
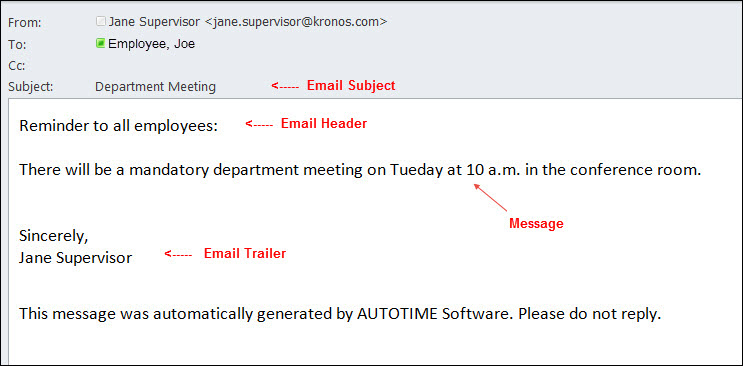
In the Email Subject field, enter the text that will appear in the Subject line of the email. The subject is usually visible in the email application's Inbox.
In the Email Header field, enter the text that will appear as the header line in the body of the email.
Note: The header must contain more than one word or it will not be included in the email.
In the Message field, enter the actual message.
In the Email Trailer field, enter the text that will appear in the trailer line in the body of the email.
Click Send.
If the message was sent to a terminal (Send Terminal/Web is checked on the Broadcast Messages form and Alert on Terminal is checked in the person’s Message Policy), the message will display when the person logs in to the terminal during the Start/End Date range.
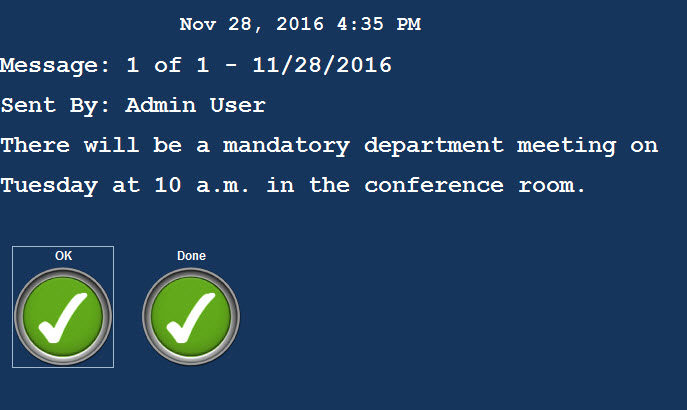
In the Shop Floor Time Web, the message will also display when the person logs in during the Start/End Date range (provided Send Terminal/Web is checked on the Broadcast Messages form and Alert on Web is checked in the person’s Message Policy).
If the message was sent to an email address (Send Email is checked on the Broadcast Messages form), the message will be sent the next time the MESSAGE_DELIVERY Service runs during the Start/End Date range.
Employee
Employee as defined on the Employee form.
In the filter area, use the Employee field to search for employees by their First Name, Last Name, Employee, or Login Name. For example, to find Employee 1101 named Jane Doe who has Login Name JDOE001, you can enter 1101, Jane, Doe, or JDOE001 in the Employee field.
You can also use the * or % wildcard symbol in this field to search using partial values. The wildcard symbol can be placed anywhere in your search value to represent unknown characters. For example, to find employees whose First Name, Last Name, Login Name, or Employee starts with the letter b, enter b* in the Employee field. To find employees whose First Name, Last Name, Login Name, or Employee includes 007, enter *007* in the Employee field.
Rcd Num
Record Number as defined in the Employee form.
First Name, Middle Name, Last Name
Person’s First, Middle, and Last Name as defined in the Employee form.
Start Date, End Date
The dates when the message will be active.
For messages sent to a terminal or the web, the message will display when the person logs in during this date range until the message is read.
For email messages, the MESSAGE_DELIVERY service will send the message when the service runs on a date in this range. The MESSAGE_DELIVERY service will only send the message once. If the MESSAGE_DELIVERY service does not run until after the End Date, the message is considered inactive and the service will not send it.
Priority
Priority may be used to determine the order in which messages will be displayed. The person’s Message Policy must have Use Priority checked.
High: The message will be sent to the receiver before any other messages. If you have several messages with High priority, the message with the oldest Start Date will be sent first.
Medium: Medium priority will be sent after High and before Low.
Low: Low priority is sent after any messages that are set to High/Medium.
Do Not Purge
Check this box if you do not want this message to be purged when the PURGE service runs.
Send Terminal/Web
Check this box if you want the message to display after login on a client terminal or the web application. The Alert on Terminal and/or Alert on Web boxes must also be checked in the person's Message Policy.
Send Email
Check this box if you want the person to receive the broadcast message via email. The person's Email Address is defined o the Employee form.
Email Subject
Text that will appear in the Subject line of the email. Only used when Send Email is checked. The subject is usually visible in the email application's Inbox.
Email Header
Text that will appear as the header line in the email. Only used when Send Email is checked.
Note: The header must contain more than one word or it will not be included in the email.
Message
Actual message content. If the message is being sent to the terminal/web, only the Message text will display to the person. If the message is being sent via email, the Message field is the text that will appear in the body of the email.
Email Trailer
Text that will appear in the trailer line in the email. Only used when Send Email is checked.
Use the ![]() Filter fields on the Broadcast
Message form to narrow the list of persons that can be selected to receive
the message.
Filter fields on the Broadcast
Message form to narrow the list of persons that can be selected to receive
the message.
The Employee, Facility, Supervision Type, and Include Direct fields are enabled by default. The other fields can be added to the form by modifying the Form Profile.
Employee
Use the Employee field to select persons by their first name, last name, or employee.
You can use the * or % wildcard symbol in this field to search using partial values. The wildcard symbol can be placed anywhere in your search value to represent unknown characters. For example, to find persons whose first name, last name, or employee/person number starts with the letter b, enter b*. To find person numbers (or first and last names) that include 007, enter *007*.
Facility
To select only those persons assigned to a specific Facility, select the Facility from this drop-down list.
Use this field to filter the person records by the type of supervisor the person has.
Include Direct
When this box is checked, persons that report directly to the logged in supervisor (are members of an Employee Group of type DIRECT_MANAGER) will be displayed on the form. This box is automatically checked when you select Direct from the Supervision Type field.
Current Status
Use this field to find persons with a particular Employment Status on the current date. The Employment Status is defined in the person’s Employment Profile.
The Current Emp Status options are explained below. Refer to the Employee form for information on how each status affects a person’s use of the application.
Active persons have full use of the program. Active employees can log into the program and post labor. Active supervisors can also review and adjust employee timecards.
Inactive status is typically used for persons that take extended leave time but will eventually return to work. Inactive persons cannot post labor.
Terminated persons cannot use the application because the system does not grant access to terminated persons. A supervisor with the SUPERVISOR_ADMIN item in their Security Data Role can still view timecards for terminated persons.
Classification Type
Use this field to find only hourly, salaried, or non-exempt persons. A person’s Classification Type is defined in their Employment Profile.
HOURLY persons are paid by the hour.
SALARIED persons are paid a salary instead of an hourly rate.
NONEXEMPT refers to persons who are entitled to overtime pay.
Time Entry Type
Use this field to find only employees with a certain Entry Type as defined in their Employment Profile. Time Entry Type defines how employees can post time in the application.
PUNCHED employees post time on the Web or a client terminal using the punch type entry or elapsed type entry method:
EXCEPTION employees do not punch or add elapsed. Instead, employees are clocked in and out each day by the ATTENDANCE service. Exception employees are only required to enter exceptions to the work schedule, such as vacation and sick days.
ELAPSED employees can post time only via the Web application and can only use the elapsed type entry method. With this method, employees enter time after the time has been worked. This is a method typically used by salaried employees.
Employees whose Time Entry Type is NONE cannot post time.
Default Shift
Use this field to find employees who have been assigned particular shift. The available options are defined on the Shift Definition form.
Default Schedule
Use this field to find employees who have been assigned particular schedule. The available options are defined on the Schedule Cycle form.
Home Loc. Type
Select HOME_LOCATION_HR, HOME_LOCATION_FINANCIAL, or HOME_LOCATION_MANUFACTURING.
The Home Loc. Type determines the available Home Locations (see below).
The Home Loc. Type and Home Location fields allow you to filter employees based on the Home Location (HOME_LOCATION_HR, HOME_LOCATION_FINANCIAL, or HOME_LOCATION_MANUFACTURING) in their Employee Assignment.
You must select a Facility in order to select a Home Loc. Type and Home Location. The Facility’s Hierarchy Name and Hierarchy Level settings will determine which Home Locations are available.
Home Location
The Home Loc. Type and Home Location fields allow you to filter employees based on the Home Location (HOME_LOCATION_HR, HOME_LOCATION_FINANCIAL, or HOME_LOCATION_MANUFACTURING) in their Employee Assignment.
The available Home Locations will depend on the Facility and Home Loc. Type you select. For example, if you select HOME_LOCATION_HR as your Home Loc. Type, the available Home Locations will be based on the Facility’s HR Hierarchy Name and HR Hierarchy Level settings. These settings are defined in the Employee Group Setting form.