Auxiliary Hours Rules are used to calculate Auxiliary (Bonus) Hours, which allow employees to earn more hours than they actually work. For example, a second-shift employee may work 6.5 hours and be paid for 8 hours. The employee’s timecard will still show the actual hours worked (6.5 in this example). The Auxiliary Hours will be visible in transaction details and will have a unique pay designator.
Auxiliary Hours are calculated according to the Auxiliary Hours Ruleset assigned to the person’s Pay Policy. The LABOR_ALL_MT service uses this ruleset to calculate Auxiliary Hours.
When you create rules, a combination of operands and operators make up the IF and THEN clauses. The combination of operands and operators must return a Boolean value or be a Boolean expression (True or False) in order for the rules to work. For example, the IS operands will return a Boolean expression (True or False statement) and the GET operands will return a value.
The following is a list of the available operands for the AuxiliaryHoursRuleset.
This operand calculates auxiliary hours over a post date, pay week, or pay period and stores the hours in a particular Auxiliary Duration column.
Parameters:
Multiplier = Decimal amount that will be multiplied by the transaction hours to get the auxiliary hours. For example, if an employee is scheduled to work 8 hours but should be paid for 9 hours, then the multiplier will be 0.125 (8 * 0.125 = 1). Likewise, if an employee is scheduled to work 6.5 hours and will be paid for 8 hours, the multiplier will be 0.230769.
Basis = Indicates whether auxiliary hours will be calculated for a Post Date, Pay Week, or Pay Period. The default value is Post Date. The transaction durations will be summed over the Basis.
Auxiliary Number = Select the number of the Auxiliary Duration column in the trans_action_duration table where you want to store the auxiliary hours. For example, select 1 to use the auxiliary1_pay_designator column. This number will indicate which column in the Transaction Duration form will display the auxiliary hours (Auxiliary 1 Duration, Auxiliary 2 Duration, etc.).
Pay Designator = Enter the Pay Designator to assign to the auxiliary hours. This value will be displayed in the Auxiliary Pay Desg column in the Transaction Duration form based on the Auxiliary Number parameter (Auxiliary 1 Pay Desg, Auxiliary 2 Pay Desg, etc.).
Example:
Employee who works 8 hours during Shift 2 will be paid for 9 hours.
IF:
Is Shift Num( 2 )
THEN:
Add Bonus Hours( 0.125, Post Date, 1, AX1 )
And
Stop Processing( )
During Shift 2, the employee posts time to three different work orders (WO1, WO2, and WO3). The auxiliary hours for all these transactions will display in the Auxiliary Duration 1 column.
First, the employee posts 2.5 hours to WO1. To calculate the auxiliary hours for this transaction, 2.5 is multiplied by the Multiplier in the rule (2.5 hrs. * 0.125 = 0.3). The Auxiliary 1 Duration is now 0.3.
Next, the employee posts 4 hours to WO2. The duration for the day is now 6.5 hours (2.5 + 4.0 = 6.5). The 6.5 hours are multiplied by 0.125 for a total of 0.8. The auxiliary hours from WO1 are then subtracted from this amount (0.8 – 0.3 = 0.5) and this transaction receives 0.5 auxiliary hours. The Auxiliary 1 Duration is now 0.3 (from WO1) + 0.5 (from WO2) = 0.8.
Finally, the employee posts 1.5 hours to WO3. The duration for the day is now 8.0 hours, multiplied by 0.125 = 1.0 auxiliary hours. Subtract the auxiliary hours already received (0.8) and this transaction receives 0.2 hours. The Auxiliary 1 Duration is now 0.3 (from WO1) + 0.5 (from WO2) + 0.2 (from WO3) = 1.0.
Add Bonus Hours All Aux Columns
Like the Add Bonus Hours operand, this operand calculates auxiliary hours over a post date, pay week, or pay period and stores the hours in a particular Auxiliary Duration column. However, this operand calculates the auxiliary hours across all Auxiliary Durations.
Parameters:
Multiplier = Decimal amount that will be multiplied by the transaction hours to get the auxiliary hours.
Basis = Indicates whether auxiliary hours will be calculated for a Post Date, Pay Week, or Pay Period. The default value is Post Date. The transaction durations will be summed over the Basis.
Auxiliary Number = Select the number of the Auxiliary Duration column in the trans_action_duration table where you want to store the auxiliary hours. For example, select 1 to use the auxiliary1_pay_designator column. This number will indicate which column in the Transaction Duration form will display the auxiliary hours (Auxiliary 1 Duration, Auxiliary 2 Duration, etc.).
Pay Designator = Enter the Pay Designator to assign to the auxiliary hours. This value will be displayed in the Auxiliary Pay Desg column in the Transaction Duration form based on the Auxiliary Number parameter (Auxiliary 1 Pay Desg, Auxiliary 2 Pay Desg, etc.).
Example:
IF:
Is Event Name( Meeting (DAY_WORKED) )
THEN:
Add Bonus Hours All Aux Columns( 0.125, Post Date, 2, AX2 )
And
Stop Processing( )
IF:
Is Event Type( Labor ( Project ) )
THEN:
Add Bonus Hours All Aux Columns ( 0.125, Post Date, 1, AX1 )
And
Stop Processing( )
First, the employee posts 2.5 hours to PROJ1. To calculate the auxiliary hours for this transaction, 2.5 is multiplied by the Multiplier in the rule (2.5 hrs. * 0.125 = 0.3). The Auxiliary 1 Duration is now 0.3.
Next, the employee posts 4 hours to PROJ2. The duration for the day is now 6.5 hours (2.5 + 4.0 = 6.5). The 6.5 hours are multiplied by 0.125 for a total of 0.8. The auxiliary hours from PROJ1 are then subtracted from this amount (0.8 – 0.3 = 0.5) and this transaction receives 0.5 auxiliary hours. The Auxiliary 1 Duration is now 0.3 (from PROJ1) + 0.5 (from PROJ2) = 0.8.
Finally, the employee posts 1.5 hours to the Meeting event. For this event, a different rule is used and the auxiliary hours will be stored in Auxiliary Duration 2. The duration for the day is now 8.0 hours, multiplied by 0.125 = 1. The Meeting event has 1 auxiliary hour. However, because this rule calculates the auxiliary hours across all Auxiliary Durations, we must subtract the auxiliary hours from the previous events (0.3 for PROJ1 plus 0.5 for PROJ2 = 0.8) to get the Auxiliary Duration 2 amount. When we subtract 0.8 from 1, the Auxiliary Duration 2 amount is 0.2.
At the end of the day, the employee has 0.8 hours in Auxiliary Duration 1 and 0.2 hours in Auxiliary Duration 2.
Like the Add Bonus Hours operand, this operand calculates auxiliary hours over a post date, pay week, or pay period and stores the hours in a particular Auxiliary Duration column. However, this operand specifies that a maximum number of auxiliary hours can be calculated for the day, week, or period.
Parameters:
Multiplier = Decimal amount that will be multiplied by the transaction hours to get the auxiliary hours. You can use the Multiplier parameter to determine the auxiliary hours based on the duration. For example, if an employee is scheduled to work 8 hours but should be paid for 9 hours, then the multiplier will be 0.125 (8 * 0.125 = 1). Likewise, if an employee is scheduled to work 6.5 hours and will be paid for 8 hours, the multiplier will be 0.230769.
Basis = Indicates whether auxiliary hours will be calculated for a Post Date, Pay Week, or Pay Period. The default value is Post Date. The transaction durations will be summed over the Basis.
Cap = Maximum number of auxiliary hours that can be calculated for the day, week, or period. Once the number of auxiliary hours for the day, week, or period reaches this cap, no more auxiliary hours will be added.
Auxiliary Number = Select the number of the Auxiliary Duration column in the trans_action_duration table where you want to store the auxiliary hours. For example, select 1 to use the auxiliary1_pay_designator column. This number will indicate which column in the Transaction Duration form will display the auxiliary hours (Auxiliary 1 Duration, Auxiliary 2 Duration, etc.).
Pay Designator = Enter the Pay Designator to assign to the auxiliary hours. This value will be displayed in the Auxiliary Pay Desg column in the Transaction Duration form based on the Auxiliary Number parameter (Auxiliary 1 Pay Desg, Auxiliary 2 Pay Desg, etc.).
Example:
An employee is scheduled to work three 11.5 hour days for a total of 34.5 hours. The employee will be paid for 40 hours. To make sure the auxiliary hours do not exceed 5.5, a different multiplier is used depending on the day of the week. In addition, there is a daily cap on auxiliary hours.
IF:
Is Nth Scheduled Day( Pay Week, 3 )
THEN:
Add Bonus Hours With Cap( 0.16521739, Post Date, 1.9, 1, AX1 )
And
Stop Processing( )
IF:
Is Scheduled Day( )
THEN:
Add Bonus Hours With Cap( 0.15652174, Post Date, 1.8, 1, AX1 )
And
Stop Processing( )
For the first two days in the pay week, the employee earns 1.8 auxiliary hours (0.15652174 * 11.5). On the third day, the employee earns 1.9 auxiliary hours (0.16521739 * 11.5). If the employee works more than 11.5 hours on any of these days, the number of auxiliary hours earned will not exceed 1.8 or 1.9.
Add Bonus Hours with Cap All Aux Columns
Like the Add Bonus Hours with Cap operand, this operand specifies that a maximum number of auxiliary hours can be calculated for the day, week, or period. However, this operand calculates the auxiliary hours across all Auxiliary Durations.
Parameters:
Multiplier = Decimal amount that will be multiplied by the transaction hours to get the auxiliary hours. You can use the Multiplier parameter to determine the auxiliary hours based on the duration. For example, if an employee is scheduled to work 8 hours but should be paid for 9 hours, then the multiplier will be 0.125 (8 * 0.125 = 1). Likewise, if an employee is scheduled to work 6.5 hours and will be paid for 8 hours, the multiplier will be 0.230769.
Basis = Indicates whether auxiliary hours will be calculated for a Post Date, Pay Week, or Pay Period. The default value is Post Date. The transaction durations will be summed over the Basis.
Cap = Maximum number of auxiliary hours that can be calculated for the day, week, or period. Once the number of auxiliary hours for the day, week, or period reaches this cap, no more auxiliary hours will be added.
Auxiliary Number = Select the number of the Auxiliary Duration column in the trans_action_duration table where you want to store the auxiliary hours. For example, select 1 to use the auxiliary1_pay_designator column. This number will indicate which column in the Transaction Duration form will display the auxiliary hours (Auxiliary 1 Duration, Auxiliary 2 Duration, etc.).
Pay Designator = Enter the Pay Designator to assign to the auxiliary hours. This value will be displayed in the Auxiliary Pay Desg column in the Transaction Duration form based on the Auxiliary Number parameter (Auxiliary 1 Pay Desg, Auxiliary 2 Pay Desg, etc.).
Example:
In this example, the multiplier for the auxiliary hours is different depending on the day of the week. Regular and Overtime hours go into different Auxiliary Durations, but the auxiliary hours are calculated across all Auxiliary Durations. There is also a daily cap on auxiliary hours. This configuration requires multiple rules.
IF:
Is Nth Scheduled Day( Pay Week, 2 )
And
Is Hours Class( O )
THEN:
Add Bonus Hours With Cap All Aux Columns( 0.16521739, Post Date, 1.9,
2, AX2 )
And
Stop Processing( )
IF:
Is Nth Scheduled Day( Pay Week, 2 )
And
Is Hours Class( R )
THEN:
Add Bonus Hours With Cap All Aux Columns( 0.16521739, Post Date, 1.9,
1, AX1 )
And
Stop Processing( )
IF:
Is Scheduled Day( )
And
Is Hours Class( O )
THEN:
Add Bonus Hours With Cap All Aux Columns( 0.15652174, Post Date, 1.8,
2, AX2 )
And
Stop Processing( )
Is Scheduled Day( )
And
Is Hours Class( R )
THEN:
Add Bonus Hours With Cap All Aux Columns( 0.15652174, Post Date, 1.8,
1, AX1 )
And
Stop Processing( )
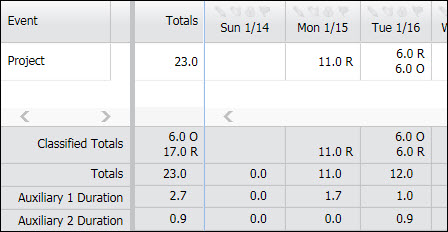
On day 1 of the pay week, the employee posts 11 Regular hours and receives 1.7 hours in Auxiliary Duration 1. The last rule shown above is used.
On day 2, the employee posts 6 Regular and 6 Overtime hours.
The 6 Regular hours receive 1 hour in Auxiliary Duration 1 (the second rule above is used). The rule has a daily cap of 1.9 auxiliary hours, but the cap has not yet been reached.
Next, the 6 Overtime hours are calculated (using the first rule above). The duration for the day is now 12 hours, which yields 2.0 hours for Auxiliary Duration 2. Because the auxiliary hours are being calculated across all Auxiliary Durations, the 1.0 hours in Auxiliary Duration 1 are subtracted from this amount for a total of 1.0 hours in Auxiliary Duration 2. However, there is a cap on the day of 1.9 auxiliary hours. Therefore the 6 Overtime hours only receive 0.9 hours in Auxiliary Duration 2.
Checks to see if there is a value in a particular Auxiliary Duration column in the trans_action_duration table. These table columns are used to store and calculate the Auxiliary Hours. You can also the Not operand with Has Auxiliary Duration to stop the rule from processing if there is already a value in the specified Auxiliary Duration column.
Parameter:
Auxiliary Number = Select the number of the Auxiliary Duration column in the trans_action_duration table that you want to check. For example, select 1 to select the auxiliary1_pay_designator column.
Checks for a specific event by name.
Parameters:
Event Name = Determines which event will be considered by this rule. The available options are defined in the Events form.
Checks for a specific event type.
Parameters:
Event Type = Determines which event type will be considered by this rule. Select Attendance, Labor, Material Move, or Transient Assignment. See Event Type for more information on these options.
Checks if the posted hours classification is the same as the indicated classification.
The Is Hours Class and Is Hours Class Paid operands may be useful if you have different bonus multipliers for different hours classifications. They may also be used to give bonuses to paid time only.
Parameter:
Classification = Indicates which hours classification to check in the transaction.
Checks to see if the transaction’s hours classification is paid. To do so, the operand looks at the coefficient of the hours classification for the transaction. It then matches this record with the Hours Class Group in the person’s Pay Policy. If the coefficient in the detail record for this Hours Class Group is greater than zero, the classification is considered paid.
The Is Hours Class and Is Hours Class Paid operands may be useful if you have different bonus multipliers for different hours classifications. They may also be used to give bonuses to paid time only.
This IF operand checks if the post date is a specific scheduled day number in the pay week or pay period.
Parameters:
Schedule Range = Indicates whether the Pay Period or Pay Week will be checked.
Schedule Day Number = Indicates which day number in the Schedule Range (Pay Week or Pay Period) will be checked.
Example:
An employee has a weekly schedule that begins on Monday and ends on Sunday. The operand Is Nth Scheduled Day( Pay Week, 1 ) will return true for Monday. The operand Is Nth Scheduled Day( Pay Week, 5 ) will return true for Friday.
This IF operand checks if the post date is a scheduled day.
Checks if the posted shift is the same as the indicated shift.
Parameter:
Shift Num = Indicates which shift number to check for in the transaction.
Use this operand to select a value that is the opposite of a specified value.
Parameters:
Value = Enter a value in this field or right-click and choose an operand to calculate this value.
For example, use the operand Not( Is Scheduled Day() ) to require a Gap Day.
This THEN operand will stop processing all rules in the ruleset for the person and post date, even if there are more rules in the ruleset that are sequenced after this rule.
The True operand always returns a value of True. For example, to make sure that a rule is executed in all circumstances, create an IF clause with only the True operand.