Setting up columns

Follow these instructions as part of designing a financial statement.
If you have rows of account information that you want to filter in the same way, you may want to set up a row as a Column Setup row and define the column contents.
You do this by:
- Step 1: Defining a row as a Column Setup row
- Step 2: Defining column contents
- Step 3: Using column filters (optional) - unavailable in ajeraCore unless you have the Departments add-on
- Step 4: Changing column headings and formatting
Ajera enters the data you define in the column of the current row and continues down the column until you define another Column Setup row.
| Note: | You can define columns without using a Column Setup row, but you will have to define each cell in the column individually. |
Step 1: Defining a row as a Column Setup row
- Select a row in the first column of the worksheet. The first column is a work area only and does not print on the statement.
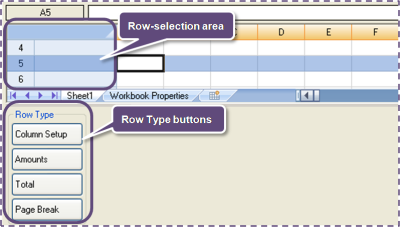
- Click the Column Setup button. The Column Setup and Column Headings rows appear in the worksheet.
Step 2: Defining column contents
- Click a cell in the Column Setup row. The Content List buttons, options, and fields appear.
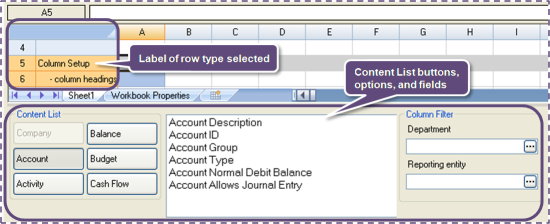
- You can define the contents of the column by either selecting a Content List option or using a formula. For a full list of the options, see Content List options.
To select an option, do the following. Otherwise, proceed to the next step to enter a formula.
|
To display this |
Click this button |
The information comes from |
||
|---|---|---|---|---|
|
Information from the chart of accounts |
Account And double-click an option such as Account Description, Account ID, and so on. |
Company > Financials > Chart of Accounts |
||
|
Account activity for a specific time frame, excluding closing entries |
Activity And double-click an option such as This Month This Year, Last Quarter Last Year, and so on. |
Month-End Date field on the Workbook Properties sheet |
||
|
Account balances at a specific point in time, including all previous closing entries |
Balance And double-click an option such as Current Balance This Year, Retained Earnings Balance Two Years Ago, and so on. |
Month-End Date field on the Workbook Properties sheet |
||
|
Accrual budget amounts for a specific time frame |
Budget And double-click an option such as Budget This Month This Year, January Budget Three Years Ago, and so on. |
Month-End Date field on the Workbook Properties sheet
|
||
|
Credit or debit account activity for a specific time frame |
Cash Flow And double-click an option such as This Month Debit This Year, Year End Credit Four Years Ago, and so on. |
Month-End Date field on the Workbook Properties sheet |
||
|
Activity, balance, or cash-flow information for a time frame or point in time that you specify
|
Custom And double-click a custom date property. |
Custom Date Properties window and the Month-End Date field on the Workbook Properties sheet |
The worksheet displays a label for the Content List option you selected.
Repeat these instructions for the other columns, as needed.
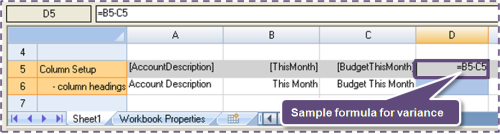
- To define the cell with a formula:
- Enter it into the cell. The formula appears in the worksheet.
Ajera supports common spreadsheet formulas. You can use formulas to define percentages, variances, key ratios, and so forth. In the following example, a formula for variance between Activity This Month (B5) and Budget This Month (C5) is =B5-C5.
- In the Format group of the toolbar, select Currency, Percent, or Number to define the values in the column as currency, percentages, or numbers, as needed.
- Repeat these instructions to define other columns, as needed.
Step 3: Using column filters (optional)
unavailable in ajeraCore unless you have the Departments add-on
- To filter the information in a column for a department or reporting entity, select the column. If you use multi-company, you can also filter by company.
- Click
 in the Department or Reporting Entity field, and select a department
or reporting entity. If you use multi-company, you can also select a company.
in the Department or Reporting Entity field, and select a department
or reporting entity. If you use multi-company, you can also select a company.
| Note: |
By default, the Department List window and Reporting Entity List window
display both active and inactive items but do not indicate the status.
To view the status, click |
 (Customize) and select
the
(Customize) and select
the

- Make sure that the column heading (see next step) indicates the company (multi-company only), department, or reporting entity chosen.
Step 4: Changing column headings and formatting
- Click a cell in the Column Headings row, and change the heading or enter a descriptive new heading.
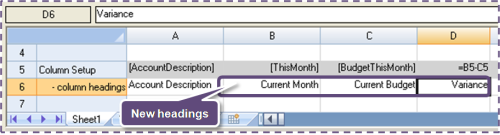
- Use the toolbar to format and align the heading and apply borders. Repeat for the other column headings in that row.
- Resize rows or columns by dragging the row or column edges.
- If you want to add or delete a row or column to the design, right-click a row or column and click Insert or Delete.
- To create a space between columns, insert a blank column.
See also