Features and Enhancements
This topic includes details about the new features and enhancements in WorkBook Release 13.3.
Agents
Agent Type 143 Optimized
Agent Type 143 – Job Teams Clean-Up has been optimized to make it run faster.
Improved Performance of Daily Currency Calculation
The overnight update of currencies has been improved. This avoids a rare issue where currency was not updated correctly.
Overnight General System Maintenance Optimized
The overnight general system maintenance has been optimized, resulting in faster completion, with less chance of timing out.
ConceptShare Integration
ConceptShare Provision Callback Process/Integration
- It simplifies the WorkBook/ConceptShare setup process.
- It automates the WorkBook and ConceptShare callback process, which means that you do not need to do a refresh to apply changes that you made in ConceptShare to WorkBook.
- If you update or remove a ConceptShare link that change is automated via the API.
More details about these improvements are provided in the following.
When the same ConceptShare instance is linked to another WorkBook instance, account callbacks are automatically created in ConceptShare for both WorkBook instances, and both WorkBook instances are subscribed to the same events.
When a WorkBook-ConceptShare integration is set up, account callbacks are automatically added to ConceptShare so that the changes that users make to reviews directly in ConceptShare are displayed in real time in WorkBook. In addition, when users edit or delete reviews, those changes are automatically shown in ConceptShare.
When you update or remove the ConceptShare-WorkBook link (via WorkBook > Settings > ConceptShare Settings) while you are logged in to ConceptShare as a user who can manage callbacks, and callbacks to your WorkBook instance were automatically created in ConceptShare, those callbacks are deleted.
Job-Level Reviews are Redesigned
Job-level reviews have been redesigned to bring more information from ConceptShare into WorkBook, following ConceptShare's introduction of Review Chains. Previously, you could view, create, edit, and delete reviews in WorkBook.
- View comments on a review
- View asset and review details
- See who is in a review
- Search the Reviews grid
When you navigate to Jobs > Jobs List > Reviews and log in to WorkBook ConceptShare, the Reviews Grid displays all reviews. You can select a review on the Reviews grid and view more detail about the review and/or update the review using the tabs that the new Review Details side panel at the right side of the grid provides.
The following additions and changes also support these functions.
When you access the Review Grid, the redesigned toolbar includes icons, symbols, and color coding that enable you to access and interact with review information.

- 1 –
 – Add New Review – Opens the Review Builder so that you can create a review.
- 2 –
– Edit Current Review – Opens the Review Builder with the selected review's settings/configuration loaded.
- 3 –
 – View Current Review – Opens the Proofing Workspace with the selected review loaded.
- 4 –
 – Delete Review – Displays a confirmation dialog box asking if you want to delete the selected review. Note that you can only delete the last review in the review chain, if it belongs to a review chain.
- 5 –
 – Toggle Review Details – Displays or hides the Review Details side panel.
- 6 –
 – You Are Logged In [Company Name] – Log On/Log Off ConceptShare (at the right side of the toolbar) – Displays a dialog box that enables you to log in or out of ConceptShare.
- 7 – Color Bar – Review status color, which comes from ConceptShare.
- 8 – Review chain icon and color – The icon indicates that the review is part of a review chain. The color indicates all of the reviews that are part of the same review chain. The color is specified in WorkBook.
- 9 – Asset Thumbnails – You can load assets in WorkBook and/or ConceptShare.
- 10 – Review Status – Drop-down list whose options you can select: Not Started, In Progress, Completed.
- 11 – Review Info Side Panel – Provides tabs where you can interact with a review that you select in the Review Grid: Review Details tab, Comments tab, and Review Chains tab. The tabs also display additional information such as the review status, user name, user's avatar, and user's role.
- Its name
- Status
- Instructions
- Due date
- Start rule
- Auto-approve rule
- Tags to be set when the review is complete
- Thumbnails of the assets in the review
- Information about each review participant: name, avatar, review role, indicator of the status of their review action (no action, action pending, action completed), and number of comments they posted in the review
This tab displays all of the reviews within the review chain that correspond to the review that you selected in the Reviews Grid. Each review in the chain is displayed on a review card; the card for the selected review is highlighted. Review cards are displayed in the order that represents the review chain sequence, with the first review in the chain at the top. You can click through the review cards to select a review to see its information, which is the same information as listed for the Review Info tab.
 – Launch Review
 – Edit
 – Minimize Panel
Note: If you have highlighted a review in the Reviews Grid that is not part of a review chain, it still is displayed in the Review Chains tab.
- Comment text
- Thumbnail of the marked-up asset
- Date stamp that shows when the comment was posted
- Avatar and name of the person who posted the comment
- Number of replies made on the comment
- Comment flag, if there is one
Comments are searchable.
Task-Level Reviews Available for Basic Users and Advanced Users
If you are a Basic or Advanced User you now have access to task-level review functionality via Task Card > Reviews – ConceptShare. A new Reviews – ConceptShare icon within the Task Card enables you to access and log in to ConceptShare to create, view, and edit review details on the Task Settings pane.
Tip: On the ConceptShare side, the Account Role Permits Third-Party Integration setting must be set to Yes.
In addition, if Automatically Grant Access to New Pages is selected, Basic Users should have access to the Reviews – ConceptShare pages under the Task Card by default.
If this is not the case, you must manually grant access to the group Reviews – ConceptShare under the Tasks Group for each access role. See the Deltek WorkBook Integration Guide for ConceptShare for more details.
Dashboards
Business Intelligence Widget Added in Dashboards Module
You can now add a business intelligence widget on a WorkBook dashboard using the new Intelligence Widget option on the Add a Widget context menu. The intelligence widget is an iFrame. It is a full-screen widget in which you can present various business intelligence displays.
Tip: This business intelligence widget functionality is not part of—and is different from—WorkBook Intelligence dashboards.
If you are the owner you can change the default title from Intelligence Widget. Owners can also set and view the associated URL parameter and close the widget. Non-owners cannot do these things.
Users can reload the intelligence widget using a soft refresh button within WorkBook or by using the widget's reload button.
Dashboard Widget Close Confirmation
If you manually close a widget in the dashboard stage in Dashboards > My Dashboards by clicking the Close button, a dialog box asks you to confirm that you want to close the widget.
Finance & Administration
Changes to System and Company Variables to Enable Company-Level Control of Some Finance Settings
The following enhancements and changes have been made to improve the posting configuration process and make posting configuration easier to use.
System Variable 971 (Job Adjustment Method) has been converted to Company Variable 75, which has the same name. This enables you to manage this setting at a Company level, rather than at the system level.
- 1 – Balance Sheet Method
- 2 – P/L Method
- 3 – P/L Method including PQ Line Level
Company Variable 75 also has the same default value, 1 – Balance Sheet Method.
System Variable 97 is no longer active.
Company Variable 75 Added to Copy Finance Settings when Creating a Company and Copying Finance Settings
Company Variable 75 (Job Adjustment Method) has been added to replace System Variable 971.
When you create a Company and select another Company in the Copy Financial Settings from Company field, WorkBook copies the value of Company Variable 75 to the newly created Company.
When you create a Company without selecting another Company in the Copy Financial Settings from Company field, WorkBook applies the default value of Company Variable 75 to the newly created Company. The default value of Company Variable 75 is 1 – Balance Sheet Method.
- 1 – Balance Sheet Method
- 2 – P/L Method
- 3 – P/L Method including PQ Line Level
Company Variable 75 Description Explains Function of its Options
In WorkBook, the description of new Company Variable 75 (Job Adjustment Method) provides the following information about how to use the options that you can choose from its drop-down list.
- Balance Sheet method assumes that the balance of Work in Progress (WIP) is used to determine the value of the adjustment
- P/L method assumes that the value of revenue to be recognized in the P/L is used to determine the value of the adjustment
- P/L method including PQ line level allows a revenue adjustment to be made to the P/L using Price Quote lines as the means of calculating the value of the adjustment
The default value is 1 – Balance Sheet Method.
Automatic WIP Adjustments and New Company Variable 75
When you run the Automatic WIP Adjustment agent (Agent Type 141), automatic adjustments are made on jobs in Companies that have the new Company Variable 75 (Job Adjustment Method) set to option 1 - Balance Sheet Method.
Debtor Invoice Filter – Updated Icon
The Client icon on the Debtor Invoice filter has been updated to the
 icon to be consistent with the analogous icon that is used on the Resource filter.
Creditors – Improved Creditor Voucher Approval Data Load
- Finance & Administration – Creditor Invoices
- Tasks – Creditor Invoice Approval
Previously, for these pages WorkBook loaded data that was not used or required, which could cause a crash.
Databoards – Databoard 1098 (US 1099-NEC) is Now Available
As of the 2023 calendar year, support for US 1099 reporting is no longer provided directly within WorkBook through reports. US 1099 reporting is instead supported through data export and use of 1099 PRO, third-party software.
You can now select Databoard 1098 – US 1099-NEC in Databoards. The data export format matches the criteria required by 1099 PRO.
For more information about 1099 PRO, see https://www.1099pro.com/.
Debtors – Email Statement of Accounts
Finance Users need the ability to generate multiple emails with an attached selected debtors statement/transaction report to send to selected debtors, without having to wait for the process to complete. This batch processing functionality has been implemented to make this workflow more efficient.
Create Email Statement of Accounts via New Button
You can now create email drafts of Statement of Account reports 223 (Statement of Accounts (Open Items)), 225 (Statement of Accounts (Transactions)), and 522 (Statement of Accounts (Transactions Currency)).
When you click on the Send Statement of Accounts Reports button located on the header of the Debtor List view, the Email Statement of Accounts Reports dialog box opens so that you can specify the required information. When you click OK, WorkBook generates a draft email with report(s) attached and sends it to the Email Draft menu on the application header, where you can update, send, or delete the email.
Finance Budget Page – New Label Clarifies How Budget Handles Credits and Debits
The Finance Budget page now displays a label that says Positive Numbers are Debit, Negative Numbers are Credit, to clarify how the budget handles credits and debits as positive and negative numbers.
General Ledger – Finance Account Subtypes Expansion
- Only Operating Accounts can be set as Revenue.
- Only Balance Sheet accounts can be set as Assets.
Additional information is provided in the following.
Finance Account Subtypes – Add, Edit, and Delete those that are not Predefined for Operating and Balance Sheet Accounts
If you are an Admin or Advanced User, and you have access to Settings > Finance > Finance Account Subtypes, you can now add, edit, and delete Finance account subtypes that are not predefined for Operating and Balance Sheet accounts. However, you still cannot add, edit, or delete predefined account subtypes; they are hardcoded.
- When you add an account subtype that is not predefined, the Account Subtype Name field allows up to 256 characters. It cannot contain null, “, or “ ” values.
- When you edit an account subtype that is not predefined, the Account Subtype Name field allows up to 256 characters. It cannot contain null, “, or “ ” values. In addition, you cannot change the parent account type if the account subtype is already used in any Financial account.
- When you delete an account subtype that is not predefined, you cannot delete the account subtype if it is already used in any Financial account.
Subaccounts Drop-Down List Added to Chart of Accounts Sidebar
When the Account Type is Operating Account or Balance Sheet Account, the Account Subtype drop-down list is available on the Chart of Accounts sidebar. The Account Subtype field has no default value upon deployment, and it is not mandatory. The content of the Account Subtype drop-down list is filtered by Account Type and Company ID. If you change the Account Type, that clears the Account Subtype. You can also clear the Account Subtype field manually.
If the Account Type is neither Operating Account nor Balance Sheet Account, the Account Subtype drop-down list is not visible.
General Ledger – Chart of Accounts – Controlling Access to Create New Account Button
- Create New Account button
- Delete Account button
- Setup > All Settings grid
- Settings sidebar
You enable this access by going to Settings > Employee Settings > Employee Cross-Company Access and selecting the checkbox in the Allow Access to Settings column.
If your access is revoked, the Create New Account and Delete Account buttons on the Chart of Accounts List tab are not displayed, and the Setup > All Settings grid and Settings sidebar are read-only.
If you have been given access, you can create accounts and delete accounts on the Chart of Accounts List tab, and you can change values on the Setup > All Settings grid and the Settings sidebar.
General
Default Page After Error and Restart
When a system error occurs, and you are forced to restart WorkBook, the page that you are returned to defaults to the Tasks > To-Do > Tasks page.
Email Import – Microsoft Exchange Deprecates Basic Authentication
Microsoft Exchange Basic Authentication has been deprecated. As a result, if you are using WorkBook version 12.2 and Office365, you can no longer import emails. The following changes and enhancements have been implemented to resolve this issue.
The third-party software that WorkBook uses for email handling (Mailbee) has been updated.
- A Sign-In with Microsoft button has been added to My Settings > Email Import Settings.
- New agents using the OAuth 2.0 mail import configuration have been added:
- Ticket Import Public Agent (OAuth 2.0) - Agent Type 180
- Mail Import Agent (OAuth 2.0) - Agent Type 178
- Mail Import Public Agent (OAuth 2.0) - Agent Type 176
- Mail Archive Agent (OAuth 2.0) - Agent Type 179
- The Connected to OAuth 2.0 column has been added to the grid at Settings > Advanced Tools > Employee Email Sync. Use this column to track users who are connected and actively working in OAuth 2.0.
Faster Login to WorkBook
The process of logging in to WorkBook is now faster.
Overnight System Maintenance is Improved
The performance of the overnight system maintenance has been improved.
HTML Sanitizer Version is Updated
HTML Sanitizer has been updated from version 3.3.142 to version 7.1.512.
Improved Handling of Voucher Attachment File Uploads to Storage Provider
When you try to upload a file as an attachment to a voucher, WorkBook checks its type against the list of file types (file extensions) that is specified as the value of System Variable 1034, File Extensions Allowed when Uploading a File to a Voucher.
If a file's type is not one of the types that System Variable 1034 specifies, WorkBook blocks the upload and displays the following error message: The file type that you are trying to upload is not allowed. Please check System Variable 1034 for the allowed file extensions.
System Variable 1034 permits the following file types by default: .png, .jpg, .jpeg, .txt, .htm, .html.
Your System Administrator(s) might have specified a different set of valid file types in System Variable 1034.
Improved Performance of Drop-Down Lists Throughout WorkBook
- CRM - Pipelines – Sidebar – Pipeline Dimensions
- Finance & Administration – Assets – Sidebar – Asset Dimensions
- Jobs – Job Properties Sidebar – Job Dimension Settings
- Settings – Subscription Billing – Dimensions (Tab)
A number of new indexes have been added to database tables to improve the performance of several queries.
iOS Push Notifications Now Available
Push notifications are now available on iOS. If WorkBook is closed (in the background), and you receive a message, a notification from the sender and the first lines of the message are shown as a native notification on your phone.
Note: You must be using WorkBook 13.1 or newer to use this feature.
Login – Deferred Loading Google Maps API until It is Needed, Instead of Loading it on Login Screen
The Google Lookup entry field on the Create Client page has been set to beta status.
Performance of Notifications Improved
The performance of notifications has been improved, with the result that any request that uses notifications now has an improved completion time.
Proof HQ Page Removed
The Proof HQ page has been removed from the job and task sidebars. In addition, the Proof HQ settings have been removed from the Settings module (Settings > Global System Settings > Proof HQ).
Quick Menu – Search Jobs Tab is Rewritten
The Jobs tab that you access via the Quick Menu Search icon > Search Jobs > Jobs (Tab) has been rewritten to Vue. It maintains all of its previous features and functions.
Sarbanes-Oxley Act References have been Removed from WorkBook
The Sarbanes-Oxley Act (SOX Act) is a US Federal law that introduced new and/or expanded requirements for the regulation of corporate governance and financial practices for public companies. This law was created to help protect shareholders, employees, and the public from accounting errors and fraudulent financial practices.
These practices and requirements are US-specific and are related to users and how they (and their organizations) use software, rather than to the software itself. WorkBook is not required to be SOX-compliant. Rather, it enables users to configure their environments such that their processes are SOX-compliant.
All references to SOX and Sarbanes-Oxley have been removed from WorkBook so that there is no confusion or possible misinterpretation that would lead anyone to infer that WorkBook is SOX-compliant.
The SOX-Related System Variables category has been removed from Settings > Global System Settings > System Variables and is no longer displayed in the user interface if you search manually.
Because the SOX-Related Variables category has been removed from Settings > Global System Settings ” System Variables, all of its System Variables are now redistributed to their designated categories.
WorkBook Initialization is Improved
WorkBook's initial loading screen has been optimized, lowering the time that is required to enter the application.
Inbox
Caching Enhances Overall System Performance
Company Variables, System Variables, user settings, and user-translated messages are now cached on the server side. This means that if WorkBook must read the actual value of one of these objects, it is only required to fetch the value from the database once. This should have a positive impact on performance.
Clean Up Conversation List Button Added to Inbox Toolbar
The
 Clean Up Conversation List button has been added at the right side of the Inbox conversation list toolbar. When you click this button, the Clean Up Conversation List dialog box prompts you to select the type(s) of conversations that you want to remove from your Inbox:
- Tasks where I'm done
- All done tasks
- Tickets where I'm done
- Closed tickets
- Latest comment by me
- Latest comment before
The last option provides a calendar so that you can select a date.
You can select multiple options.
Click OK to remove the selected types of conversations.
Query that Loads the Inbox is Optimized
The query that loads the Inbox no longer loads data that it does not use, which improves the speed of loading the conversation Inbox list. The unused field One2OneLatestComment was removed, which also means that less data is loaded, resulting in increased speed of loading.
In addition, the HasAttachment field now shows the correct value that is returned; previously, only one value was returned.
Jobs
Change to FollowUpPriceQuoteApprove API Approval Logic
Users must now have Extended Access to price quote approval status approved externally to be able to set Price Quotes as externally approved when using the Follow-up Price Quote Approve API.
Change to JobPriceApproveRequest API Approval Logic
Users must now have Extended Access to price quote approval status approved externally to be able to set Price Quotes as externally approved when using the Job Price Approve Request API.
Costing Code and its Description Displayed in Additional Places
- For jobs-related information:
- Simplified Jobs List
- Jobs List
- Job Creation Dialog
- For tasks-related information:
- Tasks grid on the Tasks page
Job Filter – Updated Icons
The following icons on the Job filter have been updated to be consistent with the analogous icons that are used on the Resource filter:
- – Client (under the Client & Groups field
 – Company (under the Properties field)
Note: The Client icon on the Debtor Invoice filter (In the Finance & Administration module) has also been updated to the
icon.
Job Lists View – Set Simplified Jobs List as Default
When you log in to WorkBook, and you open the Jobs List in the Jobs module, it now defaults to the Simplified Jobs List view.
This is based on browser session, so when you select a different view and move to other pages or modules, switching back to the Jobs List shows the last view that you selected. However, if you log out and then log back in to WorkBook, it defaults to the Simplified Jobs List view once again.
Job Lists Views – Out-of-Sync Indicator Added to Job List Grids
In all Job List views—except for Gantt View (6)—when a job that is displayed in the grid becomes outdated, its row is not immediately reloaded. Instead, a Refresh icon appears in the leftmost column of that job's row to indicate that the job is out of sync. Click the Refresh icon to refresh the grid and update outdated row(s).
JobCopyPlan Procedure has been Optimized
The JobCopyPlan procedure has been optimized, which has enhanced its performance.
JobCreateRequest Procedure has been Optimized
The JobCreateRequest procedure has been optimized with code improvements and for heavy application load scenarios. The procedure is now more stable during heavy application use.
Price Quote (PQ) – Ability to Limit Access to Approval from Status-40 to Status-50 via Extended Access
You can now restrict external approval of PQs to specific user groups, using extended access. This enables you to ensure that internal regulations are complied with. Your established approval flow still directs the formal PQ approval process from Status-10 to Status-40. However, using this enhanced functionality, only those users with extended access can move approval of a PQ from Status-40 to Status-50.
You can manage this at the Company level, using the new Company Variable 76 (Price Quote Approve Button Sets Status: Internally/Externally Approved), which replaces System Variable 252.
Price Quote (PQ) – Header – Approve PQ Button Behavior when PQ Reaches Status-50
The Approve Price Quote button is now disabled if a PQ has reached Status-50 (Approved Externally).
To be able to set a PQ as externally approved when using the Approve Price Quote button and Approval Status selector, users must have Full Access on the Extended Access of the pricequote.approvalstatus.approvedexternally element.
Price Quote (PQ) – PQ Copy no longer Loads too much Data
When you create a PQ using the Create a PQ from Another Job copy method, the runtime performance of the dialog box is no longer affected by an excessive API request that loaded too much data.
Tasks – Department Column Added to Booking Subgrid
The Department column has been added to the Booking subgrid at Jobs > Tasks > Booking subgrid > Matrix View.
Tasks – Gantt Report Export – Improved Security when Exporting Gantt Data
Exporting data from the Gantt pages no longer sends unnecessary data to the remote server for generating PDF files; this now complies with GDPR. For the same reason, you can no longer export data from the default calendar synchronization job. (See System Variable 295, Calendar Synchronization Default Job for Imported Calendar Items. When the calendar synchronization is active. WorkBook will import calendar entries and add these as tasks to the job you assign in this variable.)
MediaForce Integration
MediaForce Renamed to GaleForceMedia
The name MediaForce has been changed to GaleForceMedia throughout WorkBook because the name of the product that is integrated with WorkBook was changed to GaleForceMedia.
Note: In future Release Notes the category MediaForce Integration will be replaced by GaleForceMedia Integration.
My Settings
Google Sign-In JavaScript Library is Migrated to New Google Identity Services Software Development Kit (SDK)
WorkBook has migrated the Google Sign-In JavaScript Library to the new Google Identity Services SDK. This affects the area and function of My Settings > Calendar Synchronization Settings > Calendar Connection Settings > Calendar Client.
Grid Settings – Box Around Cell Selection – Improved Contrasting Color
When you select the Box Around Cell Selection checkbox in My Settings > Grid Settings, WorkBook now uses a more contrasting color to indicate cell selection. This makes it easier for you to locate the selected cell(s).
Notifications
Absence Entry Notifications Appear in Inbox after Approval, Cancellation, or Deletion
When an absence entry is approved, cancelled, or deleted, the absence entry notification for the manager, timesheet manager, and traffic manager appears in the Inbox.
User Notification for Large Job List Data Loads
You can sometimes trigger large data loads inadvertently when you move from one Job List to another, using a filter that loads a large number of jobs. Before Release 13.3, when this happened, you did not have the opportunity to adjust the filter before you were committed to waiting for that large number of jobs to load.
Now WorkBook warns you before starting to perform the load, so that you can decide whether to continue or to adjust the filter to identify a smaller result set to load.
You can set a threshold value for how many jobs users can try to load into certain Job List views before WorkBook warns them that they are about to load a large number of jobs, which can impact performance. This is true whether a user is accessing the Job List view initially or is changing filter criteria such that the resulting number of jobs is very high.
When that threshold is met or exceeded, a dialog box displays the following message:
You are about to load a very large number of jobs.
This can take a long time and degrade system performance. Recommended best practice is to further filter the list of jobs to reduce the number.
Users can click Adjust Filter to reduce the number of jobs or click Continue to load the large number of jobs anyway. Closing the notification dialog box is the equivalent of clicking Continue: WorkBook proceeds to load the large number of jobs.
You set the threshold for the number of jobs as the value of System Variable 1189.
- Jobs List (1)
- Status Report (2)
- Expenditure Overview Cost Prices (3)
- Expenditure Overview Sales Price (4)
- Jobs List with Dimension Settings (13)
- Expenditure Overview Cost and Sale (17)
Use System Variable 1189 (Prompt User to Narrow a Page's Filter When More than the Following Number of Items are being Loaded) to set the threshold value for how many jobs users can try to load before WorkBook displays a notification that they are about to load a large number of jobs.
When the number of jobs triggers this warning, the message described in Large Job List Data Load Notification Message is displayed.
- Click Adjust Filter and then narrow the job filter to reduce the number of jobs.
- Click Continue to load the large number of jobs anyway.
- Close the notification dialog box, which has the same effect as clicking Continue.
If you set System Variable 1189 to 0 (zero), the notification dialog box is not displayed.
The default value is 0.
- Jobs List (1)
- Status Report (2)
- Expenditure Overview Cost Prices (3)
- Expenditure Overview Sales Price (4)
- Jobs List with Dimension Settings (13)
- Expenditure Overview Cost and Sale (17)
Resources
Anonymized Employees' Names do not Appear in Background Tasks List
When you have anonymized employees, background tasks no longer show the employees' names.
Job Statistics Performance Improvement
When you navigate to the Job Statistics tab on a Resource card the Time Used vs. Time Booking graph now displays correct numbers based on hours spent and hours booked.
Scheduling
Calendar Views – New Dialog Box with Task and Job Information
A new dialog box that displays task and job information has been added to the following views: Scheduling Calendar, Timeline Calendar, and Personal Calendar. You open this dialog box by single-clicking on a booking.
Costing Codes – Extended Visibility of Costing Codes
The Costing Code column has been added to the following grids:
- Scheduling > Task Matrix
- Scheduling > Weekly Schedule > Booking Details subgrid (Task Grid View)
- Scheduling > Task List
- Tasks > To-Do > Tasks > Grid View
- Tasks > To-Do > Tasks > Week View
Scheduling – Group Scheduling Resources (GSR) – Booking Empty GSRs is Allowed
You can now book empty group scheduling resources if new Company Variable 78 (When Enabled, Allows Booking of Hours Against an Empty GSR) is enabled.
Scheduling – Job Scheduling – Basic User Access to Scrum Board
Basic Users can now access the Scrum Board under Scheduling and under Job Scheduling.
Tasks – Enhanced Task Settings Copy Functionality
Previously, you could only create multiple tasks simultaneously by using an automated process, such as copying from a Price Quote (PQ) to a schedule. However, using such a method, you could not apply settings to the tasks as you created them; you had to add settings individually later.
You can now copy task-level settings from one task to one or more selected tasks in the same job.
You access this functionality from the Task Basic Settings hamburger menu.
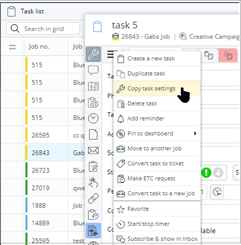
When you select Copy Task Settings on the Task Basic Settings hamburger menu, the Copy Task Settings dialog box is displayed, where you can select the settings that you want to copy and the tasks to which you want to copy them. Alternatively, you can select the Select All checkbox to copy the settings to all tasks that are listed in the Copy Task Settings dialog box.
Task Matrix – Allow Approvers to Approve Status-20 Bookings in Task Matrix
You can now approve bookings that were sent for approval (Status-20) directly from the Task Matrix view
Task Matrix – Percentage Display Option
The ability to view bookings data in additional scheduling views beyond the Weekly view was a requirement for supporting resource planning by percentage. This assists those who are moving away from resourcing in hours.
Using percentages also provides better data insights such as resource bookings across clients. It provides a quick overview of Utilized Capacity by percentage.
To enable this functionality, the Percentage Display Option has been added to the Task Matrix in the Task Total, Period Total, and Calendar cells. These options are read-only and are now available in the Day and Month views, as well as the Weekly view.
Toggle Booking Colors – Calendar and Timeline Calendar
- Use Client Colors – Display bookings in the color assigned to the client.
- Use Task Colors – Display bookings in the relevant standard task color.
If you choose one of these color options and then navigate away from the Calendar or Timeline Calendar view, the last option that you chose is still in effect when you return to that view.
Settings
Added Ability to Mark Departments as Inactive
Previously, you could delete a department if no employee resources were allocated against it, or you could merge departments. Merging departments moves allocated resources from one to another. Deleting and merging departments are not always appropriate options because of the possible impact on historical data, including complete and closed jobs. Now you can set a department to inactive, which enables you to retain historical data, and which removes the inactive department from field option lists so that it can no longer be selected.
When departments have been set to inactive, visual indicators make that status clear.
The impact of the ability to set a department to inactive status is widespread, as described in the following.
When you view Activity department settings at Settings > Activities, inactive departments are hidden from view. When you select the Show Inactive Departments checkbox, inactive departments are displayed in the grid, and their header text is shown in red and enclosed in parentheses.
When you open a client card, resource information is displayed. When you have marked a department as inactive (via Settings > Company Settings > Departments > Active column), that department no longer appears in the drop-down list of values in the Department field in New Job Settings > Client Defaults.
In the Client Resource Information and Resource card, inactive departments are removed as an option from drop-down list fields or cells so that only relevant data is displayed.
If you are an Admin User or Advanced User with access to Settings, you can now mark departments as inactive, or reset them to active. Navigate to Settings > Company Settings > Departments, where a new Active column has been added. The Active column contains a checkbox for each Company row. Select the checkbox for a Company (or set of Companies) to set the Company(ies) to active, or clear the checkbox to set the Company(ies) to inactive.
In Settings > Company Settings > Departments, all inactive departments are removed from the options in the Merge Department drop-down list and thus are not available for selection.
When you clear the checkbox in the Active column to set a department to inactive, a dialog box prompts you to confirm that you want to change the department's status to inactive. Click Yes to mark the department as inactive; otherwise, click No to cancel.
To mark a department as active, select the checkbox in the Active column in that department's row in the Departments grid.
In the Company Resource Information and Resource card, inactive departments are removed as an option from drop-down list fields or cells so that only relevant data is displayed.
When a department is marked as inactive at Settings > Company Settings > Departments > the Active column, that department no longer appears in the drop-down list in the Price Quote Approval – Department Dimension Details in Settings > Company Approval.
In addition, when you view a PQ approval role, and that role has an inactive department selected in the Dimension Value column, that department is shown in red and enclosed in parentheses.
In Pipelines > Pipelines Grid > the Department column and Prospect card, in the Department field, names of inactive departments are shown in red and enclosed in parentheses.
On the Settings > Dimensions > Dimension Detail Role Setup > Department grid view, when a department that is displayed or selected is inactive, it is shown in red and enclosed in parentheses.
When you have marked a department as inactive (via Settings > Company Settings > Departments > Active column), that department no longer appears in places where employee details are displayed and updated, such as employee creation (Add New Employee dialog), opening an existing employee's resource card, and when in the Resource module > Employee settings grid (vertical and horizontal resource information).
You can no longer approve creditor invoices from Status-10 / Status-20 to Status-40 / Status-50 if they have inactive departments. Any attempt to move a creditor invoice from Status-10 or -20 to Status-40 or -50 now results in a message that the department is inactive.
When you have marked a department as inactive (via Settings > Company Settings > Departments > Active column), that department no longer appears in the drop-down list in the Creditor Invoice Line Details Department column in Creditors > Creditor Invoices. For creditor invoices whose status is Under Preparation or For Approval, inactive departments are displayed in parentheses and highlighted in red. For creditor invoices whose status is Approved, For Booking, or Booked, inactive departments are displayed in parentheses.
When you view a debtor invoice under Debtor > Debtor Invoices > Drafts view, and that invoice belongs to a job that has an inactive department, that department is displayed in parentheses and highlighted in red.
For debtor invoices under Debtor > Debtor Invoices > Electronic view whose status is Approved, Ready for Print, or Finalized, inactive departments are displayed in parentheses.
Journals that have inactive departments cannot be approved. The error message field in the top right of the Journal Entry page indicates that the department is inactive.
When you have marked a department as inactive (via Settings > Company Settings > Departments > Active column), that department no longer appears in the drop-down list in the Journal Entry Department column in Finance & Administration > General Ledger > Journals > Journal Entry. For journals whose status is Under Preparation or For Approval, inactive departments are displayed in parentheses and highlighted in red. For journals whose status is Approved or Booked, inactive departments are displayed in parentheses.
When you have marked a department as inactive (via Settings > Company Settings > Departments > Active column), and that department is used by an entry in Storage Provider > Job Folder setup, that department is displayed in red highlighting and enclosed in parentheses.
In addition, inactive departments are no longer included in drop-down list fields or cells if you try to change departments that are used in the Job Folder setup.
When you have marked a department as inactive (via Settings > Company Settings > Departments > Active column), that department no longer appears in the drop-down list field (cell) for invoice lines departments at Jobs > Jobs List > (Selected) Job > Invoice > Lines (Tab) > Departments (Column). For records that are in Status-40 and above, inactive departments are displayed in parentheses.
If a resource's department is inactive, approval of bookings for that resource is blocked.
When an invoice has an inactive department on one or more invoice lines, submitting that invoice for approval (moving it from Status-10 to Status-20) and approving that invoice (moving it from Status-20 to Status-40) are now blocked.
When you open a Jobs List with Dimensions Settings (13) via Jobs » Jobs List (View) > Jobs List with Dimensions Settings (13) > Department column, if the existing department was marked as inactive (via Settings > Company Settings > Departments > Active column), that department no longer appears in the drop-down list for the Department column. For jobs whose status is Invoiced or Canceled, inactive departments are displayed in parentheses in the job's Department column.
When you have marked a department as inactive (via Settings > Company Settings > Departments > Active column), when you create a job via Jobs > Jobs List Grid > Create New Job, or when you select an existing job from the Jobs List View grid and open the job properties sidebar, that department no longer appears in the drop-down lists under Department fields.
When the department that is assigned on a PO header is inactive, submitting that PO for approval-moving it from Status-10 to Status-20-and approving that PO-moving it from Status-20 to Status-40-are now blocked.
When you have marked a department as inactive (via Settings > Company Settings > Departments > Active column), that department no longer appears in the drop-down list in the Sent from Department field in Jobs > Jobs List > (Selected) Job > Purchase Order > Header (Tab).
When you have marked a department as inactive (via Settings > Company Settings > Departments > Active column), that department no longer appears in the drop-down list in the PQ lines Department column in Jobs > Price Quote > Lines. For PQs whose status is Under Preparation or For Approval, inactive departments are displayed in parentheses and highlighted in red. For PQs whose status is Approved Internally, Approved Externally, or Cancelled, inactive departments are displayed in parentheses.
When a PQ has an inactive department on one or more PQ lines, submitting that PQ for approval (moving it from Status-10 to Status-20) and approving that PQ (moving it from Status-20 to Status-40) are now blocked.
On the Settings > Price Lists & Activities > Price Lists > Price List Setup tab, when you add an entry on the grid via the Add New Price List Data dialog box, a department that is displayed as the default source reference on the grid is shown in red and enclosed in parentheses if it is inactive. (Active departments are shown normally.)
When you view a booked resource in the Jobs > Tasks > Task > Booked Resources subgrid > List View or Matrix, if that resource is assigned to an inactive department, that department is shown in red and enclosed in parentheses for bookings that are Under Preparation or For Approval status.
In the Settings > Teams > Team Matrix > Teams grid, inactive departments are shown in red and enclosed in parentheses. This makes them easy to identify or filter.
Company Variables – Converted System Variable 252 to Company Variable 7
System Variable 252 (Price Quote Approve Button Sets Status: Internally/Externally Approved) has been converted to Company Variable 76, which has the same name. This enables you to manage this setting at a Company level, rather than at the system level.
Company Variable 76 has the same possible values that System Variable 252 did: 40 - Internally Approved; or 50 - Externally Approved. Company Variable 76 also has the same default value, 40 - Internally Approved. Company Variable 76 provides the same behavior that System Variable 252 did.
System Variable 252 is no longer active.
Company Variables – New Company Variable 78 to Allow Booking Hours Against Empty Group Scheduling Resources (GSRs)
Use Company Variable 78, (When Enabled, Allows Booking of Hours Against an Empty GSR) to allow booking empty group scheduling resources. An empty GSR has no assigned resources; thus, it has no calculated capacity. You enable this Company Variable 78 by selecting its checkbox. Disable it by clearing its checkbox. The default value is cleared (disabled).
Folders, Reports, & Documents – Storage and Folders – Storage Provider – Google Storage Provider Authentication Updated not to Use Out-of-Band (OOB)
Google Storage Provider setup now uses an alternative flow for OAuth, rather than the OOB flow, which Google has deprecated.
When you set up a new Google Storage Provider, after you successfully grant access to your Google Drive account, a pop-up window shows the message Authentication success. You can now close this window.
Note: The OOB flow used previously would have shown a token that you would have been required to copy over into WorkBook. This step is no longer required.
Global System Settings – System Variables – System Variable Added to Control Default Jobs List Behavior
Use System Variable 1190 (Force the Default Job List Shown to be Simplified Job List) to control whether the Simplified Job List is the default jobs list view. When System Variable 1190 is enabled, WorkBook only tracks and applies the last-shown jobs list during the browser session; you are instead directed to the Simplified Job List. Enabling this System Variable can improve overall system performance.
You enable System Variable 1190 to set the Simplified Job List as the default. To enable System Variable 1190, select its checkbox. Clear its checkbox to disable it. The default value of System Variable 1190 is cleared (disabled).
Global System Settings – System Variables – System Variable Added to Control Allowed File Types when Uploading Files
Use System Variable 1192 (File Extensions Allowed when Uploading a File) to control which file types users can upload as attachments to items other than vouchers. (For valid file types for attachments to vouchers, see changes to System Variable 1034 described in Improved Handling of Voucher Attachment File Uploads to Storage Provider.
The default value of System Variable 1192 is doc, docx, heic, jpeg, jpg, png, svg. In addition, the following file types are always allowed: bmp, csv, data, gif, htm, html, mht, odt, pdf, rtf, txt, wav, xls, xlsx, xml.
The following file types are never allowed in the value of System Variable 1192: app, bat, bin, cmd, dll, dmg, exe, jar, js, msi, ps1, sh, src, vb, vbs. If you enter any of them in the value of System Variable 1192, an error occurs with an appropriate error message.
The value of System Variable 1192 cannot be blank or null. If you try to use a blank or null value, an error occurs with an appropriate error message.
Global System Settings – System Variables – SOX Related Variables Category Removed
The SOX-Related System Variables category has been removed from Settings > Global System Settings > System Variables and is no longer displayed in the user interface if you search manually.
Global System Settings – System Variables – SOX Related Variables Redistributed
Because the SOX-Related Variables category has been removed from Settings > Global System Settings > System Variables, all of its System Variables are now redistributed to their designated categories.
Proof HQ Settings Removed
The Proof HQ settings have been removed from the Settings module (Settings > Global System Settings > Proof HQ). In addition, the Proof HQ page has been removed from the job and task sidebars.
Recalculate JobKeyFigures (Financial Figures) on a Set Frequency
Key job Financial figures are now recalculated periodically, which means that the numbers in grids might be somewhat outdated when you view them. The header in Jobs Lists now tells you when figures were last calculated and provides a button that enables you to recalculate them on demand instead of waiting.
Use System Variable 1188 (Frequency of Recalculation of Jobs Financial Figures in Minutes) to set the interval at which the recalculation of job key figures occurs. You specify a number of minutes for the value of this System Variable.
The default value is 0 (zero), which means that unscheduled updates of jobs occur whenever they are needed because changes were made to job key figures.
Any positive value means that an interval of that number of minutes elapses before jobs are updated when job key figures are changed.
Recalculations occur in the background. When recalculations have been performed, the
 Reload button appears in job lists on rows that are out-of-sync as a result. Click
Reload to do a manual refresh; note that this refresh reloads all of the rows, not just those that became out-of-sync when recalculations were performed.
Reload button appears in job lists on rows that are out-of-sync as a result. Click
Reload to do a manual refresh; note that this refresh reloads all of the rows, not just those that became out-of-sync when recalculations were performed.
When System Variable 1188 is enabled, the amount of time (in minutes) since the last data update is displayed at the right side of the Jobs List header. Next to this information, an Update Now button is provided so that you can manually update the job key figures, rather than wait the remainder of the interval that System Variable 1188 specifies.
User Access Rights – Nonexistent Pages Removed from Access Rights Lists
Multiple pages that appeared in the tree view on the Access tab and in the list on the Override tab did not actually grant or remove access to any pages because they were placeholders for pages that did not exist. These items have been removed.
This change affects only Admin Users. The following items have been removed.
- Schedule plan settings
- Move task to another resource
- Xdce dxchart
- Xdce grid
- Xdce dxpiechart
- Wb board script editor
- Xdce dxchart
- Xdce grid
- Xdce dxpiechart
- Wb board script editor
- Database explorer tables
- Database explorer table fields
- Database explorer table data
- Database explorer views
- Database explorer views fields
- Database explorer enums
- Database explorer functions
- Database explorer stored procedure
- Database Explorer Main
- Payment information control
- Payment information control
- Schedule plan settings
- Move task to another resource
- Payment information control
- Document template
- Price line dimensions
- Job invoice valuation
- Partial invoice valuation
- Move time entries settings
- Move time entries select hours
- Creditor adress information
- Manage address specification fields
- Debtor adress information
- Manage address specification fields
- Move time entries settings
- Move time entries select hours
- Create client order
- Job invoice card
- Manage conversation groups
- Inbox add resources to jobteam
- Inbox add resources to jobteam
- Task overuse follow-up
- Sla settings
- Create client order
- Client Order
- Kanban List View
- SVG Library
- Gantt task view
- Schedule Plan Settings
- Job Invoice Card
- Job Invoice Valuation
- Partial Invoice Valuation
- Move Time Entries Settings
- Move Time Entries Select Hours
- Job Book List Filter V2
- Inbox Add Resources To Jobteam
- Document template
- Add new report profile
- Move Task To Another Resource
- Deactivate Dilog
- Payment Information Control
- Creditor Default Card
- Report Profile Setup Access
- Price Line Dimensions
- Database Explorer Tables
- Database Explorer Views
- Database Explorer Enums
- Database Explorer Functions
- Database Explorer Stored Procedure
- Database Explorer Table Fields
- Database Explorer Table Data
- Database Explorer Views Fields
- Database explorer main
- Notification Parameter Sidebar
- Add Notification Schedule
- General Ledger DataImport Selector
- Task Overuse Followup
- ProfitForecastDataDetail
- Customer SLA
- Client Order Create Dialog
- Debtor adress information
- Addressgroups
- Special tax setup
- Job dimension multi update
- Job dimension list update
- Tasks, Approvals & Followups list
- Manage Address Specification Fields
- Manage conversation groups
- DevExpress Chart Editor X
- xDCE dxChart
- xDCE dxPieChart
- xDCE Grid
- wbBoardScriptEditor
- Checklist Individual Template Setup
- Debtor Invoices Container
- Pipeline Billing Plan
- Test and bechmarks
- Subscription Agreement Miscellaneous setup
- Creditor Payment Proposal Merge
- New Pipeline Card
- Media Force Buy Import Dialog
- Client order
- Client orders
Storage
Job Folder Setup – Duplicate Folder Paths Allowed for Different Departments
For job folder setup, you can now have duplicate/multiple entries with the same Company and Storage Provider with the same folder path, as long as the Departments of the entries are different.
For resource folder setup, you can now also use the folder path that you use for job folder setup on resource folder setup.
Tasks
Costing Code and its Description Displayed in Additional Places
For jobs-related and tasks-related pages and dialogs, the Costing Code column now displays the concatenation of the Costing Code and its description as follows.
- For tasks-related information:
- Tasks grid on the Tasks page
- For jobs-related information:
- Simplified Jobs List
- Jobs List
- Job Creation Dialog
Creditor Voucher Approval Data Load Improvement
The following pages now load significantly less data:
- Tasks – Creditor Invoice Approval
- Finance & Administration - Creditor Invoices
Previously, for these pages WorkBook loaded data that was not used or required, which could cause a crash.
Scheduling Views – Percentage Display Option Added to Task Matrix
A percentage display option has been added to the Task Matrix in the Task Total, Period Total, and Calendar cells.
Time & Expense
Time Entry – Additional Data is Logged
Additional data is now logged for time entries. This data is used for referencing tasks and jobs after time entries are deleted.
Time Entry – Deletions Now Tracked
When you delete time entries that have hours recorded, the deletion is logged in the TimeRegLog table.
Time Entry – Regulatory Time Entry Requirements
To meet various regulatory requirements related to time entry, several enhancements and other changes have been made. These affect the Whereabout functionality, timesheets, and time entry. To implement this functionality, a Company Variable has also been added, and another Company Variable's options have been expanded.
Use Company Variable 77 (Block Employees Required to Track Time from manually Adjusting the Default Time Stamp Sequence) to block employees who are required to track time (as set by Company Variable 74, (Require Employees to Track Time Using Whereabout) from editing the default time stamp sequence on time tracking using whereabout.
If you are an Admin User, you enable Company Variable 77 by selecting its checkbox. Disable it by clearing its checkbox. The default value is cleared (disabled).
- 1 – Not Required
- 2 – Required for All Employees
- 3 – Required for Some Employees
The default value remains unchanged: 1 – Not Required.
A column has been added on Time & Expense > Timesheet > Daily View to identify where a specific employee must track time. The
 Time Entry icon is displayed in the column header to identify the days (time) that must be tracked, or the tracked time, during the day(s) for that employee. The tooltip for this column is Time Entered has been Sufficiently Tracked.
This column is displayed on employee timesheets when an employee is required to track time—that is, the employee belongs to a Company where Company Variable 74 (Require Employee to Track Time Using Whereabout) is set to 2 – Required for All Employees, or Company Variable 74 is set to 3 – Required for Some Employees, and the user setting for tracking time is also enabled for the employee.
This column contains a checkbox that is checked if the employee has tracked time on the whereabout that is at least equal to the time entered on the employee's time sheet. The column is read-only.
On the Time & Expense > Time Sheet > Weekly view, indicators of time-tracking compliance have been added to day columns for users who are required to track time on specific dates with sufficient time entries in accordance with whereabout time tracked for those dates.
- 2 – Required for All Employees
- 3 – Required for Some Employees
For option 3, the employee basic setting User Must Track Time must also be enabled for the indicator to be displayed.
The column displays
 when time tracked using whereabout is equal to or exceeds the time entered on time entry for the day. When this check mark is not displayed, the employee has either not entered time or time entry, or has not sufficiently tracked time using whereabout.
You can now delete whereabout entries set in the past.
You can now duplicate existing whereabout entries and add the duplicates to the whereabout grid. This functionality has been added to all whereabout entry views, such as personal, Time & Expense, Finance & Administration, and so on.
Select the whereabout entry that you want to duplicate in the grid, and click the Duplicate button on the toolbar.

WorkBook asks you to choose a date. Use the date-picker calendar to select a date or accept today's date as the default and click OK.
Note that you can duplicate one entry at a time; you cannot duplicate multiple whereabout entries simultaneously.
When you click the whereabout indicator in the WorkBook footer with the default or reset status for whereabout, and then you select another status from the list of available options, a dialog box prompts you to confirm the selection.
When you click the whereabout indicator in the WorkBook footer, the whereabout status displays available options, such as In Office, Online, Not Available, and so on.
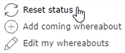
A Reset Status option has been added to this list. Select that option to reset or revert your whereabout status to its original state.
Note: The Reset Status option is not available to employees who are required to track time as specified by Company Variable 74 (Require Employees to Track Time Using Whereabout).
The Last Updated Date column has been added to the Whereabout page: This new column displays the date and time when an entry was last modified.
- Hours – Displays the number of hours of the whereabout entry.
- Updated by – Displays the resource who last updated the whereabout entry.
- Tracked against Time – Displays a checkbox that is selected if the whereabout type of the selected whereabout entry is configured to be included in time-tracking calculations.
You specify whether a whereabout type is included in time-tracking calculations via Settings > Employee Settings > Whereabout page > Include in Time Tracking Calculations (Agent) column
Timesheet – Enhancements to Approval Functionality
The process for approving timesheets has been improved. For example, if your organization's timesheets cover periods that are longer than one week, you can now send timesheets for the full time period for approval in one transaction. Additional information is described in the following.
On the Time & Expense > Timesheet Weekly and Daily views, the shortcut (context) menu now provides an additional Approve Date Range option so that you can define the time period for which you want to approve timesheets.
The new Approve Date Range option on the shortcut (context) menu displays a new dialog box where you can define the start and end dates of the time period for which you want to approve timesheets.
The date range can be a maximum of 31 days long, and it can straddle calendar months.
The approval of time entries has been optimized. The time to approve days or individual entries has been improved by up to 70 percent.
Timesheet – Display Public Holiday Hours on Timesheet
When you enter time on a timesheet-or when someone enters time on your behalf-there are now clear visual indicators of days that are public holidays, as identified by the Company holiday calendar of the Company to which the employee belongs. Public holidays appear in a blue shading and are accompanied by the
 beach ball icon.
These indicators appear on Daily and Weekly time entry pages and on the detail expansion on the Weekly view, which you access via the
 icon on the Weekly view.
The icon for bank holidays has been changed from the
beach ball icon to the
 icon to clarify which days are registered as absences, and which are bank holidays.
On the Timesheet – Daily View, the way in which public holidays are displayed has been improved. The Company holidays are indicated on the timesheet in the color that is associated with the Company to which the employee who owns the timesheet belongs.
On the Time & Expense > Time Sheet > Weekly view, the way in which public holidays are displayed has been improved. The Company holidays are indicated on the timesheet in the color that is associated with the Company to which the employee who owns the timesheet belongs.
Timesheet – Time Entry Approval – Optimization of Loading, Approval, and Rejection of Time Entry Records
The loading of time entry records and their approval or rejection have been optimized and are now faster.
Timesheet Status – Color of Selected Cell
In Timesheet Status, when you select a cell, the background color now turns darker.