Intracompany Work Assignments
Beginning with Costpoint 8.2, companies will be able to set up and manage intracompany work assignments (IWAs) in Costpoint. This feature allows companies within the same Costpoint database and using the same co-deployed Time & Expense instance to efficiently move charges and expenses from the performing company (intracompany vendor) to the contracting company.
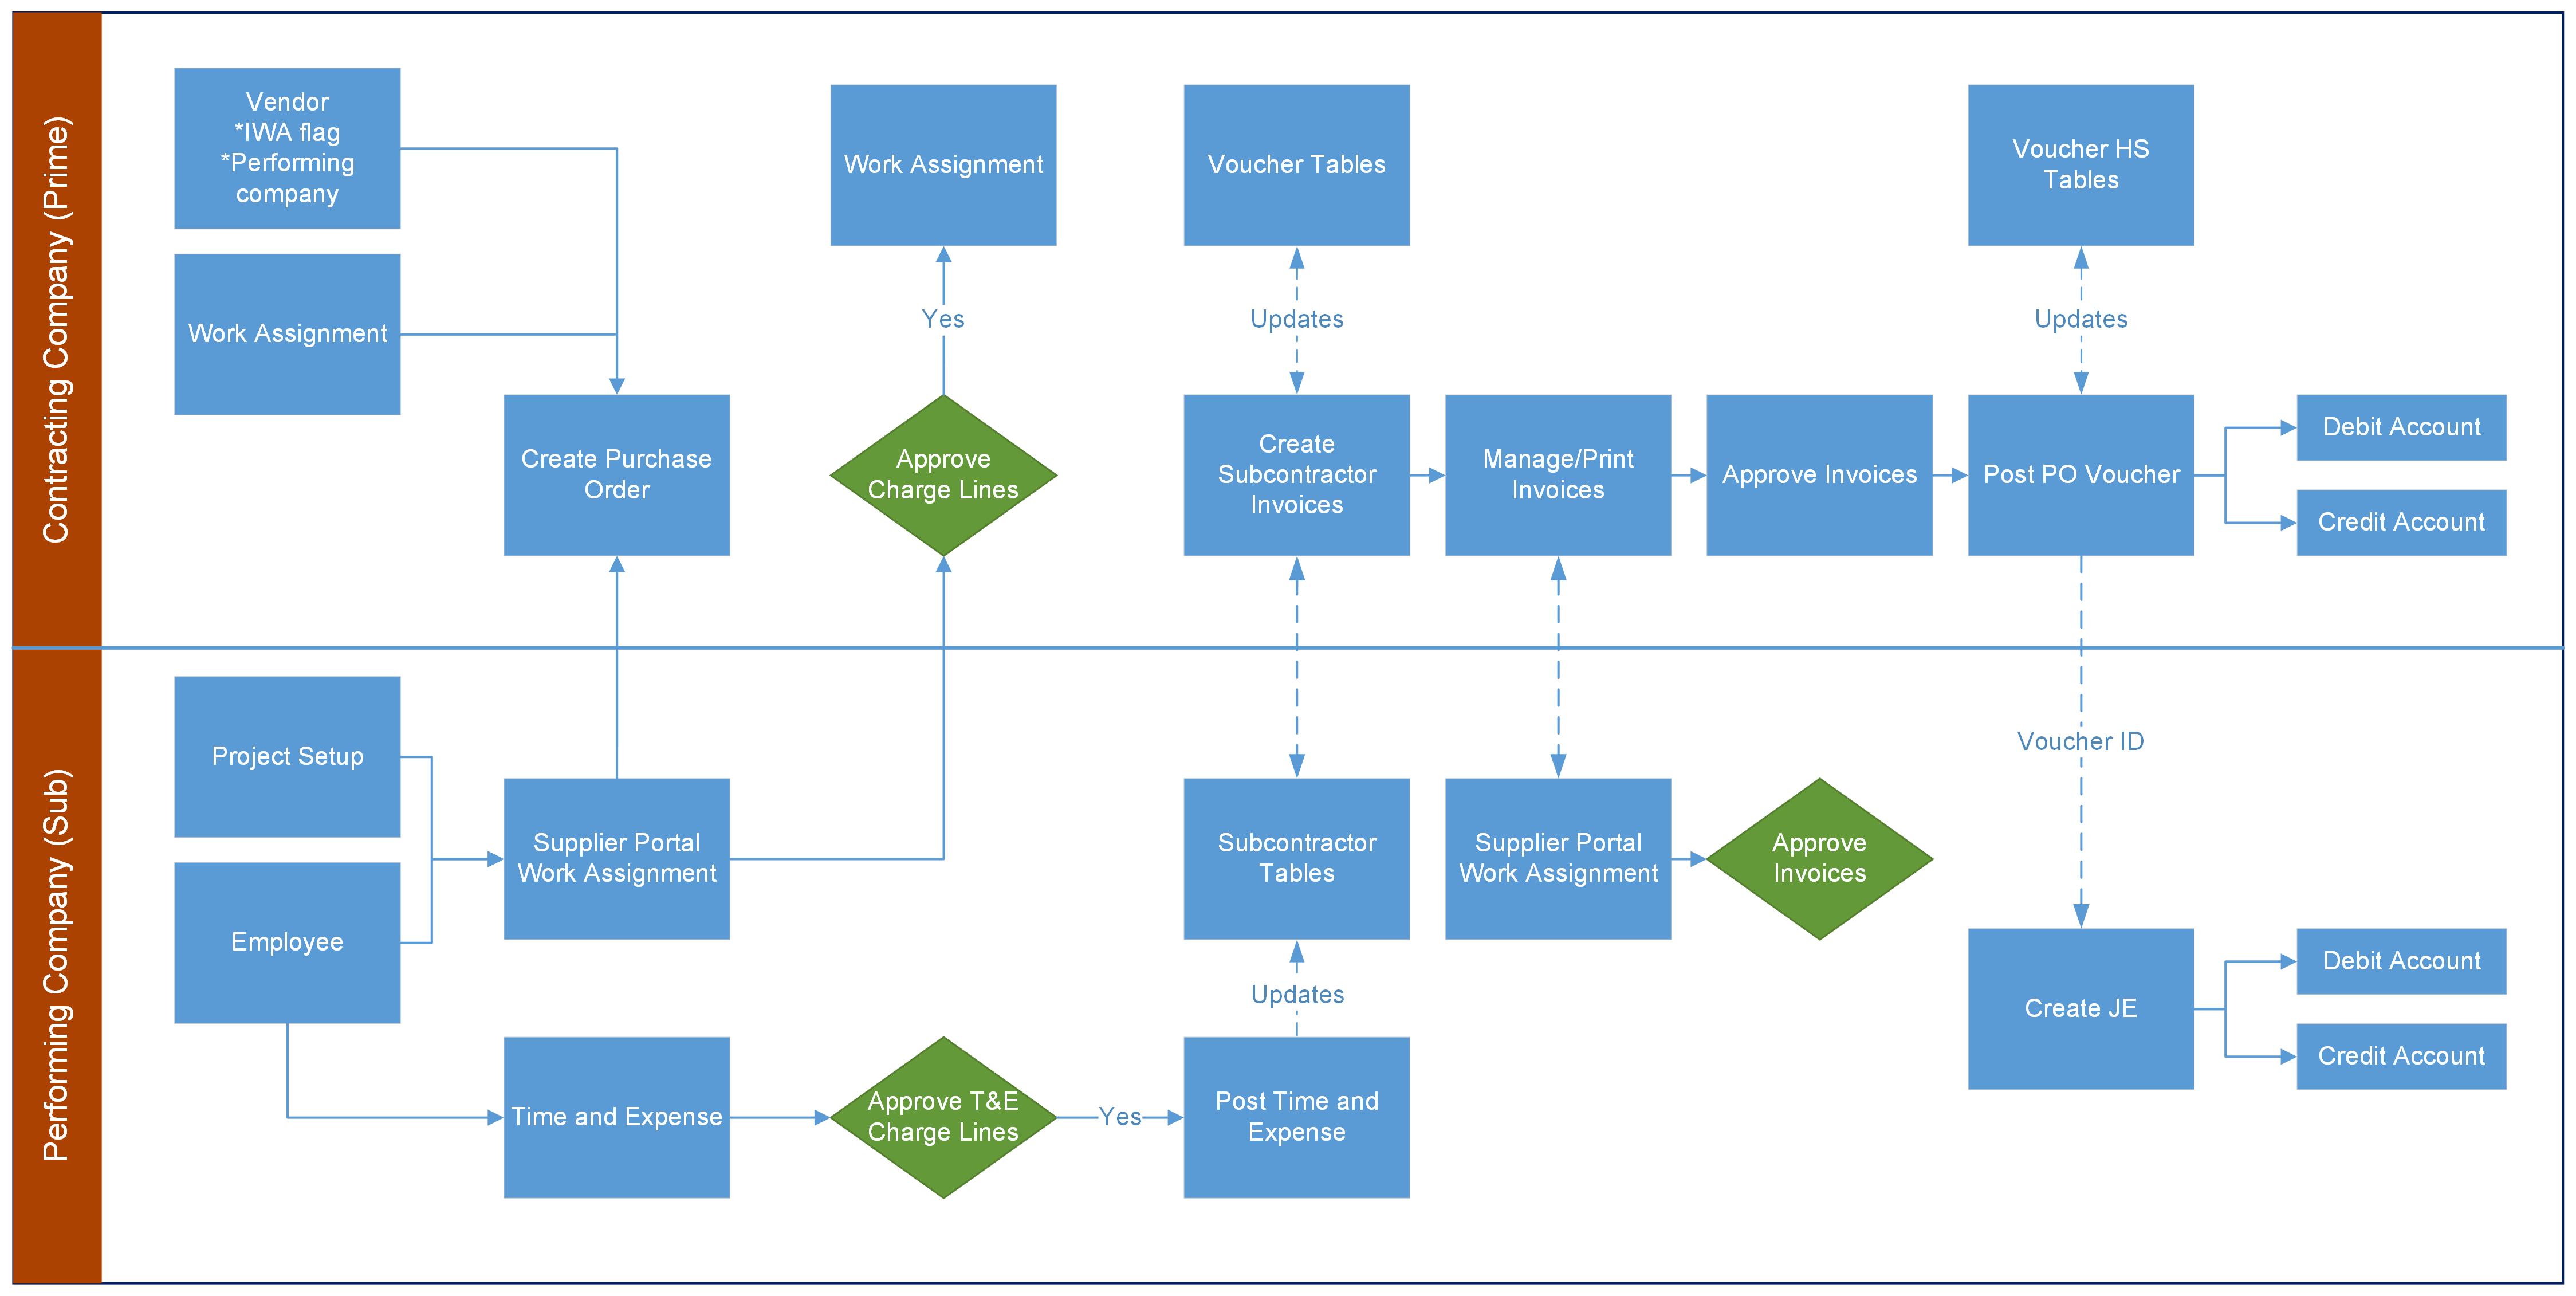
For example, the contracting company is hiring employees from the performing company to do work or services for them as a subcontractor. The contracting company can set up the performing company as a vendor in their Costpoint database, create a purchase order (PO) and work assignment, and link those items to the vendor. The performing company will be able to update the charges applicable to the work subcontracted to them through the Supplier Portal module in the Materials domain. The performing company can also have its employees charge the work assignment through Time & Expense. When timesheets/expenses are approved by both companies, the intracompany allocations are created and ready to be posted. Intracompany payment can be automatic (via journal entries (JEs) to offset payable/receivable amounts) or can be manual (bank transfer, check, transfer of assets, and others).
Rules that apply to IWAs include the following:
- The contracting and performing companies must be in the same Costpoint database.
- Both companies will be able to access the same work assignment.
- Multiple performing companies can be set up as intracompany vendors in one contracting company as long as they are in the same Costpoint database as the contracting company and assigned to separate work assignments.
- Employees can be set up to work across companies.
- Multiple employees with different projects, PLCs, and other details can charge the same contracting company.
Use the following diagram as a guide when setting up your IWAs. The detailed information on each step is indicated below the diagram.
Set Up the Intracompany Vendor (Contracting Company)
The first step is for the contracting company to set up the performing company as an intracompany vendor. On the Manage Vendors screen, create a record for the performing company. On the Header tab of this screen, be sure to select the following checkboxes:
- Intracompany Vendor
- Subcontractor
The Performing Company field will only be enabled once you select the Intracompany Vendor checkbox.
Set Up the Vendor for Supplier Portal (Contracting Company)
Next is to set up the vendor and its employees so that those employees will be able to use the Supplier Portal module in the Materials domain to view, update, and communicate updates on the purchase order, work assignment, and invoice created by the contracting company.
On the Manage Vendors screen, complete these steps:
- On the Defaults tab, select the Supplier Portal Enabled checkbox for the intracompany vendor.
- On the Contacts subtask of the Addresses subtask, add the performing company's employees as contacts. Be sure to indicate their email addresses as these will be used to send notifications when records are ready to be viewed in the Supplier Portal.
Configure Supplier Portal User Setup (Contracting and Performing Companies)
Once you have the vendor set up, you need to grant access to the employee in both the performing and contracting companies.
In the performing company, employees should have their standard access to applications to which they have been given rights.
In the contracting company, employees from the performing company must have access to the Supplier Portal screens to be able to review the purchase order, work assignment, and invoice from the contracting company.
Follow these steps:
- On the Manage User Groups screen, create a user group with access only to the Supplier Portal screens. You will link this user group to the employee/user from the performing company.
- On the Company Access subtask of the Manage Users screen, be sure to have the following fields filled in for the specific employee/user from the performing company:
- Company ID: Enter or select the contracting company ID.
- Supplier Portal Vendor: Enter or select the performing company ID.
- On the Assigned User Groups subtask of Manage Users, perform the following actions:
- Add the user group you created in step 1 to link this user to the supplier user group.
- In the Company field, enter the contracting company ID. This way, when the employee from the performing company logs in to the contracting company, that employee will have access only to the Supplier Portal screens.
- Optional. You may assign other groups to the user or modify already linked user groups to limit the user's access, depending on the setup of your business. For example, through the Company field, you can set the user to have access only to the performing company. Note that if you select ALL in Company, Costpoint automatically assigns the user group to the user across all your companies.
Create a Purchase Order (Contracting Company)
The next step is to create a purchase order in the contracting company for services or work needed from the performing company.
On the Manage Purchase Orders screen, be sure to correctly set the following fields:
- Type: This must be Subcontractor Agreement.
- Vendor: Select the performing company in this field. This is the company that you set up as an intracompany vendor on the Manage Vendors screen.
- Intracompany Vendor: This checkbox is automatically selected after you entered the performing company in Vendor.
Release the Purchase Order to the Vendor (Contracting Company)
Before you release the PO to the vendor, you may want to enable the Supplier Portal Email Notification feature of Costpoint. Although this is not required, you can take advantage of this functionality in the review and approval process of the PO. It triggers email notifications between the contracting and performing companies, and you can also directly access the PO through the link included in the email.
To enable this feature, complete these steps on the Other Information tab of Manage Purchase Orders:
- Under Contact, specify the Last Name, First Name, and Email Address of the person who should be the point of contact responsible for reviewing or approving the purchase order and communicating with the contracting company on requested changes.
- Select the Supplier Portal Email Notification checkbox.
Once of the details of the PO have been set up and ready for the performing company to review, the contracting company can release the entire PO by selecting the Released to Vendor checkbox on the Other Information tab and saving the record. This will trigger an email notification and allow the performing company to view the PO in the Supplier Portal.
If not the entire PO is ready to be reviewed, the contracting company can choose to select and release separate PO lines individually.
Create a Work Assignment (Contracting Company)
On the Manage Work Assignments (SMMWRK) screen, the contracting company creates a work assignment that will contain the settings and business rules that define the items and resources that can charge against the intracompany subcontractor PO.
On the Business Rules tab, set up the charging rules and validation requirements for the work assignment. In the Intracompany Posting group box, you must also specify the Intra-Co Payable project/account/organization that will be used to send the funds to the intracompany vendor (performing company). The Account and Organization fields are required, but if your intracompany payable is by project, you can also enter a value in Project.
After completing the header and tab sections, go to the Charges subtask and enter the necessary information. You can load the charge lines from the subcontractor PO or manually enter them on the subtask. In each charge line, specify the project labor category (PLC), general labor category (GLC), account, organization, and project that will receive the charges for the charge line.
Enter other information on the Manage Work Assignments as necessary and then save the record.
If approval is not required as set up in Configure Subcontractor Management Settings, the Approval Status field on this screen defaults to Approved, and all the charge lines for this work assignment will be set to Approved as well. If approval is required, Approval Status is set to Pending or is blank (if approval is at the charge line level), and you need to access the Approve Work Assignments screen to approve the work assignment.
Approve the Work Assignment (Contracting Company)
If work assignment approval is required, use the Approve Work Assignments screen to approve the entire work assignment or just select charge lines within the work assignment.
The performing company will have access only to approved work assignments.
Set Up a Receiving Project (Performing Company)
While logged in to the performing company, the performing company needs to set up how it wants to charge work. On the Manage Project User Flow screen, create a project, which may be a direct or an indirect project. It does not need to be exactly the same as how the project in the contracting company was set up. If you are going to post charging information to a revenue account, be sure to select the appropriate revenue formula on the Revenue Information subtask. Fill in other project information in Manage Project User Flow as necessary.
Access Supplier Portal (Performing Company)
Once the purchase order and work assignment are released to the employees in the performing company (with notifications sent to the intracompany vendor via email), and the project in the performing company has been set up as well, the performing company employee can now log in to the contracting company and access the Supplier Portal screens.
Add Posting Information (Performing Company)
The performing company needs to set up its intracompany posting information on the Intracompany Work Assignments screen in Supplier Portal. They can query the work assignment on this screen or use the link from the email notification sent when the contracting company approved the work assignment.
Intracompany Work Assignments (SPMSIWA) is accessible via . Information on this screen comes from the Manage Work Assignments (SMMWRK) screen in the Projects domain. The application in Supplier Portal lets the performing company not only review and approve the work assignment but also specify posting information for the charges.
On the Business Rules tab of the screen, the performing company must specify the Intra-Co Receivable project/account/organization that will be used to receive the funds or journal entry posting for performing the work or services for the contracting company. If you are going to post charging information to a revenue or other account, use the fields in Revenue/Other to specify the receiving project/account/organization.
Add Employees to Charge Lines (Performing Company)
In order for employees from the performing company to charge their time and expenses against the work assignment, they must be assigned to the specific charge line they will be working on. On the Charges subtask of Intracompany Work Assignments, with the specific charge line selected, open the Employees subtask and then add the employees who should be assigned to the charge line.
Add Charging Information (Performing Company)
On the Charges subtask of the Intracompany Work Assignments screen, the performing company needs to enter the account/organization/project that should be used when employees enter their time and expenses for the specific charge line.
On the Contacts tab of the same screen, Deltek recommends that you enter the Contracting Contact Email and Performing Contact Email so that changes and communication notes that are added to the work assignment by either company will trigger an email notification to the contact person for the work assignment. Note that the Contracting Contact Email field is visible only for the contracting company, while the Performing Contact Email field is enabled only for the performing company.
Once all the necessary information is entered on the Intracompany Work Assignments screen, the performing company can mark the work assignment for submission. To do this, select the Submit checkbox on the Charges subtask, and then save the record. This action will send an email notification to the contracting company, indicating that the performing company has reviewed and approved the work assignment. It also triggers the work assignment information to flow to Costpoint Time & Expense and allows performing company employees to charge work assignment lines.
Approve the Purchase Order (Performing Company)
The performing company can use the Manage Supplier Actions screen (also available in the Supplier Portal) to review and approve to the purchase order. Through the New Action field, the performing company can request changes on the PO line or approve the PO by updating this field to Accepted by Supplier. If the Supplier Portal Email Notification checkbox is selected on the Manage Purchase Orders screen, any of the actions taken in Manage Supplier Actions will trigger an email between the contracting and performing companies.
Enter Time (Performing Company)
Once employees are assigned to the work assignment (through the Employees subtask of the Charges subtask of Intracompany Work Assignments), they will be able to see and select the work assignment in the Work Assignment ID field on the Timesheet screen in Time & Expense and charge against that work assignment. The lookup of this field will display all work assignments linked to the employee.
If the employee is not assigned to any work assignment charge line, the Work Assignment ID field will not be visible to that employee.
Enter Expenses (Performing Company)
Employees assigned to a work assignment will be able to charge expenses against the work assignment on the Expense Report screen in Time & Expense. On the Default Charges tab of this screen, the Work Assignment ID field will be available for that employee, and the lookup will display all work assignments linked to the employee.
If the employee is not assigned to any work assignment charge line, the Work Assignment ID field will not be visible to that employee.
Create a Subcontractor Invoice (Contracting Company)
Once work has been completed and time and expense information is entered, the contracting company creates a subcontractor invoice for the PO via the Create Subcontractor Invoices or Manage Subcontractor Invoices screen. The invoice created based on the subcontractor PO will pull in Time & Expense information that is charged in each charge line, and this information will display on the Vendor Labor and Vendor Expense Reports subtasks of Manage Subcontractor Invoices.
After creating the invoice, the contracting company selects the Submit for Approval checkbox and saves the record in Manage Subcontractor Invoices to allow the invoice to be approved internally (by the contracting company) and to also trigger an email notification to the performing company so it can review and approve the invoice in the Supplier Portal.
Approve the Subcontractor Invoice (Contracting Company)
On the Approve Subcontractor Invoices screen, the contracting company performs the followings steps:
- Open/query the subcontractor invoice.
- Review the information on the invoice.
- If everything checks in, select the Approved checkbox in the Internal Approval group box.
- Save the record.
Approve the Subcontractor Invoice (Performing Company)
The performing company can use the link in the email to access the invoice or log in to the contracting company and access the Manage Invoices screen in the Supplier Portal.
In Manage Invoices, the performing company completes the following actions:
- Open/query the subcontractor invoice.
- Review the information on the invoice.
- If everything checks in, select the Approved checkbox in the Supplier Approval group box.
- Save the record.
This will send an email notification back to the contracting company, informing the contracting company that the final approval for the invoice has been completed.
Create and Post the Voucher (Contracting Company)
Once both companies approve the invoice, the invoice becomes a voucher. The contracting company can then post that voucher into the intracompany payable account just like any other voucher.
Create and Post the Journal Entry (Performing Company)
At the same time that the voucher is posted, a journal entry is automatically created.
In the performing company, the offsetting JE is posted to the intracompany receivable and revenue/other project/account/organization. You do not need to input labor as it came through with the timesheet and is posted like regular labor. You also do not need to enter expenses as these came through in the performing company and posted against the project/account/organization you specified.
Final Steps (Contracting and Performing Companies)
After you have posted cost, you can bill that cost, update the Project Status Report for that cost, and compute revenue on that cost.
The final steps would be for the contracting company to send payment to the intracompany vendor for the work or services rendered. It can be via elimination of JE, manual check or offsetting receipt (for example, bank transfer or transfer of assets), or through any other method defined in your business model.
Additional Procedures
While managing your IWA projects, there may be instances where you need to delete or reverse your IWO PO vouchers. Refer to the following scenarios and steps.
Delete an IWA PO Voucher (Contracting and Performing Companies)
When a contracting company approves an IWA subcontractor invoice, a PO voucher is automatically created, and its corresponding IWA journal entry is also created in the performing company. Any changes made to the subcontractor invoice requires you to delete its corresponding IWA PO voucher.
If you need to delete an IWA PO voucher that has not yet been posted, you must use the Manage Purchase Order Vouchers screen.
Refer to the following scenarios.
PO Voucher and IWA Journal Entry Are Not Posted
When changes are made to an IWA subcontractor invoice and both the PO voucher and IWA JE are not yet posted:
- The contracting company must delete the PO voucher for that invoice.
- The performing company must delete the corresponding IWA JE.
- Both the contracting and performing companies must clear the journal entry fields in the SUBC tables.
- The performing company must reverse or delete the updates inserted in the SUBC_PROJ_BILL_HS table.
PO Voucher Is Not Posted but the IWA Journal Entry Is Posted
When changes are made to an IWA subcontractor invoice and the PO voucher is not posted but the IWA JE is posted:
- The contracting company must delete the PO voucher for that invoice.
- The performing company must create a reversing IWA JE and post the reversal.
- Both the contracting and performing companies must clear the journal entry fields in the SUBC tables.
- The performing company must reverse or delete the updates inserted in the SUBC_PROJ_BILL_HS table.
Subcontractor Invoice Is Not Yet Approved
If you need to update a subcontractor invoice that is not yet approved, you can delete that invoice in Manage Subcontractor invoices and create a new invoice with updated details.
PO Voucher Is Posted
A posted IWA PO voucher can no longer be deleted. If changes are made to the subcontractor invoice for that voucher, you must first create a reversing voucher. Refer to the Reverse Posted IWA PO Vouchers topic.
Reverse a Posted IWA PO Voucher
In contrast to unposted IWA PO vouchers, which can be deleted, posted vouchers can no longer be deleted.
When changes are made to the subcontractor invoice for a posted voucher, you must create a reversing IWA voucher on the Reverse Posted Vouchers screen.
Refer to the following scenarios.
PO Voucher Is Posted but the Journal Entry Is Not Posted
When changes are made to an IWA subcontractor invoice and the PO voucher is posted but the IWA JE is not posted:
- The contracting company must create a reversing IWA voucher.
- The contracting company must post the reversing voucher.
Note: You cannot reverse a voucher that is already reversed, and you cannot delete a reversing voucher.
- The performing company must clear the updates in the JE_HDR and JE_LN tables.
- Both the contracting and performing companies must clear the journal entry fields in the SUBC tables.
- The performing company must reverse or delete the updates inserted in the SUBC_PROJ_BILL_HS table.
Both the PO Voucher and IWA Journal Entry Are Posted
When changes are made to an IWA subcontractor invoice and both the PO voucher and IWA JE are posted:
- The contracting company must create a reversing IWA voucher.
- The contracting company must post the reversing voucher.
Note: You cannot reverse a voucher that is already reversed, and you cannot delete a reversing voucher.
- The performing company must create a reversing IWA JE and post the reversal.
- The performing company must clear the updates in the JE_HDR and JE_LN tables.
- Both the contracting and performing companies must clear the journal entry fields in the SUBC tables.
- The performing company must reverse or delete the updates inserted in the SUBC_PROJ_BILL_HS table