This topic explains how to create a Word template using the Costpoint Word Template add-in.
You must install the Costpoint Word Template add-in to create the template in Microsoft © Word. The add-in is available to download on Deltek Software Manager (DSM). See Install the Costpoint Word Template Add In for more information.
You can design the template using basic Word functionality.
To create the Word template:
-
Launch Microsoft© Word.
-
On the Costpoint tab, click
Open/Close to display the Costpoint add-in sub-tabs and the Costpoint Fields Selector.
-
On the Field Definition File sub-tab, click Import New Definition to locate and select the CPMetadata.xml file.
The
Definition Generated On date reflects the last time the field file was generated.
-
Select the application to apply the template:
-
In the
Domain list, select the domain for where you want to create the report.
-
In the
Module list, select a module from the selected domain.
-
In the
Application list, select the application where the template will be available.
The Costpoint Fields Selector will update with data based on the application selection.
-
In the
Result Set list in the Costpoint Fields Selector, select a result set that contains the fields you want to include in the template.
The data fields available in the selected result set are populated in the fields table.
-
Click
Insert Begin Tag.
Each statement must have Begin and End tags so that the report can locate the data. The data fields must be placed between these statements to be included in the report.
-
Place the cursor on a line after the Begin tag and then double-click a
data field to add it to the statement. You can also type the name of the data fields directly in the statement.
Tip: To format the field, highlight the field ID, and then select a format option in the Format sub-tab.
-
Click
Validate Document, as needed, to check the document for any errors.
Errors display, one at a time, in red, with an ID and error message. Double-click the error message to highlight the problem field.
Note: Validate Document is a high-level validation and does not catch all errors.
-
Save the document.
After you create the template, use the File Upload application in Costpoint to upload the document.
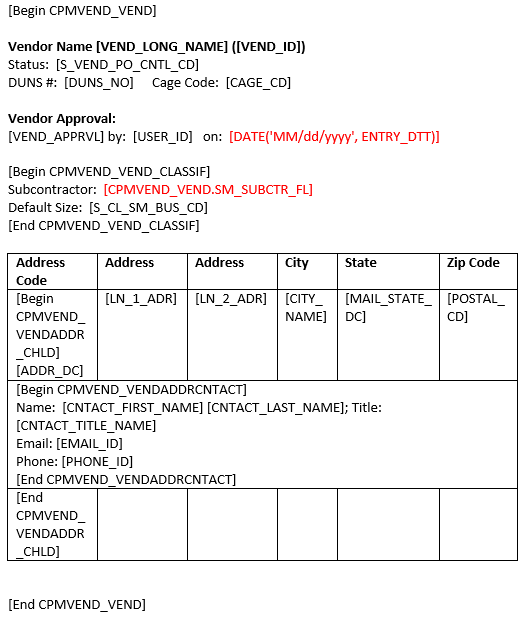
Vendor Address List Template Example


