Setting up Amounts rows
Follow these instructions as part of designing a financial statement.
To set up an Amounts row, define the accounts you want to include in the row.
You do this by:
- Step 1: Defining a row as an Amounts row
- Step 2: Defining accounts for the row
- Step 3: Using row filters (optional) - unavailable in ajeraCore unless you have the Departments add-on
- Step 4: Changing row headings and formatting
Step 1: Defining a row as an Amounts row
- If using a column heading, select a row below the Column Headings row by clicking in the first column of the worksheet. The first column is a work area only and does not print on the statement.
The Row Type buttons appear.
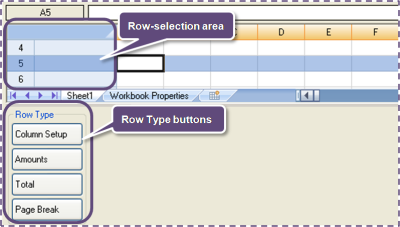
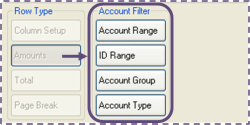
- Click the Amounts button. The Account Filter buttons appear.
Step 2: Defining accounts for the row
- Do one of the following to specify the accounts you want to include in the row.
| Note: | You can specify more than one range, account group, or account type per row. If you do, however, all accounts in the ranges, groups, and types print together and produce one subtotal. To get separate subtotals, you must set up separate Amounts and Total rows for each range, group, or type. |
| Click this button | And do this | ||
|---|---|---|---|
|
Account Range |
In the From field, click In the To field, click Example You might select Bank Account – Checking in the From field and Petty Cash in the To field to specify your range of Cash accounts.
|
||
|
ID Range |
In the From field, enter the numeric or alphanumeric account identifier for the start of the range. In the To field, enter the numeric or alphanumeric account identifier for the end of the range. The IDs represent the minimum and maximum of the range; neither ID has to represent an existing account. Example For example, you might enter 1000 in the From field and 1999 in the To field to specify your range of Cash accounts, even if there is no account associated with 1000 or 1999.
|
||
|
Account Group |
In the Account Group field, click
|
||
|
Account Type |
In the Account Type field, click |
 (Customize) and select the
 - In the Grouping area, click one of the following buttons:
- Itemized to list the amount for each account individually.
- Summarized to add the amounts of the selected accounts and list as one amount.
- Select the Reverse sign check box if you want negative values in the statement to appear as positive values, and positive values to appear as negative values.
For example, income accounts are typically credits (negative values), but should appear as positive values in a profit and loss statement.
- Review the cells in the Amounts row. If you want to use a custom date property for any of the cells:
- Click the cell you want to change.
- Click the Custom button.
- Double-click the custom date property you want.
Step 3: Using row filters (optional)
unavailable in ajeraCore unless you have the Departments add-on
- If you want to filter the information in the row for a department or reporting entity, select the row. If you use multi-company, you can also filter by company.
- Click
 in the Department or Reporting Entity field, and select a department
or reporting entity. If you use multi-company, you can also select a company.
in the Department or Reporting Entity field, and select a department
or reporting entity. If you use multi-company, you can also select a company.
| Note: |
By default, the Department List window and Reporting Entity List window
display both active and inactive items but do not indicate the status.
To view the status, click |
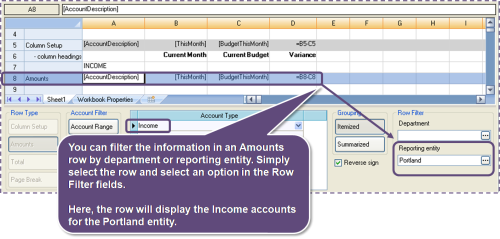
- Make sure that the row heading (see next step) indicates the company (multi-company only), department, or reporting entity chosen.
Step 4: Changing row headings and formatting
- If needed, enter a row heading by clicking where you want it to appear and typing a descriptive name (for example, Income if you selected the Income account type).
- Use the toolbar to format and align the contents of a cell, row, or column and apply borders, as needed.
- Resize rows or columns by dragging the row or column edges.
- If you want to add or delete a row or column to the design, right-click a row or column and click Insert or Delete.
- Repeat these instructions, as needed.