The Preferences form allows you to change the way data is displayed on the timecard. If you make any changes in the Preferences form, click Save.
You can access this form by clicking ![]() at the top of the application window, or by selecting it from the Self
Service menu (Main Menu > Self Service > Preferences).
at the top of the application window, or by selecting it from the Self
Service menu (Main Menu > Self Service > Preferences).
You can also use the Preferences Policy to assign specific Preferences settings to a group of employees.
You can use the Form Profile form to control which of the Preferences settings are visible to different employees. When a preference is hidden, the value in the user’s Preferences Policy will be used. See Show or Hide Preferences Settings for more information.
See Also:
Preferences Field Descriptions
Show or Hide Preferences Settings
The settings that are available in the Preferences form depends on your Form Profile configuration. See Show or Hide Preferences Settings for more information.
Enter the format for displaying names on the timecard. (LAST FIRST or FIRST LAST).
Enter the format for displaying hourly entries the in Duration fields in the application, such as the timecard, Current Situation form, and some reports.
Options are:
CLOCK: 2 ½ hours displays as 2:30:00 or 2:30. Seconds are displayed if the Show Seconds check box is selected.
DECIMAL: 2 hours and 15 minutes displays as 2.25. The number of places that appear after the decimal depends on the Time Precision in the Rounding Policy.
If the Duration Format is CLOCK, this setting determines whether seconds are displayed for hourly entries in the timecard, Current Situation form, and reports. Select this option to display seconds.
This is disabled if the Duration Format is DECIMAL.
Select the location of the date portion of a timestamp on the timecard. This setting affects the date location of the following fields on the timecard:
Start Timestamp
Start Rounded Timestamp
End Timestamp
End Rounded Timestamp
The Date Location options are:
BEFORE: The date portion is located before the hours, minutes, and seconds portion.
AFTER: The date portion is located after the hours, minutes, and seconds portion.
NONE: The date portion is not included in the timestamp.
The time portion of the timestamp can be displayed with or without seconds via the Time Pattern System Setting. See Setting Types for more information.
Select the option to view any adjustments that are made on the timecard. The adjusted hours are grayed out with a line through the entry. The adjusted hours will not count towards the total.
This setting shows/hides adjusted hours in the Daily tab of the Self Service Time Card, as well as the Daily tab of the Current Situation, Time Card Review, and Labor Review forms.
Options are
NONE: No adjustments are shown.
USER ADJUSTMENTS: Only adjustments in which a transaction is directly modified by an employee or supervisor in the web timecard are shown
ALL: All adjustments, including those made when the timecard is Recalculated, are shown.
For example, the following timecard has a clock-in, clock-out, and two work orders.

The start time of the second Work Order (3001) is changed to be one hour earlier (10:18 to 9:18). This change causes the duration of the first Work Order (3000) to change as well.
If Show Adjustments is set to USER ADJUSTMENTS, only the item that was directly modified (Work Order 3001) is shown as adjusted. Although the Duration and End Timestamp of Work Order 3000 have also changed, an adjustment for this event is not shown.

If Show Adjustments is set to ALL, adjustments are shown for both the directly modified Work Order and the Work Order that changed as a result of this modification.

This setting allows you to import charges from previous periods to the current pay period on your timecard. You can pre-populate the timecard with "recently used" charges to which you can enter hours directly on the timecard. Note that only hours may be entered in the timecard. All event prompt values will be copied from the imported transaction.
Time Card Import applies only to elapsed events in the Self Service Time Card. It is not available on the Supervisor Review timecard.
Options are:
NONE: Select this if you do not want to import any charges from previous pay periods. This is the default value.
AUTO: Select this if you want to import charges automatically.
MANUAL: Select this if you want to manually choose charges to import. These options are explained below.
Set Time Card Import to AUTO if you want charges from previous pay periods to display automatically in the timecard. These charges will display in the Period and Weekly tabs of the Self Service Time Card.
This field defines the number of previous periods from which the charges will be imported. Note that the charges that will be imported are based on the calendar date when you are viewing the pay period.
For example, Periods to Import is set to 1. In the previous pay period, you posted a Day Worked event. When you are in the current pay period (i.e., the calendar date is in the current pay period), the Day Worked event will be automatically imported. When you are in the next pay period (i.e., the calendar date is in the next pay period), the imported Day Worked event will no longer be visible.
When the Time Card Import is set to MANUAL, the Add Import Charges button will displays on the Period and Weekly tabs of the Self Service Time Card. The Add Import Charges button displays a pop-up form you can use to select which charges to import.
This field defines the number of future pay periods in which the manually imported charges will appear. For example, if Periods to Keep is set to 2, the manually imported charges will display for the next two pay periods. Note that this display is based on the calendar date when you are viewing the pay period.
For example, Periods to Keep is set to 1. In the current pay period, you use Add Import Charges to import a charge. When you are in the next pay period (i.e., the calendar date is in the next pay period), you will still see these imported charges. However, when the calendar date is in the pay period after that (2 pay periods from the current one), you will not see the imported charge.
You can delete a manually imported charge from the timecard
by clicking the trash can icon  next
to the event name.
next
to the event name.
To import charges:
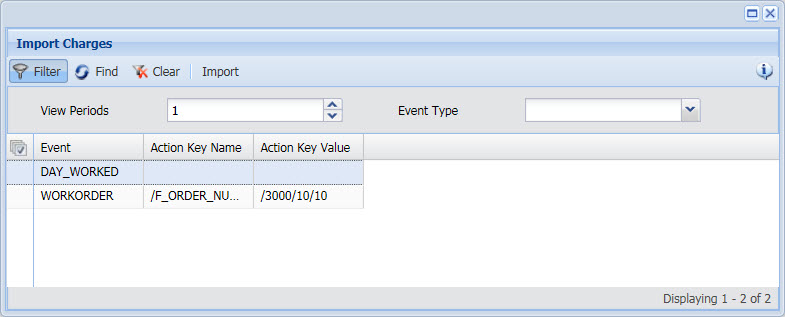
Use the View Periods filter to define the number of previous pay periods from which you want to select charges. For example, if you enter "1," the charges from the previous pay period will be available for import. If you enter "2," the charges from the previous two pay periods will be available for import.
Use the Event Type filer to specify the types of events you want to import.
Click Find in the Import Charges form. The charges will appear in the grid.
In the grid, select the charges you would like to add to the timecard and click Import.
Click Main Menu
> Self Service > Preferences or click ![]() on the top of the application window.
on the top of the application window.
Enter the changes in the Preferences form.
Click Save.
Click Cancel, to close the form without saving the changes.
You can use the Form Profile form to control which of the Preferences settings are visible to different employees. For example, you may want to hide the Duration Format preference to prevent employees from changing the hours display in the timecard (clock or decimal). When a preference is hidden, the value in the user’s Preferences Policy will be used instead.
To show or hide preferences settings:
Use the Form Profile form to create a custom Form Profile.
In the Self Service folder of the Form Profile, locate the Preferences form. The fields in the Selected column will display in the Preferences form.
To hide a field, move it to the Available column.
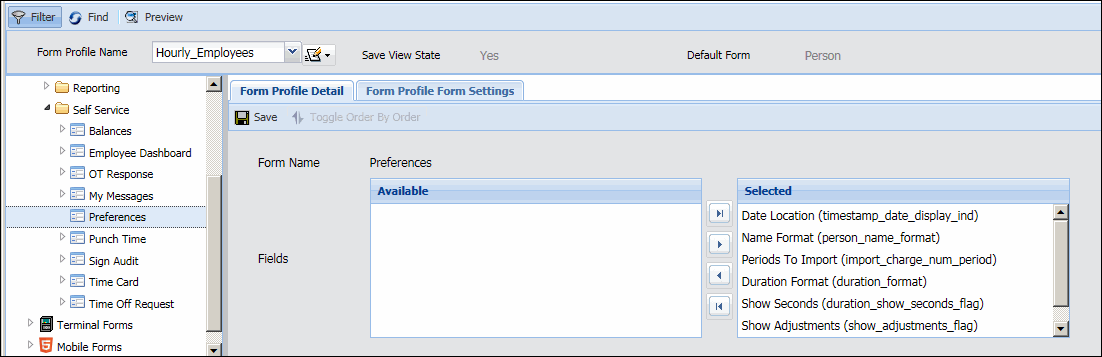
Click Save when you are done modifying your custom Form Profile.
You must then assign the Form Profile to the appropriate Employee, Employee Group, or System Setting.