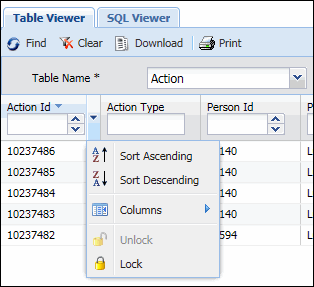
The Database Viewer form allows you to view raw data in the Shop Floor Time database tables. The Database Viewer has two tabs: Table Viewer and SQL Viewer.
Use the Table Viewer tab to select a table name and the number of records you want to view. You can also sort these records by a particular column. The Table Viewer tab will only display records from the tables included with the application. If you have any custom tables, you must use the SQL Viewer tab to view these records.
Use the SQL Viewer tab to display a table’s records using SQL select statements. If you have any custom tables, you can use this tab to view those records. You can also save your query using the Saved Filters option in this tab.
Note that neither tab in the Database Viewer form will display binary data (Blob data type).
See Also:
Sorting the Records on the Table Viewer Tab
The Table Viewer will only display records from the tables included with the application. If you have any custom tables, you must use the SQL Viewer tab to view these records.
Select the Table Name for the table with the records you want to view. The table’s columns will display in the grid.
Use the Number of Records field to restrict the number of records to display. The Table Viewer tab will select this Number of Records from the table.
The maximum number of records that can be displayed is based on the Form Setting called number_of_records. You cannot enter a value in the Number of Records field that exceeds this number_of_records setting.
If you leave the Number of Records field blank, the Table Viewer will attempt to display all the records in the table. However, if the total number of records in the table exceeds the number_of_records setting, an error will display.
Click Find to select the records.
The records will display in the grid.
Date/time fields will display in GMT (the same way they are stored in the database).
You can use the Clear button to remove the records in the grid and change the Number of Records field to its default setting (100).
You can also change how the table columns are sorted. The sorting method may change which records are displayed on the form.
Use the SQL Viewer tab to display a table’s records using SQL select statements. If you have any custom tables, you can use this tab to view those records. You can also save your query using the Saved Filters option in this tab.
In the Query field, you can enter any valid SQL select statement based on the database type to which you are connected (Oracle or SQL Server).
The following characters and words cannot be used in the Query field: ? ; and commit.
In addition, you cannot use DML (insert, update, delete) or DDL (create, alter) statements.
If you are connected to an Oracle database, the Number of Records field will be visible. You can use this field to limit the number of records to display in the grid. The SQL Viewer tab will select this Number of Records from the table.
The maximum number of records that can be displayed is based on the Form Setting called number_of_records. You cannot enter a value in the Number of Records field that exceeds this number_of_records setting.
If you leave the Number of Records field blank, the Table Viewer will attempt to display all the records in the table. However, if the total number of records in the table exceeds the number_of_records setting, an error will display.
If you are connected to a SQL Server database and you want to limit the number of records to display, you must use select top in your statement.
To run the query, press Find, F9, or CTRL+Enter.
The records will display in the grid.
Date/time fields will display in GMT (the same way they are stored in the database).
You can use the Saved Filters button in the top right corner of this form to save your Query and Number of Records settings. When you select this filter, the query will run. See Saved Filters for more information.
You can use the Clear button to delete the text in the Query field, remove the records in the grid, and change the Number of Records field to its default setting (100).
In the grid section of the Table Viewer tab, you can change how the table columns are sorted. You can also show or hide columns. To do so, click to the right of the column’s text box to display a pop-up menu with sort options. See Configuring and Sorting Columns for more information.

The sorting method (ascending or descending) may change which records are displayed on the form. For example - the Table Name is Action and Number of Records is set to 100. When you set the Posting Date column to Sort Descending, the Table Viewer will first sort all the records in the Action table by Posting Date in descending order. It will then select the first 100 of those records.
Once you have sorted a table's column on the Table Viewer tab, this sort will remain in effect until you clear your web browser’s cache.
1. Click the Download button to save the table records in the grid as a .csv file.
2. Click the Print button to print the records in the grid.