CRM Integration Setup
Use these steps to set up Deltek CRM integration.
To enable the Deltek CRM portion of the integration:
-
From DPS, log in as setup user and complete the Activation steps in order. Fields with the info icon have context-sensitive help. Clicking the
 icon shows additional information for the field.
-
Activate Modules: Accept the default values by clicking Done Activating Modules.
-
Activate Defaults: On the Industry Defaults tab, select the applicable industry and country and click Use Industry Defaults. In WBS Structure, accept the default values and click Set WBS Structure. Use the default values for work breakdown structure (WBS) settings. Note that Enable WBS2 is set to No and should not be changed, even if your organization is using WBS2. When done, click Done Activating Defaults.
-
Activate Email: Provide the default email addresses and click Done Activating Email.
-
Activate Currencies: On the Currency tab, select the main (functional) currency, provide details, and click Enable Multicurrency. On the Multicurrency tab, add the currencies in use and click Save. On the Exchange Rates tab, enter the exchange rate for each currency you use and click Save. When done, click Done Activating Currencies.
Note: Because you are not using the DPS Accounting module, you do not need to enter exchanges rates frequently. However, you may need them for historical reporting purposes. -
Activate Organizations: Click No and enter the corporate name of your enterprise in the field. When done, click Done Activating Organizations.
Note: Even if you have several profit centers or business units that you track separately, you must always answer No for this section. The integration tool sets up your organization structure automatically.
-
- Click OK and Done in the popup messages that display.
- Log out from set up and log back in as admin user.
- Go to Utilities > Integrations > Maconomy and click Add Fields and Workflows.
-
Proceed with setting up user-defined hubs (UDHs) and workflows.
Attention: See User-Defined Hubs and Elements for details.
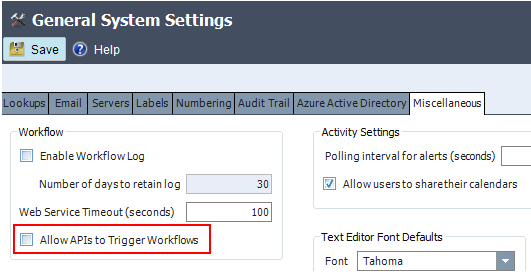
- From Deltek CRM, log in and go to Configuration > > > General > > System Settings > > Miscellaneous.
-
Clear the
Allow APIs to Trigger Workflows check box to prevent workflows from running every sync.

-
Go to
Configuration
> Security
> Roles
and click
New.
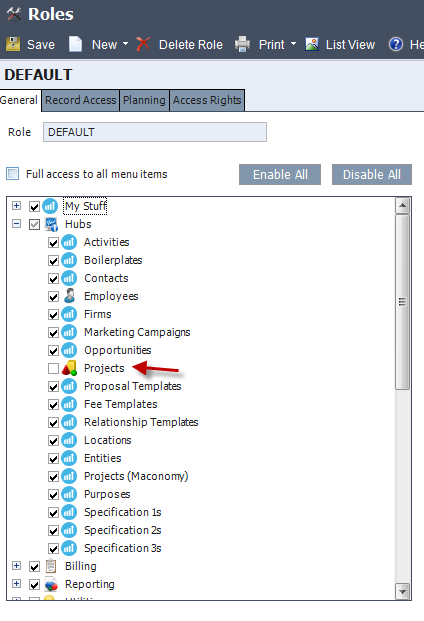
Note: When creating roles, make sure to hide the Project fields in other hubs by clearing the check box.
For all roles in Opportunities, hide the regular and promo project.
For all roles in Activities, hide the project field.
For all roles in Contacts and Firms, hide the projects grid.
For all roles, clear the check box for Reports and Lookups.

-
For non-admin roles, clear the check box for the following UDHs:
-
Proposal Templates
-
Fee Templates
-
Relationship Templates
-
Locations
-
Entities
-
Projects (Maconomy)
-
Purposes
-
Specification 1–10
-
- Remove dimensions that are not used in UDHs, Opportunities, and Firms.
- Remove fields and workflow from UDHs.
- If Deltek CRM Firm numbers are used for Maconomy Customer numbers, Firm Auto Number must be configured:
- Go to General > System Settings > Numbering.
- Set Auto Number Source and Auto Number Format for the Firm Number field.
- Clear the Allow Override of Auto Number check box (read-only).
- Go to Configuration > Security > Users and ensure that Windows Authentication is selected.
-
Enable the system setting
Search on Active employees only when using employee quick lookup.
-
Employee key format: Employee length must be 20 and “Display leading zeroes” must be enabled.
-
Organizations key format: Organization level must be 1, and delimiter must be empty. The length must be 14.
-
- Add currency codes that correspond to the currency codes in Maconomy.
- Add country codes that correspond to the country codes in Maconomy.
- If Deltek CRM Company IDs are used for Maconomy Customer numbers, the Company ID Auto Number must be configured:
- Go to General > System Settings > Numbering.
- Set Auto Number Source and Auto Number Format for the Company ID field.
-
Clear the
Allow Override of Auto Number check box (read-only).
Note: Your username must be associated with an employee record that has a language assigned to it in order to avoid workflow errors. If you are using a user that is not associated with an employee record, such as an admin user, many of the workflows will not work correctly.