Example: Project List Report
Refer to this example to create and save a list report that organizes or groups projects by their Client name. It could include columns that show the Stage, Compensation amount, and Estimated Fees for each project. After running the report, you can share it with your direct reports so they have access to it at any time.
| Step | Procedure | Related Information |
|---|---|---|
| Access the Reports List | ||
| 1 | In the Navigation pane, select . | |
| Click the Reports tab to display a list of all the reports to which you have access. | ||
| 2 | In the Type column on the Reports grid, type or select Projects. The Reports grid filters to display only Project reports. | |
| 3 | Select the Project List report directly from the grid. | |
| Set the Report Groups and Columns | ||
| 5 | Click the
Columns and Groups tab.
Use this tab to select the groups and columns that will display on the report. You can also specify the sequence in which data displays and combine multiple sort criteria. |
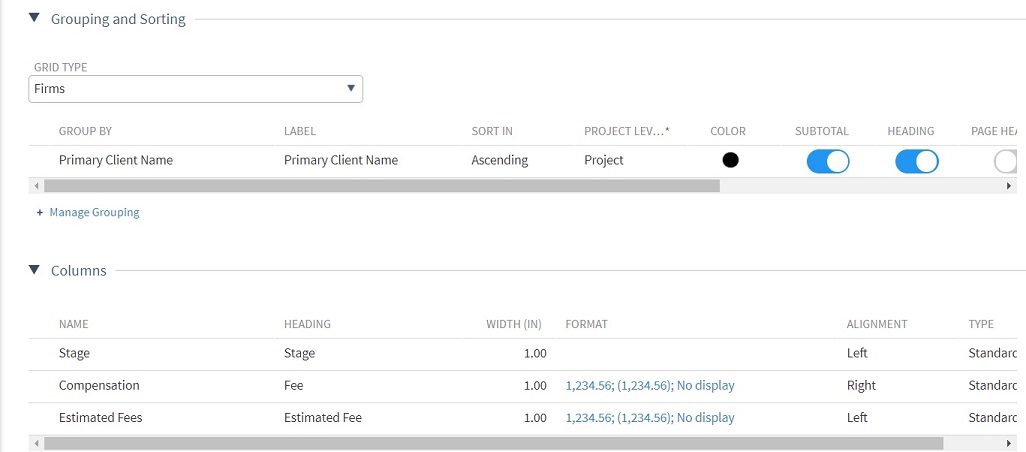
Grouping and Sorting
|
| 6 | Click + Manage Grouping to open the Select Groupings dialog box. | |
| 7 | In the Available Groupings list, select
Primary Client and click
Apply.
Vantagepoint places the Primary Client grouping in the Selected Grouping list. |
|
| 8 | Click + Manage Columns to open the Select Columns dialog box. | |
| 9 | In the Available Columns list, select Stage, Compensation, and Estimated Fee to add them to the report. | |
| 10 | Move the columns into the order in which you want them to display on the report. Click
 on the Selected Columns grid and drag the criterion up or down to establish the column order. on the Selected Columns grid and drag the criterion up or down to establish the column order.
|
|
| Step | Procedure | Related Information |
|---|---|---|
| Save the Report | ||
| On the Actions bar, click Save to open the Save Report dialog box and save the report. | Save a Report | |
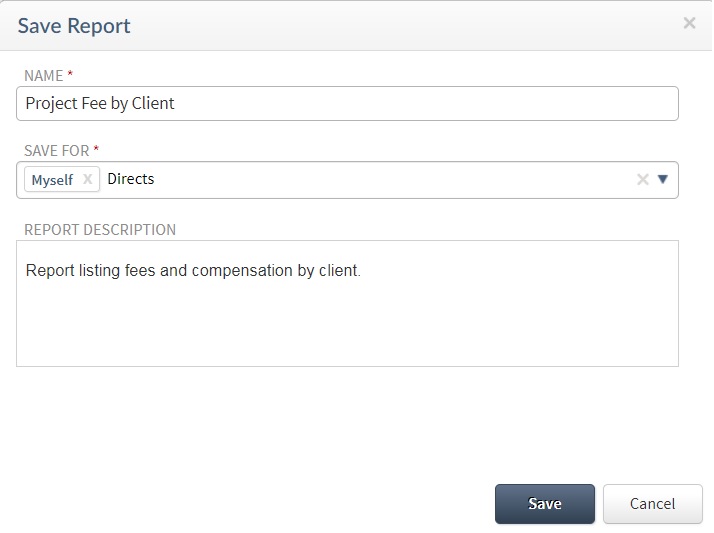
| Assign a new name to the report. In this example, the name is Project Fee by Client. | ||
In the
Save For
field, click
 and define who will have access to the report. In this field,
Myself displays as the default role assigned to the report. This is the role that gives you access to the report. If this is the only role selected, it also defaults the report to a
Private status on the Favorites tab. and define who will have access to the report. In this field,
Myself displays as the default role assigned to the report. This is the role that gives you access to the report. If this is the only role selected, it also defaults the report to a
Private status on the Favorites tab.
|
||
Select the additional roles that will have access to the report. In this example, select
Directs. The report changes to a
Shared status on the Favorites tab. The
Status column also displays a
 to indicate that the report is shared with other users. to indicate that the report is shared with other users.
The ability to create and save favorites depend on the setting for your security role on the Roles form (). |
Share a Report | |